Operator’s Manual LT31CSH Trimmer / Brushcutter IMPORTANT: READ SAFETY RULES AND INSTRUCTIONS CAREFULLY P/N 769-01672 (2/05)
INTRODUCTION THANK YOU TABLE OF CONTENTS Thank you for buying this quality product. This modern outdoor power tool will provide many hours of useful service. You will find it to be a great labor-saving device. This operator’s manual provides you with easy-tounderstand operating instructions. Read the whole manual and follow all the instructions to keep your new outdoor power tool in top operating condition.
RULES FOR SAFE OPERATION The purpose of safety symbols is to attract your attention to possible dangers. The safety symbols, and their explanations, deserve your careful attention and understanding. The safety warnings do not by themselves eliminate any danger. The instructions or warnings they give are not substitutes for proper accident prevention measures. SYMBOL MEANING Indicates danger, warning or caution. Attention is required in order to avoid serious personal injury.
RULES FOR SAFE OPERATION • Add fuel in a clean, well-ventilated outdoor area where there are no sparks or flames. Remove the fuel cap slowly, and only after the engine stops. Do not smoke while fueling or mixing fuel. Wipe up any spilled fuel from the unit immediately. • Avoid creating a source of ignition for spilled fuel. Do not start the engine until fuel vapors dissipate. • Move the unit at least 9.1 m (30 feet) from the fueling source and site before starting the engine. Do not smoke.
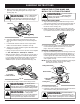
RULES FOR SAFE OPERATION • Do not run the unit at high speed when not cutting. • If you strike or become entangled with a foreign object, stop the engine immediately and check for damage. Have any damage repaired before attempting further operations. Do not operate unit with a bent, cracked or dull blade. Discard blades that are bent, warped, cracked or broken. • Do not sharpen the cutting blade. Sharpening the blade can cause the blade tip to break off while in use.
RULES FOR SAFE OPERATION SAFETY AND INTERNATIONAL SYMBOLS This operator's manual describes safety and international symbols and pictographs that may appear on this product. Read the operator's manual for complete safety, assembly, operating and maintenance and repair information. SYMBOL MEANING SYMBOL • SAFETY ALERT SYMBOL MEANING • ON/OFF STOP CONTROL Indicates danger, warning or caution. May be used in conjunction with other symbols or pictographs.
KNOW YOUR UNIT APPLICATIONS As a trimmer: • Cutting grass and light weeds • Edging • Decorative trimming around trees, fences, etc.
ASSEMBLY INSTRUCTIONS INSTALL AND ADJUST THE HANDLEBAR INSTALL THE HARNESS 1. Place the handlebar between the top and middle clamp pieces (Fig. 1). (4) Screws 1. 2. Top Clamp Always use the shoulder harness when using the cutting blade to avoid serious personal injury. Push the strap through the center of the buckle. Pull the strap over the cross bar and down through the slot in the buckle (Fig. 3). Put the harness on over head and onto shoulder. Snap it on to the support fitting (Fig. 4).
ASSEMBLY INSTRUCTIONS Cutting Attachment Shield 2. Hold the locking rod in place by grasping it next to the boom of the unit (Fig. 8). (3) Screws Gear Housing 3. While holding the locking rod, remove the cutting attachment by turning it clockwise off of the output shaft (Fig. 9). Store the cutting attachment for future use. NOTE: The blade retainer under the cutting attachment will be used when installing the cutting blade. Shield Mount Fig.
ASSEMBLY INSTRUCTIONS 5. Make sure that the cutting blade is centered on the pilot step and sitting flat against the output shaft bushing (Fig. 11). If the cutting blade is off-center, the unit will vibrate and the blade may fly off, causing possible serious personal injury. WARNING: REMOVE THE CUTTING BLADE AND INSTALL THE CUTTING ATTACHMENT To avoid serious personal injury, always wear gloves while handling or installing the blade. WARNING: Remove the Cutting Blade 1.
OIL AND PETROL INFORMATION OIL AND PETROL MIXING INSTRUCTIONS Old and/or improperly mixed fuel are the main reasons for the unit not running properly. Be sure to use fresh, clean unleaded petrol. Follow the instructions carefully for the proper petrol/oil mixture. Definition of Blended Petrols Today's petrols are often a blend of petrol and oxygenates such as ethanol, methanol, or MTBE (ether). Alcohol-blended petrol absorbs water. As little as 1% water in the petrol can make petrol and oil separate.
STARTING/STOPPING INSTRUCTIONS Operate this unit only in a well- ventilated outdoor area. Carbon monoxide exhaust fumes can be lethal in a confined area. WARNING: Avoid accidental starting. Make sure you are in the starting position when pulling the starter rope (Fig. 17). To avoid serious injury, the operator and unit must be in a stable position while starting. Stop/Off (O) WARNING: Start/On ( I ) Throttle Control Throttle Lock-Out STARTING INSTRUCTIONS 1. Mix petrol with oil.
OPERATING INSTRUCTIONS HOLDING THE TRIMMER Always wear eye, hearing, foot and body protection to reduce the risk of injury when operating this unit. WARNING: Before operating the unit, stand in the operating position (Fig. 18).
OPERATING INSTRUCTIONS DECORATIVE TRIMMING Decorative trimming is accomplished by removing all vegetation around trees, posts, fences and more. Rotate the whole unit so that the cutting attachment is at a 30° angle to the ground (Fig. 20). The blade continues to spin after the engine is turned off. The coasting blade can seriously cut you if accidentally touched. WARNING: • Swing the unit in the opposite direction as the blade spins, which increases the cutting action.
MAINTENANCE AND REPAIR INSTRUCTIONS MAINTENANCE SCHEDULE Perform these required maintenance procedures at the frequency stated in the table. These procedures should also be a part of any seasonal tune-up. NOTE: Some maintenance procedures may require special tools or skills. If you are unsure about these procedures take your unit to any non-road engine repair establishment, individual or authorized service dealer. To prevent serious injury, never perform maintenance or repairs with unit running.
MAINTENANCE AND REPAIR INSTRUCTIONS For Use with Single Line ONLY For Use with SplitLine™ or Single Line Slotted Holes 9. Insert the end of the line into the open hole in the inner reel and pull the line tight to make the loop as small as possible (Fig. 29). 10. Before winding, split the line back about 6 inches. 11. Wind the line in tight even layers in the direction indicated on the inner reel.
MAINTENANCE AND REPAIR INSTRUCTIONS INSTALLING A PREWOUND REEL Cleaning the Air Filter 1. Hold the outer spool with one hand and unscrew the bump knob clockwise (Fig. 23). Inspect the bolt inside the bump knob to make sure it moves freely. Replace the bump knob if damaged. Clean and re-oil the air filter every 10 hours of operation. It is an important item to maintain. Failure to maintain your air filter properly can result in poor performance or can cause permanent damage to your engine. 2.
MAINTENANCE AND REPAIR INSTRUCTIONS SPARK ARRESTOR MAINTENANCE If the exhaust deflector assembly is not tightened securely, it could fall off causing damage to the unit and possible serious personal injury. WARNING: NOTE: The exhaust can only flow in one direction: AWAY from the engine. Pay close attention when disassembling the muffler so you can put it back together correctly. Failure to do so will damage the unit and may cause serious personal injury. 1. Remove air filter/muffler cover.
MAINTENANCE AND REPAIR INSTRUCTIONS Clean Air Filter The condition of the air filter is important to the operation of the unit. A dirty air filter will restrict air flow and change the air/fuel mixture. This is often mistaken for an out of adjustment carburetor. Check the condition of the air filter before adjusting the idle speed screw. Refer to Air Filter Maintenance. The cutting attachment may spin during idle speed adjustments.
MAINTENANCE AND REPAIR INSTRUCTIONS CLEANING To avoid serious personal injury, always turn your trimmer off and allow it to cool before you clean or service it. WARNING: Use a small brush to clean off the outside of the unit. Do not use strong detergents. Household cleaners that contain aromatic oils such as pine and lemon, and solvents such as kerosene, can damage plastic housing or handle. Wipe off any moisture with a soft cloth.
TROUBLESHOOTING ENGINE WILL NOT START CAUSE On/Off control in the OFF position Empty fuel tank Primer bulb wasn't pressed enough Engine is flooded Old or improperly mixed fuel Fouled spark plug Plugged spark arrestor The outside temperature is below 40º F The outside temperature is above 90º F ACTION Turn On/Off control to ON Fill fuel tank with properly mixed fuel Press primer bulb fully and slowly 10 times Squeeze the trigger and pull the starter rope Drain fuel tank and add fresh fuel mixture Replace or
SPECIFICATIONS ENGINE* Engine Type.......................................................................................................................................... Air-Cooled, 2-Cycle Stroke ................................................................................................................................................... 31.75 mm (1.25 in. ) Displacement...................................................................................................................................
NOTES 23
NOTES 24