H 07 FORM NO.
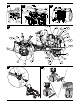
1 14 3 1 2 HOURS 1/10 F 3 4 RPM FUEL E 0 x1000 4 13 5 12 11 10 9 6 4 8 7 5 2 15 21 16 17 27 26 28 19 20 21 18 6 22 22 23 25 24 8 7 9 b (b) (c) (a) (b) (a) a
10 B 11 G C D H K F 13 12 3. L J A E N H 14a (b) 2. 4. (a) 5. 1.
20 21 c 22 b b a b a a b 10 2 23 5 20 21 23 1 19 18 5 4 17 9 7 11 3 18 14 16 5 22 13 12 16 14 15 8 6 16 9 24 25 a c d b 16 6
English 4 Français 23 Deutsch 45 Nederlands 65 Svenska 85 Dansk 103 Español 122
English Table of Contents For your safety . . . . . . . . . . . . . . 4 Assembling the appliance . . . . . . 6 Controls and indicators . . . . . . . . 7 Operating safety . . . . . . . . . . . . 10 Cleaning / Servicing . . . . . . . . . 15 Shutting down the machine . . . 21 Guarantee . . . . . . . . . . . . . . . . . 21 Information about the engine . . . 21 Troubleshooting . . . . . . . . . . . .
User manual Check the area in which you intend to use the unit and remove all objects that could be hit and propelled by the unit. You can thus avoid injuries and damage to the unit. Never use the appliance on slopes that are steeper than 20 %. Working on slopes is dangerous; the risk of rollover and sliding is increased. When working on slopes, always drive off and halt the unit gently and gradually.
English User manual Risk of injury from rotating blades and other rotating parts. Working on steep slopes increases danger. Never fold down the rollbar on a slope. Never put the seat belt on when the rollbar is folded down. Always put the seat belt on when the rollbar is folded upwards. Never operate the appliance without the mounted tractive unit protection. Warning! Risk of explosion. Battery acid/ Risk of injury.
User manual free” battery requires maintenance if it is to have a longer service life. Keep the battery clean Avoid tipping the battery. Electrolyte fluid leaks from a ‘sealed’ battery, if it is tipped. If an empty battery (type 2) is supplied (Battery with filler plugs) Fig. 25 Remove the filler plugs of the battery cells. Fill each cell slowly with battery acid up to 1 cm below the filling opening. Leave the battery to stand for 30 minutes so that the lead can soak up the battery acid.
English Note: When the safety lock system has automatically disengaged the appliance (e.g. reversing with the PTO clutch engaged), the switch must first be switched OFF and then ON in order to release the coupling lock. Throttle (3) Fig. 3 The engine speed can be adjusted continuously. Fast engine speed = . Slow engine speed = . Ignition lock (4) Fig. 1 User manual Information on forward/ reverse pedal In order to stop (to stop and change direction), release the pedal. Differential lock pedal (7) Fig.
User manual Note When the ignition is switched on, the battery voltage indicator is indicated for a short period and then the operating hours are indicated. The operating hours are always counted except for when the ignition key is in the /0 position or when it is removed. Note Each time 50 operating hours have elapsed (according to the model), the oil change indicator ‘CNG / OIL’ appears in the display for five minutes. This message appears after the next two hours of operation.
English Additional parking brake (28) Fig. 13 as an additional securing means for the parking brake when switching the vehicle off. a) Actuating the brake: Lift the lever back. a) Release the brake: Depress the button in the lever and move the lever forwards.
User manual Preparing for operation Park the tractor on an even, solid surface. Lock the parking brake. Conduct all work with the engine switched off. Remove the ignition key. Set the driver seat The driver's seat is adjustable in terms of height, longitude and hardness. Setting the seat longitudinally Fig. 14 a Take your place on the driver seat. Pull the lever (1) outwards and bring the seat into the desired position.
English Stopping the engine Cool the engine down appropriate to the previous workload. – In the case of less of a workload. Set the throttle to the position and let the engine run for approx. 1 minute. – In the case of a high workload: set the throttle to the middle setting and let the engine run for 3–5 minutes. Set the ignition key to /0. Remove the ignition key. Lock the parking brake.
User manual Fig. 19 The length of the lower transverse link bracing at each of the lower transverse links limit the lateral movement of the lower transverse links. Loosen the counter nuts (a) and turn the hex collar (b) in order to adjust the length of the lower transverse link bracing. After setting, retighten the counter nuts. Note In order to lift an attachment using the 3 point attachment device, the engine must be running. Fig.
English User manual t~êåáåÖ Ó ^äï~óë=ëÉÅìêÉ=íÜÉ=ÅçååÉÅíáçå= ÄÉíïÉÉå=íÜÉ=íê~Åíçê=~åÇ=íÜÉ=íê~áäÉê= ïáíÜ=~=ë~ÑÉíó=ÅÜ~áå=ïÜÉå=éìääáåÖ= äç~ÇëK=qÜÉ=ë~ÑÉíó=ÅÜ~áå=ãìëí=ÄÉ=~í= äÉ~ëí=~ÄäÉ=íç=ÄÉ~ê=íÜÉ=Öêçëë=ïÉáÖÜí= çÑ=íÜÉ=äç~ÇK Ó låäó=ìëÉ=íê~áäÉê=ÇÉîáÅÉë=ïÜáÅÜ=~êÉ= ~ééêçîÉÇ=Ñçê=íÜÉ=îÉÜáÅäÉ=EãçìíÜ= ~åÇ=Ä~ääJÜÉ~Ç=ÅçìéäáåÖFK Ó lÄëÉêîÉ=~ää=çÑ=íÜÉ=êÉÖìä~íáçåë=~åÇ= áåëíêìÅíáçåë=ÅçåÅÉêåáåÖ=çéÉê~íáçå= çÑ=íÜÉ=íê~áäÉê Using the connective hydraulic valves of the auxiliary hydraulics (optional) According to the model, the tra
User manual Cleaning / Servicing ! t~êåáåÖ oáëâ=çÑ=áåàìêó=íÜêçìÖÜ=íÜÉ=ÉåÖáåÉ= ÄÉáåÖ=ìåáåíÉåíáçå~ääó=ëí~êíÉÇK mêçíÉÅí=óçìêëÉäÑ=Ñêçã=áåàìêóK=_ÉÑçêÉ= ÇçáåÖ=~åó=ïçêâ=íç=íÜáë=~ééäá~åÅÉW Ó íìêå=íÜÉ=ÉåÖáåÉ=çÑÑI Ó êÉãçîÉ=íÜÉ=áÖåáíáçå=âÉóI Ó äçÅâ=íÜÉ=é~êâáåÖ=Äê~âÉI Ó ï~áí=ìåíáä=~ää=ãçîáåÖ=é~êíë=Ü~îÉ= ÅçãÉ=íç=êÉëí=~åÇ=íÜÉ=ÉåÖáåÉ=Ü~ë= Ñìääó=ÅççäÉÇK English Cleaning Servicing the vehicle =t~êåáåÖ aç=åçí=ìëÉ=ÜáÖÜJéêÉëëìêÉ=ãÉÇá~= Ñçê=ÅäÉ~åáåÖK If the unit is not cleaned, material damage and function impairments will
English User manual Checking the oil level of the front 14 axle and wheel transmission (both sides) 15 Lubricating the steering servo cylinder (both sides) and 16 Changing the oil – front axle transmission (both sides) 1) 17 Lubricating the 3 point hub drive shaft 18 Changing the engine coolant 1) 19 Inspecting all pipes and pipe connections 20 Inspecting the state of the fan belts 21 Replacing fan belts 1) 22 Emptying condensation from the fuel filter 23 Exchanging the fuel filter1) Before placing into
User manual Access to the engine compartment English ! t~êåáåÖ qÜÉ=ÉåÖáåÉ=~åÇ=íÜÉ=ëáÇÉ=ÅçîÉêáåÖ= êÉã~áå=Üçí=Ñçê=~=íáãÉ=~ÑíÉê=íÜÉ=ÉåÖáåÉ= Ü~ë=ÄÉÉå=ëïáíÅÜÉÇ=çÑÑK=tçêâáåÖ=çå= Üçí=é~êíë=Å~å=äÉ~Ç=íç=ëÉîÉêÉ=ÄìêåëK= _ÉÑçêÉ=óçì=ëí~êí=ïçêâáåÖ=áå=íÜáë=~êÉ~I= ~ääçï=~ää=é~êíë=íç=Åççä=ÑáêëíK Park the tractor on an even, solid surface. Lock the parking brake. Conduct all work with the engine switched off.
English User manual Attach the oil-fill lid to the supports and turn clockwise until it sits securely. Replace the dipstick inserting it firmly into the measuring tube. Important note The oil-fill lid and dipstick must always sit securely when the engine is running. If this is not done, servere damage can be done to the engine. Inspecting/topping-up crank and hydraulics oil The oil level in the hydrostatic cranks /in the hydraulics system should be inspected after every 50 hours of operation.
User manual English a Reinsert the grille, however at the same time make sure that it is inserted into the slots of the cooler frame. Inspect and/or exchange the air filter as follows: 1 Checking the coolant Turn the draining tap (a) anticlockwise. Allow the water on the base of the filter to drain until pure diesel runs from the tap. Turn the draining tap (a) clockwise. b Slowly, turn the ventilation knob (b) anti-clockwise until fuel starts to run from it.
English User manual Exchanging the headlight bulbs Open the engine bonnet. Exchanging the indicator bulbs c b a On the bulb unit (a), remove the cable (b). Turn the bulb unit to the left by a quarter of a revolution and remove from the reflector (c). Exchange the bulb with a bulb of the same wattage. Replace the bulb unit into the reflector and secure it (by turning a quarter of a revolution to the right). Mount the cable on the bulb unit. Close the engine bonnet.
User manual English Charging the battery Check the battery’s charged state with a voltmeter. When the charged state is less than 12.6 V (DC) recharge the battery (max 12 V at 10 A) with a battery charger in accordance with the table. Voltmeter display Battery charging state Charging time 12.7 Volt 100 % – 12.4 Volt 75 % approx. 90 Min. 12.2 Volt 50 % approx. 180 Min. 12.0 Volt 25 % approx. 280 Min. Note Observe the information in the operating instructions for your battery charger.
English User manual Fault Possible cause Remedy Engine will not start. The tank is empty. Fill with diesel. Oil or air in the fuel line. Visit a specialist garage. Diesel filter is blocked. Visit a specialist garage. Battery does not provide any current. Check the battery, charge it or exchange it. Loose or corroded battery parts. Check the battery. Tighten the contacts. Clean the corroded contacts with a wire brush, tighten again and grease them using terminal grease. Defective fuse.