L04 FORM NO.
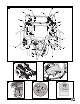
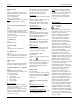
10 B N C C A M D E L F F G K H J 3 2 5 4 6 0 1. 2.
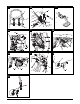
7 8b 8a 9 2 1 3 5 10 1 6 3 2 5 4 11 12 13 14 15 16 17 18 19 4
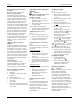
20 21 22 4 1 3 1 1. 2. 2 2 3 23 5 6 25 24 A 1. 2 1 2.
English Details on the rating plate These details are very important for identifying your appliance when you order spare parts or contact our aftersales service. The rating plate is found under the driver’s seat. Enter all the details on your appliance’s rating plate in the following fields. Operating instructions Hand over the operating instructions together with the appliance when there is a change of ownership. Replacement parts must comply with the requirements specified by the manufacturer.
English Operating instructions The safety devices are the following. Caution! Read the operating instructions before starting the appliance! Deflector Fig 2 The deflector protects you from injuries that can be caused by the cutters or ejected solid objects. The appliance must be operated only when the deflector is installed. Safety lock system The safety lock system allows you to start the engine only when – the driver is sitting on the seat, – the locking brake is engaged, i.e.
English Disconnecting • First disconnect the black cable (–), and then the red cable (+). • Remove the battery from the appliance. Connecting • First connect the red cable (+), and then the black cable (–). Note! The battery’s positive terminal is marked with a plus sign (+). The battery’s negative terminal is marked with a minus sign (–). Always make sure that the battery’s vent line is correctly installed (unobstructed downwards flow).
English PTO switch (E) Fig 6 The PTO switch actuates an electromagnetic/mechanical clutch to switch ON and OFF the cutters. ON = pull the switch OFF = press the switch Note! Before the engine can be started the PTO switch must be switched OFF. Gear release for hydrostatic drive (F) Fig 23 To push the appliance with the engine switched OFF, first pull up the two levers (near each rear wheel), and then press them down. To drive the appliance, pull up and press in the levers.
English Risk of asphyxiation from carbon monoxide Run the IC engine outdoors only. Risk of explosion and fire Fuel/petrol vapours are explosive, and fuel is highly flammable. Fill the engine with fuel before turning the ignition. Keep the petrol tank closed when the engine is running or is still hot. Refill with fuel only when the engine has been switched OFF and has cooled down. Avoid naked flames and sparking, and do not smoke. Fuel the appliance outdoors only.
English Instead of a steering wheel this appliance features two control levers that serve to steer and drive the appliance. When the control levers are moved to the max positions, the wheels rotate at the speed set at the accelerator lever. The control lever positions between Neutral and Maximum are proportional to the speed set at the accelerator lever. In order to familiarise yourself with how to operate the appliance (approx.
English General When adjusting the cutting height and drive speed make sure that the appliance is not overloaded. The length, type, and wetness of cuttings may necessitate adjustments to the cutting height and drive speed. Additional safety information on the drive • When the appliance is driven straight ahead but veers to one side or when the appliance does not remain stationary but creeps at Neutral, switch OFF the appliance (do not use the appliance any more) and contact a specialised garage.
English Cleaning the appliance Caution! Risk of damage to the appliance Do not use high-pressure media to clean the appliance. • Whenever possible, clean the appliance directly after mowing. • Park the appliance on a firm and horizontal surface. • Engage the locking brake. Cleaning the cutters Risk of injury Clean the cutters with care. Caution! Possible engine damage Do not tip the appliance through more than 30°: fuel can enter the combustion chamber and cause damage to the engine.
English • Measure the distance between the cutters’ front edge and the ground and between the cutter’s rear edge and the ground. The measured distance from the front edge should be 3–6 mm lower than the distance from the rear edge. If this is not the case, continue with the next step. • Loosen the two locknuts (3), if installed. Steadily tighten the nuts (1) to raise the front side of the cutters; steadily loosen the nuts (1) to lower the front side of the cutters.
English Operating instructions Warranty The warranty rules issued by our company or the importer apply to every country. As part of the warranty, we remedy malfunctions on your vehicle free of charge provided that this malfunction is caused by a material or manufacturing defect. In the event of a warranty claim, please turn to your dealer or the nearest branch office.
07' 3URGXFWV $NWLHQJHVHOOVFKDIW ,QGXVWULHVWUDH ' 6DDUEUFNHQ *HUPDQ\ ( MTD Handelsgesellschaft mbH MTD Denmark ApS MTD Hungária Kft Welser Straße 122 4614 Marchtrenk Messingvej 22C 8900 Randers Dózsa György út 1 8248 Nemesvámos ( 07 24 26 05 55 07 24 26 05 54 ( 87 11 91 00 87 11 96 00 ( 06 88 51 55 00 06 88 50 55 20 A.