
Products owerns manual zero-turn riding mower L04

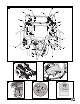


English Operating instructions
6
Instead of a steering wheel this
appliance features two control levers
that serve to steer and drive the
appliance. When the control levers
are moved to the max positions,
the wheels rotate at the speed set at
the accelerator lever. The control lever
positions between Neutral and
Maximum are proportional to the
speed set at the accelerator lever.
In order to familiarise yourself with
how to operate the appliance (approx.
thirty minutes) you should start the
appliance on flat terrain without
spectators.
Note!
Before mowing with the
appliance you should familiarise
yourself with the appliance’s new
controls. Start the appliance, move
the accelerator lever to the middle
position (mid engine speed), and leave
the PTO switch switched OFF.
Moving the control lever then causes
the appliance to move at a slow speed
only, and you can therefore familiarise
yourself with the controls.
• Start the engine as specified.
• Let the engine heat up.
• Move the accelerator lever to the
corresponding position.
• Disengage the locking brake.
• Pull both drive control levers (1)
inwards into Neutral (Fig 11)
Caution!
Always keep both hands on the drive
control levers. Never let go of the
drive control levers when operating
the appliance. Always move the drive
control levers by hand to Neutral
before slowing or stopping the
appliance. Move the drive control
levers slowly at all times. Abrupt or
hasty movements or taking too sharp
corners can lead to uncontrolled
movements and the appliance can
roll over causing serious injury.
Be particularly careful when
reversing.
Just one more tip before you drive
off
To slow or stop the appliance move
the two control levers slowly and
steadily to Neutral (Fig 11).
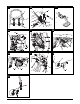
Drive mode: straight ahead
Fig 12
Press both control levers steadily
forwards. The more they are pressed
forwards, the faster the appliance
moves.
Drive mode: left corner
Fig 13
Push both control levers forwards:
the right control lever must be slightly
ahead of the left control lever.
Drive mode: right corner
Fig 14
Push both control levers forwards:
the left control lever must be slightly
ahead of the right control lever.
Note on cornering
The greater the
distance between the two control
levers the tighter the corner taken.
Reverse mode: straight ahead
Fig 15
Pull back on both control levers
steadily. The more they are pushed
back, the faster the appliance moves.
Reverse mode: left corner
Fig 16
Pull back on both control levers:
the right control lever must be slightly
further back than the left control lever.
Reverse mode: right corner
Fig 17
Pull back on both control levers:
the left control lever must be slightly
further back than the right control
lever.
Turning clockwise around the axis:
zero turn
Fig 18
1. Always move both control levers
to Neutral to stop the appliance.
2. Press the left control lever
forwards, and at the same time
pull back on the right control
lever.
Turning anticlockwise around the
axis: zero turn
Fig 19
1. Always move both control levers
to Neutral to stop the appliance.
2. Press the right control lever
forwards, and at the same time
pull back on the left control lever.
Information on executing zero turns
During a zero turn one wheel turns
forwards and another backwards.
Incorrectly executing a zero turn can
cause damage to your lawn.
Turning right or left: pivot turn
Fig 11
1. Always move both control levers
to Neutral to stop the appliance.
2. Depending on the direction,
push one control lever forwards
or back; the other control lever
remains at Neutral.
Note!
During a pivot turn only one
wheel turns. The stationary wheel then
rubs against the ground and can cause
damage to your lawn.
Slowing or stopping the
appliance
• Slowly and steadily move both
control levers to Neutral.
Mowing
Do not change direction when the
appliance is driving or coasting (see
the section “Driving the appliance”).
• Start the engine as specified.
• Move the accelerator lever to
position .
• Switch ON the cutters (PTO).
• Lower the cutters.
• Disengage the locking brake.
• Pull both drive control levers (1)
inwards into Neutral.
• Steadily press both control levers
forwards. The more they are
pressed forwards the faster the
appliance moves.
Note!
The safety lock system prevents
the appliance from reversing when the
cutters (PTO) are switched ON.
The cutters are switched OFF
automatically when both drive control
levers are moved to Reverse. As soon
as one or both drive control levers are
moved back to Neutral or Drive the
cutters (PTO) are automatically
switched back ON.