
Products owerns manual zero-turn riding mower L04


English Operating instructions
8
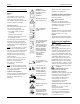
Cleaning the appliance
Caution!
Risk of damage to the appliance
Do not use high-pressure media to
clean the appliance.
• Whenever possible, clean the
appliance directly after mowing.
• Park the appliance on a firm and
horizontal surface.
• Engage the locking brake.
Cleaning the cutters
Risk of injury
Clean the cutters with care.
Caution!
Possible engine damage
Do not tip the appliance through more
than 30°: fuel can enter the
combustion chamber and cause
damage to the engine.
• Raise the cutters to the topmost
position.
• Clean the cutter chamber with
a (hand) brush or cloth.
• Remove grass residue from the
deck and around the cutter
spindles.
Cutters with cleaning nozzle
(option)
Fig 29
Park the appliance on a horizontal
surface free of loose stones, etc.,
and engage the locking brake.
1. Use a commercially available
quick-release coupling to attach
a water hose to the cleaning
nozzle.
2. Start the engine.
3. Lower the mower unit and switch
it ON for a few minutes.
4. Switch OFF the mower unit and
the engine.
5. Remove the water hose. Repeat
steps 1–5 on the second cleaning
nozzle (when installed).
After ending the cleaning procedure
(steps 1–5):
• raise the mower unit,
• start the engine, and switch ON
the mower unit for a few minutes
to dry it.
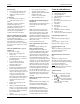
Removing the cutters
Figs 24 and 25
Danger!
Risk of injury from sharp cutters
Wear working gloves.
The cutters can be correctly removed
only when you proceed as follows:
• install the cutter wheels at the
highest possible position,
• lower the cutters by moving the
lever for raising the cutters to the
lowest recess,
• insert a ½” square spanner into
the recess (1) in the tensioning
arm (2) (Fig 24),
• use the square spanner to press
the tensioning arm in the direction
of the arrow: this releases the
tension on the V belt,
• remove the V belt from the PTO
clutch (engine pulley),
• look into the cutters from the
appliance’s right side, and locate
the locking pins (4) on the right
rear side of the cutters (Fig 25),
• pull out the pin to disconnect the
cutters from the suspension (2)
(Fig 25),
• repeat these steps for the
appliance’s left side;
Note!
Keep a firm hold on the
cutters so that they cannot fall
on the ground.
• move the lever for raising the
cutters to the topmost recess,
• let the cutters slide forwards to
the front of the appliance, making
sure that the cutters’ pick-up
hooks are detached from the
appliance’s front rail,
•
carefully draw out the cutters
(from the right side) from
underneath the appliance.
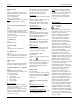
Installing the cutters
Fig 25
Follow the above instructions in
reverse order to install the cutters.
An assistant can accelerate the
procedure. Make sure that each
suspension (2) is engaged in the
recesses (3) on the cutter mount (1).
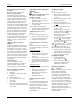
Basic adjustments to
(aligning) the cutters
Note! Before aligning the cutters,
check the appliance’s tyre pressure.
Aligning the sides
Fig 26
When the cutters seem to mow
irregularly, the sides can be aligned.
Proceed as follows.
• Park the appliance on a firm,
horizontal surface.
• Move the lever for raising the
cutters to the topmost recess.
• Turn the cutters so that they form
a right angle with the appliance.
• Measure the distance between the
outer left cutter edge (cutter left)
and the ground and the distance
between the outer right cutter
edge (cutter right) and the ground.
These two measurements should
be equal. If they are not, continue
with the next step.
• Loosen (do not remove) the
hexagon head bolt (1) from the
right mounting plate on the
cutters.
• Turn the adjusting segment (2)
to align the cutters until the two
measurements described above
are equal.
•
Retighten the hexagon head bolt
(1) when the alignment is
satisfactory.
Aligning front and rear
Fig 27
The front section of the cutters is fitted
with a holding device (2) that can be
adjusted to align the cutters’ front and
rear sections. The cutters’ front
section should be 3–6 mm lower than
their rear section. If necessary, align
the cutters as follows.
• Park the appliance on a firm,
horizontal surface, move the lever
for raising the cutters into the
topmost recess (max position),
and turn the cutters nearest to the
ejector so that they are parallel to
the appliance.