
Instructions / Assembly


3
SECTION 3: INSTALLING THE MULCH KIT
NOTE: Tractors with older-style cutting decks
(manufactured between 1997 and 2000) do NOT have
holes pre-drilled for mounting the mulch plug and deck
skirts. All tractors manufactured in 2001 or later will
have pre-drilled holes in the cutting deck.
Installing the Mulch Plug
The following instructions apply to both 38-inch cutting
decks and 42-inch cutting decks.
Tractor’s Manufactured in 2001 or later (with pre-drilled holes)
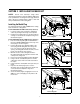
1. Locate the square hole found in the cutting deck
surface by pivoting the discharge chute upward.
2. Install the mulch plug and secure it in place with the
carriage screw, bell washer and plastic wing nut as
illustrated in Figure 2.
Tractor’s Manufactured Prior to 2001 (without pre-drilled holes)
1. Place the mulch plug drill guide included with this
kit in place on the surface (NOT over the lip) of the
mulch plug as shown in Figure 3.
2. Pivot the discharge chute upward and place the
mulch plug (with the drill guide still resting in the
hole on its surface) inside the discharge chute
opening. The drill guide will slide smoothly over the
top lip of the discharge chute opening.
3. Mark the location on the cutting deck surface
through the drill guide opening with a hammer and
center punch or large nail.
4. Remove the mulch plug and discard the drill guide.
5. Using a 1/8” bit, carefully drill a pilot hole into the
cutting deck surface where the mark was made in
the step 3.
6. Using a 9/32” bit, carefully drill out the pilot hole just
made.
7. Reposition the mulch plug in place over the
discharge chute opening and fasten it with the hex
screw, bell washer and plastic wing nut as
illustrated in Figure 4.
8. Secure the mulch plug by snugging the hex screw
(NOT one of the self-tapping screws) with a 7/16-
inch wrench.
Figure 2
Figure 3
Figure 4
Carriage Screw
Plastic Wing Nut
Bell
Washer
Drill Guide
Mulch Plug
Hex Screw
Plastic Wing Nut
Bell
Washer