OPERATOR'S MANUAL 46" SNOW BLADE Model Number 190-822 IMPORTANT: READ SAFETY RULES AND INSTRUCTIONS CAREFULLY MTD PRODUCTS INC. P.O. BOX 368022 CLEVELAND, OHIO 44136-9722 PRINTED IN U.S.A. FORM NO.
RULES FOR SAFE OPERATION Any power equipment can cause injury if operated improperly or if the user does not understand how to operate the equipment. Exercise caution at all times when operating equipment. 1. Read the tractor and snow blade owners manuals and know how to operate your tractor before using tractor with snow blade attachment. 2. Never operate tractor and snow blade without wearing proper clothing suited to weather conditions and operation of controls. 3.
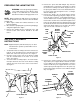
4. Remove the pivot shaft with hairpin clips from the welded brackets on the back of the blade. To attach the channel assembly to the blade, align the holes in the pivot plate with the holes in the welded brackets. Insert the pivot shaft through the holes, securing it with the hairpin clips. 5. Remove the plastic cap, the knob and the washer from the blade adjusting spring bolt. Adjust the hex nut on the bolt so that it is screwed approximately 1" onto the bolt threads.
7. Remove the hairpin clip from the lift link pin which is assembled to the pivot support bracket. Insert the end of the lower lift handle assembly through the notch in the pivot support bracket and through the holes in the channel. Align the lift link pin with the hole in the welded bracket on the lower lift handle assembly. Insert the lift link pin through the hole in the bracket and secure it with the hairpin clip. See figure 4.
NOTES 5
40 32 29 39 16 25 23 42 41 28 27 9 25 47 16 9 36 C 30 45 37 47 46 50 B 17 24 C 26 43 31 44 14 35 15 A 25 A B 11 12 13 51 10 33 49 48 52 34 24 19 3 35 6 21 8 18 20 38 6 4 7 REPAIR PARTS LIST FOR MODEL OEM-190-822 46" SNOW BLADE 6 22 1 2 4 5 4
PART NO. 63821 24524 62980 43080 43079 43064 43081 23070 24520 24347 43262 23131 1540-118 23958 23130 47572 23122 43070 9466R 44071 43015 44074 41-42 43343 43055 46053 63283 REF. NO. 1 2 3 4 5 6 7 8 9 10 11 12 13 14 15 16 17 18 19 20 21 22 23 24 25 26 27 1 1 1 8 2 10 4 2 2 1 1 1 1 1 1 8 1 1 1 1 1 1 1 2 3 2 1 QTY.
If you are having difficulty assembling this product or if you have any question regarding the controls, operation or maintenance of this unit, please call the Customer Suport Department.