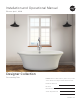
Installation and Operational Manual Effective April 1, 2020 Designer Collection Freestanding Tubs Installer: This booklet must be given to the product owner. Please note important information below: Distributor Name # Model # Manufacturer’s Date Serial / Registration # mtibaths.
Owner’s Manual and Installation Guide Thank you for purchasing an MTI bath product. You have chosen the best-built cross-linked acrylic tub in America. We know that it will give you many years of pleasure. The instructions in this booklet will provide you with the information you need to install and operate this unit. This information is also available on mtibaths.com. Our customer service department is available to answer any additional questions you may have pertaining to the installation of your bath.
Table of Contents Important Safety Instructions........................................1 Bath Installation Instructions.....................................2-7 Product Inspect & Test Procedures.................... 2 Important Information -Freestanding Bath........ 3 Rough-In Charts.................................................... 4-5 Drain Installation........................................................ 6 Plumbing & Electrical................................................
Installation and Operational Manual ° Designer Collection ° Acrylic Freestanding Tubs Important Safety Instructions This manual contains information and instructions for proper handling, operation and maintenance of your MTI bathtub. Failure to follow these instructions could result in personal injury, electrical shock or fire.
Installation and Operational Manual ° Designer Collection ° Acrylic Freestanding Tubs Installation Instructions - Inspect & Test Product Read all instructions before installing tub. MTI recommends using a professional installer for this product. Installer/product owner is responsible for complying with all state and local codes. NOTICE: Certain cleaning products will permanently damage the acrylic surface. Please see ‘Care & Cleaning Instructions’ on page 15.
Installation and Operational Manual ° Designer Collection ° Acrylic Freestanding Tubs Freestanding Bath - Important Information Installation Instructions IMPORTANT NOTICE: Do not attempt to remove the foam from the bottom of the tub. Doing so may cause damage and will void the warranty. Do not remove the wires attached to the sensors located on each side of the drain. The sensor wire must be connected to the remote blower for proper operation.
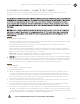
Installation and Operational Manual ° Designer Collection ° Acrylic Freestanding Tubs Rough-In Chart For Freestanding Tubs MTI RECOMMENDS USING CLEAR 100% SILICONE SEALANT. DO NOT USE PLUMBER’S PUTTY. Most of these tub models come with an access panel behind the waste and overflow for ease of installation, however access from below tub is recommended.* A box-out in the floor is required to accommodate the drain assembly.** MEASUREMENT A MEASUREMENT B MEASUREMENT C 67 2.75” 8” 5.25" 68 3” 9.
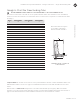
Installation and Operational Manual ° Designer Collection ° Acrylic Freestanding Tubs Rough-In Chart For Freestanding Tubs With Direct Tee Drain MTI RECOMMENDS USING CLEAR 100% SILICONE SEALANT. DO NOT USE PLUMBER’S PUTTY. Installation Instructions Tub models with direct-tee toe tap drain kits are designed to install with tub drain aligned directly above drain pipe. Rough-in waste pipe from center of drain to top outside edge of tub. A box-out in the floor is required to accommodate the drain assembly.
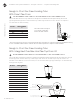
Installation and Operational Manual ° Designer Collection ° Acrylic Freestanding Tubs Installation Instructions – Drain Installation MTI Designer Series Freestanding tubs are designed to install on top of the finished floor. Many models come with an access panel behind the waste and overflow for ease of installation, however access from below tub is recommended for installation. If there is no access from below, the installation can be more difficult on some tub models.
Installation and Operational Manual ° Designer Collection ° Acrylic Freestanding Tubs PLUMBING INSTALLATION INSTRUCTIONS: ACCES PANEL COMES STANDARD ON TUB MODELS WITH INTEGRAL FAUCET DECK AND OPTONAL VIRTUAL SPOUT. DECK MOUNTED VALVES: Installation Instructions 1. Use access panel behind the integral faucet deck to install valves in accordance with valve manufacturer’s installation instructions. If your tub model does not have an access panel for valve installation, check your order details. 2.
Installation and Operational Manual ° Designer Collection ° Acrylic Freestanding Tubs ELECTRICAL INSTALLATION INSTRUCTIONS (CONTINUED): ELECTRICAL SPECIFICATIONS Air Blower............................................................................9.5 AMP Chromatherapy LED Lighting (Set of Two)..................... 1 AMP Radiance®............................................................................ 1-3 AMP Bluetooth Amp (Stereo H2O w/ Bluetooth)..................
Installation and Operational Manual ° Designer Collection ° Acrylic Freestanding Tubs Installation Instructions – Airbath Select a location for the air blower and system components that meets the conditions noted on the previous page. 2. Connect the the air hose, keypad cable, and drain sensor wires that exit the bottom of the bath near the drain to the blower. See photo "A" below. Installation Instructions 1.
Installation and Operational Manual ° Designer Collection ° Acrylic Freestanding Tubs Installation Instructions - Optional Equipment Each Radiance® and Chromatherapy system comes with a dedicated on/off touch pad or designated icon on the combination therapy keypad and a transformer box equipped with a 27" power cord. When combined to operate with the air system, the transformer box will need to be located within 2ft. of the blower. See Step 3 on page 9.
Installation and Operational Manual ° Designer Collection ° Acrylic Freestanding Tubs Operation Instructions - Combined Therapy Operation Instructions Standard Airbath #1 System ON/OFF 1st Press: The blower starts. LED indicator light on. 2nd Press: The blower stops. LED indicator light off. Note: Blower automatically stops after 20 minutes. BLOWER SPEED INCREASE Press & hold to increase the blower speed. Release pressure at the desired speed. Note: The blower initially starts at 30% speed.
Installation and Operational Manual ° Designer Collection ° Acrylic Freestanding Tubs Operation Instructions - Combined Therapy Airbath with LED Lights and Radiance® Operation Instructions #4R System ON/OFF FOR RADIANCE 1st Press: Turns on both heated zones LED indicator light on. 2nd Press: Turns off Radiance system. LED indicator light off. ON/OFF: AIRBATH 1st Press: The blower starts. LED indicator light on. 2nd Press: The blower stops. LED indicator light off.
Installation and Operational Manual ° Designer Collection ° Acrylic Freestanding Tubs Operation Instructions - Combined Therapy Elite Airbath with Spa Mode Operation Instructions Keypad style and functions may vary according to tub model and selected options. See product specification sheet for details or contact MTI Baths. #4 Digital System ON/OFF: AIRBATH 1st Press: The blower starts. LED indicator light on. 2nd Press: The blower stops. LED indicator light off.
Installation and Operational Manual ° Designer Collection ° Acrylic Freestanding Tubs Independent Chromatherapy Operation Instructions ON/OFF: PRESS THE ON/OFF BUTTON - LIGHT MUST BE ON FOR ANY MODE TO FUNCTION. 1st Press: White light. LED light on (White is only available when the system is initially turned on). 2nd Press: Light off. LED light off. MODE BUTTON: 1st Press: Aqua-Blue-Green Cycle. - First cycle 1.
Installation and Operational Manual ° Designer Collection ° Acrylic Freestanding Tubs Care and Cleaning Instructions Care and Cleaning CLEANING THE ACRYLIC SHELL The cross-linked cast acrylic surface is among the highest quality surfaces available. Its hard, non-porous surface prevents dirt from accumulating and resists stains better than other materials. With normal use, cast acrylic will retain its beauty with only a minimal amount of care.
Installation and Operational Manual ° Designer Collection ° Acrylic Freestanding Tubs Troubleshooting FAQ FAQ Q: The blower will not turn on. What should I check first? A: Check the electrical connections. Test the outlet for power by plugging in a small lamp or hair dryer. Check to make sure the breaker is not tripped. Replace GFCI outlet or breaker if necessary. On systems with multiple control boxes or equipment, ensure that all connections are intact.
Installation and Operational Manual ° Designer Collection ° Acrylic Freestanding Tubs MTI Residential Warranty This warranty is effective for MTI Designer Collection acrylic freestanding air bath and soaking tubs manufactured after January 1, 2006, and is in lieu of all other warranties. Warranty Policies Lifetime Bath Warranty Shell: MTI Baths (MTI) warrants the acrylic shell against defects in material and workmanship for the lifetime of the product to the original purchaser.
Installation and Operational Manual ° Designer Collection ° Acrylic Freestanding Tubs Acts Invalidating Warranty: Inspection of the unit prior to installation is the responsibility of the installer(s) or person(s) acting on behalf of the user. He/she is responsible for ensuring that the unit is free of defect or damage. The shipping container advises the installer of this responsibility.
Installation and Operational Manual ° Designer Collection ° Acrylic Freestanding Tubs MTI Commercial Warranty Warranty Policies This warranty is effective for MTI Designer Collection acrylic freestanding air bath and soaking tubs manufactured after January 1, 2006, and is in lieu of all other warranties. MTI Baths (MTI) provides a limited warranty on its products for use in the continental United States of America to original purchasers.
Installation and Operational Manual ° Designer Collection ° Acrylic Freestanding Tubs Acts Invalidating Warranty: Inspection of the unit prior to installation is the responsibility of the installer(s) or person(s) acting on behalf of the user. He/she is responsible for ensuring that the unit is free of defect or damage. The shipping container advises the installer of this responsibility.
MTI Baths 670 North Price Road Sugar Hill, GA 30518 p: (800) 783-8827 f: (800) 438-8827 Made in the USA mtibaths.com © Copyright 2020 by MTI Baths, Inc. Modification Rights Reserved.
Installation and Operational Manual ° Designer Collection ° Acrylic Freestanding Tubs Important Safety Instructions This manual contains information and instructions for proper handling, operation and maintenance of your MTI bathtub. Failure to follow these instructions could result in personal injury, electrical shock or fire.
Installation and Operational Manual ° Designer Collection ° Acrylic Freestanding Tubs Installation Instructions - Inspect & Test Product Read all instructions before installing tub. MTI recommends using a professional installer for this product. Installer/product owner is responsible for complying with all state and local codes. NOTICE: Certain cleaning products will permanently damage the acrylic surface. Please see ‘Care & Cleaning Instructions’ on page 15.
Installation and Operational Manual ° Designer Collection ° Acrylic Freestanding Tubs Freestanding Bath - Important Information Installation Instructions IMPORTANT NOTICE: Do not attempt to remove the foam from the bottom of the tub. Doing so may cause damage and will void the warranty. Do not remove the wires attached to the sensors located on each side of the drain. The sensor wire must be connected to the remote blower for proper operation.
Installation and Operational Manual ° Designer Collection ° Acrylic Freestanding Tubs Rough-In Chart For Freestanding Tubs MTI RECOMMENDS USING CLEAR 100% SILICONE SEALANT. DO NOT USE PLUMBER’S PUTTY. Most of these tub models come with an access panel behind the waste and overflow for ease of installation, however access from below tub is recommended.* A box-out in the floor is required to accommodate the drain assembly.** MEASUREMENT A MEASUREMENT B MEASUREMENT C 67 2.75” 8” 5.25" 68 3” 9.
Installation and Operational Manual ° Designer Collection ° Acrylic Freestanding Tubs Rough-In Chart For Freestanding Tubs With Direct Tee Drain MTI RECOMMENDS USING CLEAR 100% SILICONE SEALANT. DO NOT USE PLUMBER’S PUTTY. Installation Instructions Tub models with direct-tee toe tap drain kits are designed to install with tub drain aligned directly above drain pipe. Rough-in waste pipe from center of drain to top outside edge of tub. A box-out in the floor is required to accommodate the drain assembly.
Installation and Operational Manual ° Designer Collection ° Acrylic Freestanding Tubs Installation Instructions – Drain Installation MTI Designer Series Freestanding tubs are designed to install on top of the finished floor. Many models come with an access panel behind the waste and overflow for ease of installation, however access from below tub is recommended for installation. If there is no access from below, the installation can be more difficult on some tub models.
Installation and Operational Manual ° Designer Collection ° Acrylic Freestanding Tubs PLUMBING INSTALLATION INSTRUCTIONS: ACCES PANEL COMES STANDARD ON TUB MODELS WITH INTEGRAL FAUCET DECK AND OPTONAL VIRTUAL SPOUT. DECK MOUNTED VALVES: Installation Instructions 1. Use access panel behind the integral faucet deck to install valves in accordance with valve manufacturer’s installation instructions. If your tub model does not have an access panel for valve installation, check your order details. 2.
Installation and Operational Manual ° Designer Collection ° Acrylic Freestanding Tubs ELECTRICAL INSTALLATION INSTRUCTIONS (CONTINUED): ELECTRICAL SPECIFICATIONS Air Blower............................................................................9.5 AMP Chromatherapy LED Lighting (Set of Two)..................... 1 AMP Radiance®............................................................................ 1-3 AMP Bluetooth Amp (Stereo H2O w/ Bluetooth)..................
Installation and Operational Manual ° Designer Collection ° Acrylic Freestanding Tubs Installation Instructions – Airbath Select a location for the air blower and system components that meets the conditions noted on the previous page. 2. Connect the the air hose, keypad cable, and drain sensor wires that exit the bottom of the bath near the drain to the blower. See photo "A" below. Installation Instructions 1.
Installation and Operational Manual ° Designer Collection ° Acrylic Freestanding Tubs Installation Instructions - Optional Equipment Each Radiance® and Chromatherapy system comes with a dedicated on/off touch pad or designated icon on the combination therapy keypad and a transformer box equipped with a 27" power cord. When combined to operate with the air system, the transformer box will need to be located within 2ft. of the blower. See Step 3 on page 9.
Installation and Operational Manual ° Designer Collection ° Acrylic Freestanding Tubs Operation Instructions - Combined Therapy Operation Instructions Standard Airbath #1 System ON/OFF 1st Press: The blower starts. LED indicator light on. 2nd Press: The blower stops. LED indicator light off. Note: Blower automatically stops after 20 minutes. BLOWER SPEED INCREASE Press & hold to increase the blower speed. Release pressure at the desired speed. Note: The blower initially starts at 30% speed.
Installation and Operational Manual ° Designer Collection ° Acrylic Freestanding Tubs Operation Instructions - Combined Therapy Airbath with LED Lights and Radiance® Operation Instructions #4R System ON/OFF FOR RADIANCE 1st Press: Turns on both heated zones LED indicator light on. 2nd Press: Turns off Radiance system. LED indicator light off. ON/OFF: AIRBATH 1st Press: The blower starts. LED indicator light on. 2nd Press: The blower stops. LED indicator light off.
Installation and Operational Manual ° Designer Collection ° Acrylic Freestanding Tubs Operation Instructions - Combined Therapy Elite Airbath with Spa Mode Operation Instructions Keypad style and functions may vary according to tub model and selected options. See product specification sheet for details or contact MTI Baths. #4 Digital System ON/OFF: AIRBATH 1st Press: The blower starts. LED indicator light on. 2nd Press: The blower stops. LED indicator light off.
Installation and Operational Manual ° Designer Collection ° Acrylic Freestanding Tubs Independent Chromatherapy Operation Instructions ON/OFF: PRESS THE ON/OFF BUTTON - LIGHT MUST BE ON FOR ANY MODE TO FUNCTION. 1st Press: White light. LED light on (White is only available when the system is initially turned on). 2nd Press: Light off. LED light off. MODE BUTTON: 1st Press: Aqua-Blue-Green Cycle. - First cycle 1.
Installation and Operational Manual ° Designer Collection ° Acrylic Freestanding Tubs Care and Cleaning Instructions Care and Cleaning CLEANING THE ACRYLIC SHELL The cross-linked cast acrylic surface is among the highest quality surfaces available. Its hard, non-porous surface prevents dirt from accumulating and resists stains better than other materials. With normal use, cast acrylic will retain its beauty with only a minimal amount of care.
Installation and Operational Manual ° Designer Collection ° Acrylic Freestanding Tubs Troubleshooting FAQ FAQ Q: The blower will not turn on. What should I check first? A: Check the electrical connections. Test the outlet for power by plugging in a small lamp or hair dryer. Check to make sure the breaker is not tripped. Replace GFCI outlet or breaker if necessary. On systems with multiple control boxes or equipment, ensure that all connections are intact.
Installation and Operational Manual ° Designer Collection ° Acrylic Freestanding Tubs MTI Residential Warranty This warranty is effective for MTI Designer Collection acrylic freestanding air bath and soaking tubs manufactured after January 1, 2006, and is in lieu of all other warranties. Warranty Policies Lifetime Bath Warranty Shell: MTI Baths (MTI) warrants the acrylic shell against defects in material and workmanship for the lifetime of the product to the original purchaser.
Installation and Operational Manual ° Designer Collection ° Acrylic Freestanding Tubs Acts Invalidating Warranty: Inspection of the unit prior to installation is the responsibility of the installer(s) or person(s) acting on behalf of the user. He/she is responsible for ensuring that the unit is free of defect or damage. The shipping container advises the installer of this responsibility.
Installation and Operational Manual ° Designer Collection ° Acrylic Freestanding Tubs MTI Commercial Warranty Warranty Policies This warranty is effective for MTI Designer Collection acrylic freestanding air bath and soaking tubs manufactured after January 1, 2006, and is in lieu of all other warranties. MTI Baths (MTI) provides a limited warranty on its products for use in the continental United States of America to original purchasers.
Installation and Operational Manual ° Designer Collection ° Acrylic Freestanding Tubs Acts Invalidating Warranty: Inspection of the unit prior to installation is the responsibility of the installer(s) or person(s) acting on behalf of the user. He/she is responsible for ensuring that the unit is free of defect or damage. The shipping container advises the installer of this responsibility.
MTI Baths 670 North Price Road Sugar Hill, GA 30518 p: (800) 783-8827 f: (800) 438-8827 Made in the USA mtibaths.com © Copyright 2020 by MTI Baths, Inc. Modification Rights Reserved.