
Installation Sheet

Effective 020113 ©2013 by MTI Baths, Inc. Modication Rights Reserved.
Installation
IMPORTANT! Read all instructions carefully before beginning installation or drilling of the sink.
Self-Rim Installation
Installing your MTI sink is as easy as “set, seal and forget.” If this is a replacement of a sink the same size, no
cutting of your existing countertop should be required. If this is a new installation, or if you are replacing a smaller
sink, we offer the following advice:
1. Place the sink UPSIDE DOWN on the countertop.
2. With a pencil, trace a line around the outside edge of the sink onto the countertop.
3. Remove the sink from the countertop.
4. Measure IN 1/2" and draw a new line inside the first sink outline.
5. Cut out the countertop to the inside line.
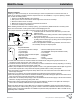
Before installing the MTI sink in the countertop opening, you must drill any additional faucet or accessory holes.
Proper care must be taken in drilling these holes to avoid damaging the sink.
Use a proper sized hole saw to allow a hole large enough for the faucet or accessory (Figure 1).
1. Locate and mark the underside of the sink where you wish to drill
additional holes.
2. Drill from the bottom first, taking care NOT to drill completely though
the top surface (Figure 2).
3. Drilling from the top, place the pilot bit in the hole that you just made
by drilling from the back (Figure 3). Taking care to drill straight down,
drill completely through the sink.
That’s all the preparation needed! Using a sealant, secure the sink to
the countertop. No clips or straps required.
Undermount Installation
1. Locate center of the bowl over the base cabinet and calculate center. Using framing square, draw a line on
countertop to locate center of bowl, mark center mark in line.
2. Locate the set back as desired for over or underhang of counter. This dimension will vary depending on overhang
style chosen and type of bowl used and size of sink deck.
3. Make a paper template and transfer paper template to a 3/8" or 1/2" plywood template. Draw template on plywood
and increase template size 1/16" (to allow 5/8" template guide at bottom of router). Cut template.
4. Secure template to countertop using 6 bar clamps. Place router over wood cutout and cut hole. Make sure router
follows edge of template.
5. After hole is cut, sand the opening with appropriate grit sandpaper and finish surface as required.
6. Drill holes through the deck of sink rim at locations necessary to provide solid support (this should include holes in
each corner and at front and rear dam location on two models).
7. Clean bottom of countertop and top flange of sink with denatured alcohol and then apply a narrow bead of silicone
adhesive to top edge of bowl flange and position bowl.
8. Mount sink by placing appropriate screws through the holes drilled into the sink rim and tighten as necessary to
secure sink to countertop. Additional holes may be drilled as necessary.
Please note: When planning to use an MTI Sink in an undermount installation, please check style and size before
cutting countertop. For undermounting to any granite, marble or solid surface materials other than wood, contact the
marble, granite or solid surface fabricator for installation requirements and proper fasteners. MTI is not liable for any
preparatory labor or materials.
Required Materials:
• Eye and ear protection is always
recommended
• Paper template
• Board for cutting wooden template
• Drill and 1⁄4" bit
• Tape measure
• Fastener screws with washers
• Silicone sealant (MTI recommends
POLYSEAMSEAL
All-Purpose Adhesive Caulk)
• 2 bar clamps
• Framing square
• Sandpaper
• Router
• Cleaning materials
Figure 1
Figure 2
Figure 3
BASICS
®
Sinks