
Owners Manual / Installation Guide


1
SHOWER BASE
INSTALLATION INSTRUCTIONS
Important: Read all instructions carefully before beginning installation.
Before Installing: Inspect shower base thoroughly.
A. Damage from shipping or delivery must be reported to carrier immediately. Do not install
damaged shower base. MTI Baths is not responsible for damage occurring during shipping
and/or handling.
B. Factory defect must be reported to factory before base is installed. Defects claimed after
installation will exclude warranty.
C. Do not store product in temperatures below 32° Fahrenheit.
D. Proper drain installation is the responsibility of the installer. MTI does not warrant leaks
associated with improper drain installation.
INSTALLATION PROCEDURES
MTI offers three types of shower bases: Integral Acrylic (molded) Flange, Multiple Threshold with
Factory Installed Tile Flange and Barrier Free Shower Bases. All shower bases have the same
basic installation instructions. The Barrier Free shower bases are designed to have the finished
floor at the same height as the front threshold of the base, allowing for a smooth transfer surface.
This can be most easily achieved by recessing the base into the subfloor. There may be alternative
methods; MTI recommends a professional contractor to inspect the individual job site to determine
the best way to achieve the finished product and function desired.
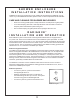
1. Check floor surface for level.
2. Mark flange of shower base where it aligns with wall studs.
3. Pre-drill a minimum of three holes on each side of the shower base flange to align with
selected wall studs. Place enough bedding compound (MTI recommends Quickrete Sand Mix
#1103) to fill void between the bottom of the shower base and floor. If your shower base was
ordered with the pre-leveled foam option, no bedding compound is necessary.
Note: If your floor is not perfectly level, use enough bedding compound to achieve level.
4. Work shower base into bedding compound.
5. Ensure shower base is level, both front to back and side to side.
6. Attach shower base to wall studs using the pre-drilled holes in the flange. Start on one front
corner, and work your way around the entire base. If you are installing a seated base, always
start with the seat side of the base.
DO NOT ATTEMPT TO DRIVE NAILS THROUGH THE INTEGRAL FLANGE.
Note: On some bases, the walls may appear to have a very slight bend or bow. This will correct
itself as you make your way around the base, securing it to the wall studs.
7. Complete drain installation. Do not use plumber’s putty, as it can yellow acrylic over time and
possibly discolor some finishes. MTI recommends clear silicone, as its flexibility can also be a
benefit in preventing leakage in the future
8. Allow bedding compound to harden overnight before use.
Note: If ordered with Radiance, the control box must be accessible for future service.