BOUTIQUE COLLECTION Engineered Solid Stone™ Tubs OWNER’S MANUAL I N S TA L L AT I O N G U I D E Effective July 1, 2013 Installer: This booklet must be given to the product owner.
OWNER’S MANUAL A N D I N S TA L L AT I O N G U I D E Thank you for purchasing an MTI bath product. You have chosen the best-built Engineered Solid Stone ™ (ESS) tub in the USA. The outstanding heat retention, combined with the ease of cleaning and the elegant look of natural stone, will provide you with many years of pleasure. The instructions in this booklet will provide you with the information you need to install this unit. This information is also available on mtibaths.com.
I M P O R TA N T S A F E T Y INSTRUCTIONS WARNING: WHEN USING ELECTRICAL PRODUCTS, BASIC PRECAUTIONS SHOULD BE FOLLOWED, INCLUDING THE FOLLOWING This manual contains information and instructions for proper maintenance of your bath. Failure to follow these instructions could result in personal injury, electrical shock or fire. INSTRUCTIONS PERTAINING TO RISK OF FIRE, ELECTRIC SHOCK, OR INJURY TO PERSONS.
I N S TA L L AT I O N I N S T R U C T I O N S Read all instructions before installing tub. MTI recommends using a professional installer for this product. Installer / product owner is responsible for complying with all state and local codes. Handle this tub with extreme caution. Dropping this product, even from several inches, may cause cracking and permanent damage. Rubber gripped gloves may make it easier to handle the ESS bath.
INSTALLATION INSTRUCTIONS FOR TUBS WITH INTEGRAL OVERFLOW* *Except Akana (model #131), Maddux 1 (model #161) & Maddux 2 (model #162) The integral overflow tubs by MTI Baths will require only the waste to be installed. The P-trap will be located directly below the drain (see tub specification sheet). The tub comes equipped with a toe tap drain and PVC drain fitting. MTI recommends using clear 100% silicone sealant, DO NOT use plumber’s putty. With access from ceiling below: 1.
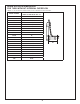
DRAIN ROUGH-IN DIMENSIONS FOR TUBS WITHOUT INTEGRAL OVERFLOW *Models 131, 161 & 162 have a slotted overflow, but use a standard PVC waste & overflow. MODEL NUMBER DISTANCE FROM CENTER LINE OF DRAIN TO CENTER OF TEE "A" 115 116 124 125 126 127 128 130 131 131A 137A 137B 137C 140 141 148 149 150 160 161 162 10.25" 8.5" 9" 9.5" 8.25" 10" 10" 8" 8" 8" 6.75" 6.75" 6.75" 17.75" 17.75" 14.25" 10.25" 8" 9.25" 5.75" 5.
Instructions for INSTALLATION INSTRUCTIONS FOR SOAKING BATH WITHOUTInstallation PEDESTAL MTI Brass Bath Drain Preparation of the floor area is required prior to the installation of this SUB-FLOOR kit (not in this leaflet) This product must be installed correctly, please read these instructions before installation. Care must be taken not to over-tighten fittings or damage may occur. Tighten MAX hand tight + 1/4 turn. Once installed, please check that all connections are water-tight.
INSTALLATION INSTRUCTIONS FOR SOAKING BATH WITH OPTIONAL PEDESTAL Note: Access from below tub is recommended for installation. If there is no access from below, the installation may be more difficult and clearance will be necessary to connect the T-piece assembly to the p-trap from above. MTI recommends using clear 100% silicone sealant. DO NOT use plumber’s putty.
INSTALLATION INSTRUCTIONS FOR AIR BATH Please also see additional information on next page. The drain instructions on this page do NOT apply to tubs with an integrated overflow and pedestal. Note: Access from below tub is recommended for installation. If there is no access from below, the installation may be more difficult and clearance will be necessary to connect the T-piece assembly to the p-trap from above. MTI recommends using clear 100% silicone sealant, DO NOT use plumber’s putty.
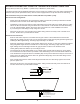
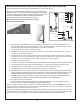
ADDITIONAL INSTRUCTIONS FOR TUBS EQUIPPED WITH AN AIR BATH The instructions on pages 8-10 apply to ALL air baths. If your bath came equipped with an air system, there are several considerations and important installation procedures to follow. 1. The blower and check valve must be remotely located from the tub (See Illustration A on next page). The blower and check valve may be remote mounted up to 8' from the bath. The check valve must be located at least 2" above the top rim of tub.
Illustration A Check Valve - must be mounted horizontally (as shown) and at least 2” above rim of tub. Rigid 1” schedule 40 PVC Connect to a dedicated 15amp GFCI. Blower: 110V 8.8 amps Air hose - leading to bottom of tub Blower - remotely located 01 Illustration B Do not use. water sensor wires Wires lead from sensors mounted on either side of tub drain and connect to blower. Allows activation of purge cycle after tub has drained.
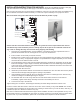
AIR BATH KEYPAD AND REMOTE CONTROL OPERATING INSTRUCTIONS 01 Please Note: Numbered instructions depict buttons in photo as seen from left to right on keypad or from top to bottom on remote control. FUNCTIONS 1- ON/OFF: 1st Press: The blower starts. LED light on. 2nd Press: The blower stops. LED light off. 2- BLOWER SPEED INCREASE + Press & hold to increase the blower speed. Release pressure at the desired speed. Note: The blower initially starts at 30% speed.
CARE AND CLEANING INSTRUCTIONS For Matte Finish The ESS surface of all MTI tubs is among the highest quality surfaces available. Its hard, non-porous surface prevents dirt from accumulating and resists stains better than other materials. This tub is made of resin and natural minerals and may have minor variations in color and surface texture throughout the tub. This is normal and part of the unique, hand-crafted beauty for products made from natural minerals such as MTI's Engineered Solid Stone.
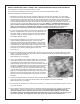
TROUBLESHOOTING FAQ Q: The blower will not turn on, what should I check first? A: Check the electrical connections. Test the outlet for power by plugging in a small lamp or hair dryer. Check to make sure the breaker is not tripped. Replace GFCI outlet or breaker if necessary. Q: There is a rust colored, greasy ring in my bath tub, what causes this? A: The condition results from sediment in the water heater of the home.
Q. My bath's air system has been working great for years, and then suddenly just stopped working. What should I check first? A. The problem is most likely the breaker or the GFCI outlet. Check your breaker box first, and then use a hairdryer to test the outlet where the equipment is plugged in. This should identify the problem. If both these items check out fine, please have your serial or registration number available and contact our technical service department. Q.
M T I R E S I D E N T I A L WA R R A N T Y This warranty is effective for all MTI Engineered Solid Stone (ESS) tubs manufactured after January 1, 2007, and is in lieu of all other warranties. MTI Baths, Inc. (MTI) provides a limited warranty for all ESS tubs for use in the continental USA* to the original purchaser for personal or single family use. Warranty coverage begins from date of purchase (regardless of installation date).
Warranty Performance: In the event of any malfunction or defect covered under the terms of this warranty, a Factory Authorized Service Agent of MTI Baths will repair the MTI product. To obtain service, contact the MTI Service Department for an agent in your area and issuance of a service order number. No work/ payment will be made without an authorized service order number. There will be no charge for parts, labor or freight costs for parts necessary to repair the tub under warranty.
M T I C O M M E R C I A L WA R R A N T Y This warranty is effective for all MTI Engineered Solid Stone (ESS) tubs manufactured after January 1, 2007, and is in lieu of all other warranties. MTI Baths, Inc. (MTI) provides a limited warranty for all ESS tubs for use in the continental USA to the original purchaser for commercial, rental or multifamily application. Warranty coverage begins from date of purchase (regardless of installation date).
Warranty Performance: In the event of any malfunction or defect covered under the terms of this warranty, a Factory Authorized Service Agent of MTI Baths will repair the MTI product. To obtain service, contact the MTI Service Department for an agent in your area and issuance of a service order number. No work/payment will be made without an authorized service order number. There will be no charge for parts, labor or freight costs for parts necessary to repair the tub under warranty.
Manufactured by: MTI Baths, Inc. mtibaths.com 670 N. Price Road Sugar Hill, GA 30518 800 783 8827 770 271 8228 Fax 800 438 8827 © Copyright 2014 by MTI Baths, Inc. Modification Rights Reserved. Part # ESSTUB rev.