
Installation Sheet


5
INSTALLATION INSTRUCTIONS FOR SOAKING BATH WITHOUT PEDESTAL
Please read ahead for soaking baths with pedestal base or air bath instructions.
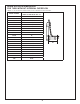
Note: This is a sub oor drain. Access from below tub is recommended for
installation. If there is no access from below, the installation is more difcult.
Clearance for the drain will be required and the oor near the overow will
need to be completed after the drain is installed. See picture below.
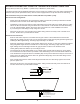
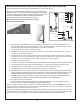
Drain kit parts breakout is shown in illustration to the right.
MTI recommends using clear 100% silicone sealant.
DO NOT use plumber’s putty.
1. Place the tub in the exact position of final installation. The bathtub cannot be repositioned once it is
plumbed and installed. The tub is designed to sit on top of the finished floor, however, you may need to
leave an area by the drain open until installation of the drain is complete.
2. Ensure location is structurally sound, flat and level.
3. Elevate the tub to allow access to the bottom of the tub from the drain to the overflow area. The tub is
very heavy; use appropriate supports.
4. Temporarily "dry fit" the drain kit and trim the pipes to proper length. Note the distance from the edge of
the tub to the center of the overflow pipe. This measurement will be used to verify the location of the hole
in the floor for the overflow pipe. Also see rough-in dimensions on previous page.
5. Remove the drain kit from the tub.
6. Use emery cloth, grinder or wire brush to remove the plated finish from the pipe where it will be soldered to the 'tee'.
7. Provide opening in floor below drain of approximately 6" x 6". This will be completely covered by the tub.
8. Install tub in precise location desired. Use only 100% clear silicone to adhere tub to floor.
9. Using the distance noted in step #4, drill 2" diameter hole in floor for overflow pipe.
10. Re-assemble drain kit on tub using clear silicone under drain strainer. Remove excess silicone immediately.
Tighten waste flange assembly and ferrule until seated plus 1/4 turn. Remember to install bell flange on over-
flow pipe. Slide the bell flange high up on the overflow pipe to avoid heat damage during the next step.
11. Carefully solder connections at brass 'tee'. Wrap a wet rag around overflow pipe to prevent the heat from
damaging the plating. Always use proper heat shielding to protect the surrounding materials.
12. Connect the 'P-trap' to the drain kit.
13. Use clear silicone to seal the gap between the overflow pipe and the floor. Lower bell flange to the floor.
Attach overflow cover and thread stopper assembly into waste flange.
Fill tub to overflow and allow water to stand for 30 minutes. Check carefully for any leaks. NOTE: The overflow
is a plumbing device designed to prevent water from reaching a certain level in your tub. DO NOT, under any cir-
cumstances, tape off or block the overflow in any way.
MTI does not warrant leaks associated with improper drain installation and will not be responsible for any costs
involved with removing or reinstalling the tub. Failure to properly check oor for level will result in improper drain-
ing of the bath. If you need assistance, please call our technical service department at 800-783-8827.
Customer Service
MTI
p-800.783.8827
f-800-438-8827
Visit our web site at
Customer Service
MTI
p-800.783.8827
f-800-438-8827
Visit our web site at
Bell Flange
T-Piece
Drain Stopper Assembly
Waste Flange Assembly
Drain Shoe
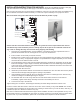
Installation Instructions for
MTI Brass Bath Drain
Preparation of the floor area is required prior to the installation of this SUB-FLOOR kit (not in this leaflet)
This product must be installed correctly, please read these instructions before installation.
Care must be taken not to over-tighten fittings or damage may occur. Tighten MAX hand tight + 1/4 turn.
Once installed, please check that all connections are water-tight.
LOCAL GOVERNING PLUMBING CODES MUST BE OBSERVED, IF IN DOUBT, PLEASE CONTACT YOURLOCAL PLUMBING DISTRIBUTOR / BODY.
mtibaths.com
mtibaths.com
Baths
Cover
Clamp Plate
Ferrule
Overflow
Hex Bolt Stem
Assembly