
Installation Sheet

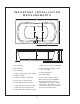
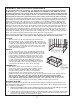

Table Of Contents

5
GENERAL INSTALLATION GUIDELINES
Do not begin building any structure for your tub until your tub arrives. All printed specications
for MTI tubs have +/- ½" tolerance AND ARE SUBJECT TO CHANGE AT ANY TIME. Take all nal
installation dimensions from your tub. Note: the pre-leveled foam base and pre-leveled frame add
approximately 2-3 inches to the height of the tub. The bolts/screws through the mounting feet on
the pump may be loosened or removed once the tub is in place if necessary for future servicing.
MTI tubs are not equipped with leveling feet. The tub must be leveled from the top ange in both directions
and bedding compound used underneath for proper operation. MTI recommends Quikrete #1103, sand/
topping mix. Sheetrock mud or plaster are not acceptable to use as bedding compound. Determine the
nal height of the tub rim by measuring from the underside of the rim to the oor on the drain side and
add ½" to allow for bedding compound. If your tub has a pre-leveled foam base, do not add ½" since wet-
bedding is not necessary. The tub must be leveled by the rim of the tub, and supported by the bedding (or
foam base) under the full length of the tub bottom. MTI recommends using a plastic sheet barrier on top
of and underneath the bedding compound. Carefully lower tub into place. Shift tub side to side to settle
into compound. The tub will not drain properly if not level both front to back and side to side. Use care not
to damage any plumbing, wiring or other options when bedding the tub. Let compound harden overnight
before use. Failure to properly bed the tub will void any warranty on the tub shell.
Note: Pre-leveled frame eliminates the need to frame the walls or use bedding compound to level the tub.
The pre-leveled frame adds ½ to 3 inches of height, depending on the specic model of tub.
ALCOVE
Mark a level line on the stud walls using the measurement
determined above. A 2x2 or similar stringer will be attached to
the studs touching this line. All mounting surfaces must be level
to allow for proper drainage. Framing of the same height should
be constructed across the front of the tub for skirt, tile or other
material. Remember to allow for access to each heater, pump
and/or electrical component.
DROP IN
Use the above dimension as the finished deck height from the
floor. The drop in opening should be approximately 1-½ inches
smaller than the outside dimensions of the tub. This will create
a ¾ inch ledge to support the entire rim of the tub. It is best
to have as large an opening as possible in the deck to clear
the plumbing and other tub accessories. Full size templates
for oval or odd shaped tubs are available. The bottom of
the tub must be fully supported with bedding compound and
must bear the weight of the tub, water and bather. Under no
circumstances should the tub “hang” by the top flange.
UNDERMOUNT
MTI does not make recommendations as to the size and
shape of the opening for undermount installation. Do NOT
use any templates supplied by MTI for undermounting.
Construct framing for the tub using the measurement
determined above. The framing structure is to level the tub.
Additional framing must be provided around the tub to support the weight of the decking material.
The rim of the tub is not to bear the weight of the deck material! Have tub at jobsite
and measure or template very carefully before cutting any decking materials. MTI is not
responsible for any preparatory labor or materials. If your application calls for solid surface
material covering only the width of the tub flange, additional support is not necessary.
INTEGRAL SKIRTED
All of MTI’s Integral Skirted tubs come with several standard features including an integral molded front
skirt, integral three-sided tile ange and a pre-leveled foam base. These tubs are designed for three-wall
alcove installation applications.
1. Slide tub into installation location. Check to ensure that the tub is level to allow for proper drainage. If the tub is
level, proceed to step two. If the tub is not level, use bedding compound to level tub.
2. Carefully drill 1/8" holes through the tile flange at each stud location. Secure to stud with screws, being
careful not to over-tighten as this may cause the acrylic to crack or chip. Do not attempt to drive nails
through the integral flange. See illustrations on pages 6.
Leveling Stringers
For whirlpools and air systems,
be sure to provide an opening of
at least 16" x 14" for pump access.
MTI's optional skirts will often
provide this access.
For whirlpools and air
systems, be sure to
provide an opening of at
least 16" x 14" for pump
access. MTI's optional
skirts will often provide
this access.