
User manual


MPA82000 Power Amplifier
Software Installation
Minimum System Requirements:
Intel Pentium or equivalent processor
Microsoft Windows XP, 2000, NT 4.0 (w/Service Pack 5 or later), 98, 98SE or Me
64 MB RAM
20 MB hard drive space
SVGA (800x600) or higher resolution display card and monitor
1 free USB port or 1 free COM port or 1 free RS485 port
Keyboard
Mouse or other pointing device
Please visit www.mtidanmark.dk to ensure that you have the most up to date version of the
MPA82000 speaker management software.
The MPA82000 speaker management software consists of a single application (.exe) file. Simply copy
this file to the hard drive on your computer. If the program is used frequently it is recommended that it
is placed in the Windows Desktop for quick access. Please see your Windows documentation for
further information.
Using the Speaker Management Software
To start the MPA82000 speaker Management Software click on the MPA82000 logo.
Select COM
Whenever you launch MPA82000 speaker
management software you will be asked to Select
COM. Simply highlight the COM port that your
amplifier(s) are
connected to and
press SELECT. If you
wish to explore the
software without an
amplifier connected
then select DEMO.
The Main Screen consists of four control buttons in
the top left corner:
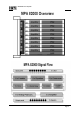
Detect: Searches COM port for any connected
MPA82000 amplifiers
Update: Uploads on-screen settings to MPA82000
memory
Load: Recalls previously saved preset information
from hard drive or floppy drive
Save: Saves on-screen preset information to PC
Beneath the control buttons is a connection tree
showing all devices that are connected and have
been successfully detected by the software. Double
click on a Unit to create a preset. The default preset
name (e.g. Preset 0) then appears beneath the unit.
To edit the preset name first right click then left-click
the name and enter a new name.
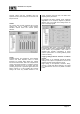
To the right of the screen is the function control panel
showing the programmed settings for Matrix,
Equaliser, Crossover, Delay, Volume and Limiter.
Clicking on the tabs at the top accesses each
individual screen.
Page 8