MTS Echo™ Software Manual Title AdditionalUser Information Guide be certain.
Copyright information Trademark information © 2012 MTS Systems Corporation. All rights reserved. MTS is a registered trademark and MTS Echo and Station Manager are trademarks of MTS Systems Corporation within the United States. These trademarks may be protected in other countries. Windows and Windows NT are registered trademarks of Microsoft Corporation. All other trademarks or service marks are property of their respective owners.
Contents Before You Begin Conventions 5 6 Documentation Conventions Getting Started 6 9 About MTS Echo Software 9 MTS Echo Software Requirements 10 Additional Support Information 10 MTS Echo Software Quick Start 11 About the MTS Echo Widget Create and Edit System Views About System Views 13 15 15 Access to System Views 17 Configure a System View 19 Disable/Enable Alert Notifications from the Widget Create and Edit Lab Views About Lab Views Company Labs Create a Lab 23 23 24 25 Assi
Set User Access Permissions Unique URLs 33 33 Password Protect System Views Give Access to Specific Users Remove Users Add Users 33 34 34 34 Restrict Edit Capabilities to Specific Users Restrict View Access to Specific Users 37 Change Your Password and e-mail Address 4 Contents 35 38 MTS Echo™ Software
Preface Before You Begin Safety first! Other MTS manuals Before you use your MTS product or system, read and understand the Safety manual and any other safety information provided with your system. Improper installation, operation, or maintenance can result in hazardous conditions that can cause severe personal injury or death, or damage to your equipment and specimen. Again, read and understand the safety information provided with your system before you continue.
Conventions Documentation Conventions The following paragraphs describe some of the conventions that are used in your MTS manuals. Hazard conventions Hazard notices may be embedded in this manual. These notices contain safety information that is specific to the activity to be performed. Hazard notices immediately precede the step or procedure that may lead to an associated hazard. Read all hazard notices carefully and follow all directions and recommendations.
Illustrations Electronic manual conventions Hypertext links MTS Echo™ Software Illustrations appear in this manual to clarify text. They are examples only and do not necessarily represent your actual system configuration, test application, or software. This manual is available as an electronic document in the Portable Document File (PDF) format. It can be viewed on any computer that has Adobe Acrobat Reader installed. The electronic document has many hypertext links displayed in a blue font.
Preface MTS Echo™ Software
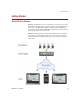
Getting Started Getting Started About MTS Echo Software MTS Echo Software allows you to view the status of a test system or entire lab anywhere, anytime, from any internet-connected device. Everything you need to start using MTS Echo Software is installed with your MTS Series 793 software. Simply launch the MTS Echo application and start monitoring your test(s) from anywhere in the world.
Getting Started MTS Echo Software Requirements Systems that will run MTS Echo Software must meet the following requirements: • MTS controller running MTS Series 793 Control Software version 5.5 or later. • Internet access for the MTS controller PC. For example, you must be able to open a browser and go to http://mtsecho.com. • Compatible web browsers: Internet Explorer 8 and 9, Firefox 3.5 and later, Safari, or Chrome.
Getting Started MTS Echo Software Quick Start 1. Install MTS Series 793 Control Software version 5.50 or later. 2. On the MTS controller PC, load a station as usual. 3. From the Start menu, click MTS Echo. 4. Enter your activation code. The activation code is included in the MTS Echo Software “Getting Started” paper inset that came with your MTS Series 793 Software. 5. Read and accept the software license agreement. The MTS Echo widget appears. 6.
Getting Started 7. Click the Send Link button to e-mail or text message the link to an internet-connected device. This unique link provides access to the System View. 8. Create System and Lab Views that depict your lab layout, and customize the types of information that are displayed. For more information See “Create and Edit System Views” on page 15. See “Create and Edit Lab Views” on page 23.
Getting Started About the MTS Echo Widget The MTS Echo widget appears on the desktop of the Test PC. The widget must be loaded for any system connected to that Test PC to be visible through the MTS Echo software. The widget is also used to configure MTS Echo settings as well as interact with the MTS Echo system. 1 2 3 4 5 6 7 MTS Echo Widget ITEM DESCRIPTION 1 Indicates that the MTS Echo application is connected to the MTS Cloud Server.
Getting Started Widget Connection Status When the Widget is connected to the MTS Echo Software Cloud Server, the indicator turns green. This indicates that there is an internet connection and it has successfully connected to the Cloud Server. When there is no Internet Connection available, the indicator turns red. In this case, ensure that the internet is connected to this Test PC. To test, you can open a Web Browser like Internet Explorer or Google Chrome and try to navigate to: http://mtsecho.com.
Create and Edit System Views Create and Edit System Views About System Views A System View provides real-time monitoring of a test system. After activating the MTS Echo widget on the Test PC, it will automatically connect to your test station. Access to your test system can then be broadcast securely through a cloud server to any authorized user’s internet-connected device, such as a desktop, laptop, or mobile device. Web interface The web interface allows you to view and edit each System View.
Create and Edit System Views 1 3 2 4 5 System View CALLOUT ITEM DESCRIPTION 1 View basic status information View the system state: Program Run, HPU, HSM, and Interlock states. 2 View equipment information Click on a picture to change it to one that accurately represents the test system. 3 Runtime display tabs Customize by adding objects from the “Toolbox,” moving existing objects around, or editing their properties. 4 Properties Editor Click on an object to edit its properties.
Create and Edit System Views Access to System Views A System View is accessible through the unique URL generated when the MTS Echo Software was activated on the Test PC. If multiple test systems (stations) are connected to a Test PC, you will be prompted to select which System View that you want to view. Important In a PC per Station setup, only run the MTS Echo widget from the Master PC. Do not run the MTS Echo Widget on the Client PCs.
Create and Edit System Views From mtsecho.com • Text Message - Select the Text Message option and enter your phone number and select your carrier. Click OK and a text message will be sent to your phone with the link. Standard carrier text messaging rates may apply. • QR Code - Download a free barcode-scanning application to your smart phone (example: RedLaser). Open the scanning application and use your phone’s camera to scan the QR code.
Create and Edit System Views Configure a System View 1. Navigate to the System View. See “Access to System Views” on page 17. 2. Select the type of test system. Choose the type of test system that is running by clicking the “?” image on the Info tab and selecting the picture that most closely matches your test system. 3. Define what information is displayed. Click the Toolbox tab and click-and-drag objects from the toolbox onto the tab to create the view. 4.
Create and Edit System Views 5. Create station alerts.
Create and Edit System Views Station alerts are triggered by the system associated with the current System View. A. Click the Station Alerts tab to add and configure alerts. B. Select the Enabled check box to activate station alerts for the current System View. Alerts can be disabled by clicking the Bell button on the widget or by clearing the Enabled check box. 6. Create PC Alerts. PC alerts are triggered by the equipment and software associated with any of the test systems on the Test PC. A.
Create and Edit System Views Disable/Enable Alert Notifications from the Widget You can disable alert notifications to avoid alert messages while you are setting up a new test or performing maintenance. On the Test PC From a Remote Device 22 Toggle alerts on and off by clicking the Alert button on the widget. If you forget to turn alerts back on, you can remotely turn them on from the System View web page by clicking the Alert tabs and selecting the Enabled check box.
Create and Edit Lab Views Create and Edit Lab Views About Lab Views Lab Views provide real-time status to allow you to monitor and manage your entire laboratory or create a custom layout of multiple test systems. Lab layouts can include multiple tabs to organize tests by project. Lab Views can include layout and table tabs that show the real-time status of every test in your lab and to indicate which tests require your attention and which test system is idle.
Create and Edit Lab Views Company Labs Before you can configure Lab Views, you must create a lab for each physical lab in your company. Each Test PC can be assigned to one of these labs. The systems associated with each Test PC is available for display in the Lab View. A Test PC can only be assigned to one lab.
Create and Edit Lab Views Create a Lab To define the various labs that exist in your facility: 1. Display the MTS Echo widget on the Test PC. 2. On the MTS Echo widget, click the Settings button. 3. Click Labs. 4. Click Create New Lab to create a new lab within your company. 5. Type a Company Lab Name and click Save. 6. Repeat this procedure for each physical lab within your facility.
Create and Edit Lab Views Assign Test PCs to a Lab Perform this procedure on each Test PC within a given lab. Important In a PC per Station setup, only run the MTS Echo widget from the Master PC. Do not run the MTS Echo Widget on the Client PCs. 1. If a lab(s) have not already been created, use the widget to create the lab to which the test pc will be assigned for each physical lab within your facility. See “Create a Lab” on page 25. 2. On the MTS Echo widget, click Settings. 3.
Create and Edit Lab Views Display a Lab View Each lab that you create will have its own unique URL. You can access the Lab View from a System View or by logging in to mtsecho.com From a System View 1. From the System view for a particular system, click the Info tab and then click the Lab link on the left side of the screen. 2. This will display the Lab View for the lab where the Test PC is assigned.
Create and Edit Lab Views Create a Lab Schematic View This view depicts the actual layout of your lab and allows you to quickly scan the screen and see high-level status information for your entire lab. The test equipment objects will turn green, red, or yellow to indicate the Test status of Run, Stopped, or Hold. Note Lab Views can be displayed on a large LCD monitor in the corner of your lab. 1.
Create and Edit Lab Views Create a Lab Overview Table You can set up a table view to monitor multiple tests at once. Through the property editor, you can add the test systems that you want to monitor, plus define what columns of information you want to view. The table updates in real-time and changes color to indicate status. 1. On your web browser, display a Lab View. 2. From the Toolbox, click-and-drag an Overview Table object onto one of the user-defined tabs. 3.
Create and Edit Lab Views 5. Select the column (signal values and other status) that will appear for each equipment row. A. In the Available Columns list, select a column that you want to add to each equipment row. B. Click Add. C. Repeat until all of the desired columns are added. 6. Arrange the order that the columns appear in the table. A. In the Columns list, select a column and use the up and down arrow buttons to rearrange the order. B. To delete a selected column, click the X button. 7.
Set System States Set System States The Echo widget allows you to set the state for each system to indicate its current state. Currently, you can set the state to: Open, Test, Maintenance, Calibration, or Unknown. This state is shown on the System Views and the Lab Views. For example, if you need to start up a new test, you can display your Lab View and quickly determine which systems are available and which systems are being used for a test or are down for maintenance.
Set System States View System State - System View The system state is shown as a System Status indicator in the System View. Whenever a system state is changed through the MTS Echo widget, it is immediately updated on the System View. View System State - Lab View The system state appears in the Lab View as an indicator in the Test Equipment control or as a cell in the Overview Table. Whenever a system state is changed through the MTS Echo widget, it is immediately updated on the Lab View.
Set User Access Permissions Set User Access Permissions There are many options available for configuring user-access permissions. Unique URLs By default, each System and Lab View has its own unique, long URL. For each view, only the people who have that exact URL can access it. Anyone without the unique URL will not be able to view the page. Password Protect System Views You can require a password for all the System Views connected to a particular PC. 1.
Set User Access Permissions Give Access to Specific Users You can also give specific users access to a particular Test PC. 1. On the widget, click Settings, and then click Accounts. The Accounts page lists all the users in your company that can have access to MTS Echo Software. 2. Select the check box next to each user that requires access. 3. Click Save to apply the changes. When logged in, only the selected users will be able to access the System views for all systems connected to the particular Test PC.
Set User Access Permissions Restrict Edit Capabilities to Specific Users System Views You may want to allow anyone with the URL to see the System View, but only allow specific logged-in users to edit the System View. 1. On the widget, click Settings and then click System Views. 2. Select the Only give selected users in the Accounts page edit capability check box. 3. Click Save. Now, when someone navigates to the System View URL, each Tab, the Toolbox, and the Properties settings includes a Lock icon.
Set User Access Permissions Lab Views 1. On the widget, click Settings and then click Labs. 2. Ensure the correct Lab is selected. 3. Select the Only give logged in users edit capability check box. 4. Click Save to apply the changes. This will restrict edit capabilities to only users who have been added to your company. All other users, or those who are not logged in, will not have edit capabilities in the Lab Views.
Set User Access Permissions Restrict View Access to Specific Users System Views You can restrict System View access to only specific users. Only the users who you give access to will be able to see the System Views. All other users, even if they are in your company, will not be able to see the view. 1. On the widget, click Settings, and then click System Views. 2. Select the Limit access to only the selected users in the Accounts page check box. 3.
Set User Access Permissions 2. From the drop-down list, select the lab that requires restricted access. 3. Select the Limit access to only logged in users from my company check box. 4. Click Save. When navigating to the URL, all users will now see a Login window if they are not yet logged in. The users must log in before they can see the views. Change Your Password and e-mail Address 1. From the navigation path in the upper right-hand corner of the System or Lab View, click your user name. 2.
Set User Access Permissions MTS Echo™ Software 39
Set User Access Permissions 40 MTS Echo™ Software
m MTS Systems Corporation 14000 Technology Drive Eden Prairie, Minnesota 55344-2290 USA Toll Free Phone: 800-328-2255 (within the U.S. or Canada) Phone: 952-937-4000 (outside the U.S. or Canada) Fax: 952-937-4515 E-mail: info@mts.com Internet: www.mts.