MODEL MP41B/MODEL MP41W Owners Manual 4545 E Baseline Rd Phoenix AZ 85040 Phone: (602)438-4545 Fax: (602)438-8692 21A2953
CONGRATULATIONS ...on your purchase of MTX multi-purpose loudspeakers. Your new loudspeakers represent years of thorough research and development in the most modern techniques of speaker design and engineering. Using advanced technology and high quality electronics and components, MTX loudspeakers assure you of exceptional performance and value. Your speakers were examined very carefully during and after manufacturing to assure all quality standards were met or exceeded.
SPECIFICATIONS Frequency Response INTRODUCTION 102-20kHz Impedance 8 Ohms Power Handling 40 Watts RMS Total Power Handling 160 Watts About the MP41 Multi Purpose Speaker The MTX MP41 may be the most comprehensive loudspeaker design ever conceived. The unparalleled application flexibility afforded by this design gives you the freedom to listen to music almost anywhere and in just about any possible configuration.
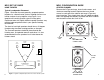
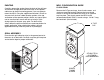
MP41 PARTS GUIDE 1 MP41 SET UP GUIDE 3 HOME THEATER 7 4 Left/Center/Right Front Speaker Height A B 6 One of the most Important parameters for the left/center/right/front speakers in a home theater system is height. Figure 2 shows the ideal arrangement of the speakers in relation to the viewing screen: all three speakers are aligned on the same horizontal plane.
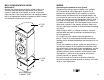
MP41 SET UP GUIDE MP41 CONFIGURATION GUIDE HOME THEATER CENTER CHANNEL Remove the B-Type end caps, brass thumb screws, and aluminum mounting bracket. Replace the brass thumb screws in each end of the cabinet and snap A-Type end caps into place. Then simply place the self adhesive cabinet feet in the appropriate locations to protect the MP41 cabinet and whatever surface that it will sit on.
MP41 CONFIGURATION GUIDE WIRING BOOKSHELF Remove the B-Style end caps, brass thumb screws, and aluminum mounting bracket. Replace the brass thumb screws in each end of the cabinet and snap A-Type end caps into place. Then simply place the self adhesive cabinet feet in the appropriate locations to protect the MP41 cabinet and whatever surface that it will sit on. Connecting the Speakers to Your System Though there are many sizes of speaker wire available.
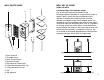
PAINTING MP41 CONFIGURATION GUIDE Carefully remove the spring clip on the back of the grill logo and remove the logo. Mask the baffle area of the speaker cabinet out to the grill mounting groove. If you are going to mount the MP41 using the supplied wall bracket it is best to also mask off the foam rubber bracket gaskets at the top and bottom of the speaker cabinet. Almost any type of paint can be used but best results will be had using a quick drying enamel or lacquer spray paint.
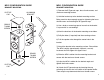
MP41 CONFIGURATION GUIDE MP41 CONFIGURATION GUIDE BRACKET MOUNTING BRACKET MOUNTING ALUMINUM BRACKET B-STYLE CAP 1) Remove the B-Type end caps, brass thumb screws, and aluminum mounting bracket. 2) Hold the bracket up to the desired mounting surface. Being careful to leave enough space for tightening the brass thumb screws and installing the B-Type end caps. BRASS THUMB SCREW 3) Use a level or measuring tape to insure that the bracket is square with its surroundings.