
Installation Manual


Mi.Node M Installation Manual
Mueller Systems – Proprietary
Page 5
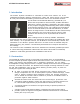
There are no customer serviceable parts inside the Mi.Node M housing.
Batteries
are not replaceable.
The electronic design utilizes the latest RF microchip technology which
increases
reliability when compared to older RF designs.
3. Installation
Mi.Node M modules support two mounting options, either mounting to a ½” PVC pipe
for pit set installations or affixed to the side of a building. Pit set installations
require no
drilled holes through the lid and are mounted beneath the polymer meter
box lid for security
and ease of installation on PVC pipe. Surface mounts are
easily accomplished with the
integral mounting brackets and two screws (not
included).
3.1 Pit Set Installation
Please note that meters or registers should never be carried while supported only
by
the AMR transmitter or wiring.
Tools Required: Length of ½” PVC pipe for pit depth, hammer
1.
PVC pipe should be cut to the proper length and installed deep
enough in the floor of
each meter box that subsequent flooding
will not allow the stake and Mi.Node M to change position. The
Mi.Node M includes
a ½” female PVC pipe fitting for easy pit
installation.
2.
For maximum radio performance, once installed, the top
of the
transmitter should be located approximately ½” inch
below the pit
lid in the center of the meter box to maximize RF
performance.
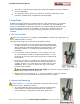
3.
Once the PVC stake is installed, the Mi.Node M should be
pushed down onto the stake by hand until the interference fit
engages securely. Two solid stops are molded into the PVC
Installation Slot in order to prevent the wire from being
pinched
when installed.
Never hammer Mi.Node M onto the stake since this may result in damage to
the electronic components inside the unit.
4.
Always mount the Mi.Node M in a vertical orientation, with the antenna
compartment on top and the battery compartment on the bottom.
3.2 Exterior Wall Mounting
Tools required: 1 – 1 1/2 inch galvanized, or stainless wood or sheet
metal screws (2 per), Phillips screwdriver
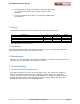
1.
The open ended wire from the device permits routing through
interior walls for external wall mounting when required or
direct mounting to exposed floor joists above grade level.