
Installation Instructions


2
For complete Smart Hydrant Solutions It is just as important
to confirm the location's signal strength prior to installing a
complete Smart Hydrant Solutions Super Centurion. However,
the Pumper Cap Assembly will already be installed on the
hydrant.
HYDRANTFLUSHING
•
Depending on the location of the hydrant, conditions of
piping, hydrant lateral, etc. prior to depressurization it is
recommended to flush the hydrant until water is clear
prior to the insertion of Smart Hydrant.
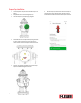
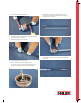
DE-PRESSURIZATION
OF HYDRANT
1.
Before removing any bolt(s) holding hydrant together,
shut off the appropriate gate or isolation valve(s) to isolate
hydrant from main water source.
2.
Loosen – BUT DO NOT REMOVE – one nozzle cap
two turns and check for water under pressure inside the
hydrant – bleed off any pressure, then remove the nozzle
cap completely.
3.
Open hydrant main valve completely.
4.
A continuous flow of water, no matter how slight, indicates
hydrant is not properly isolated from the main water
supply. This issue must be corrected before any hydrant
disassembly can proceed, i.e. the water to the hydrant MUST
be stopped.
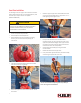
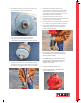
EQUIPMENT & TOOLS NEEDED:
PPE:
•
Hard hat
•
Safety shoes
•
Safety vest
•
Safety glasses
•
Work gloves
Tool:
•
A-367 brass sleeve
•
A-311 operating wrench
•
A-359 seat wrench*
•
1/4˝
hex-key
wrench
•
Cell Phone/App
•
Dianna 2100 Grease
•
Mueller hydrant lubricating oil
•
Thred Gard
®
Anti-Seize
*Review the Seat Wrench Operating Manual (F14285)
for more seat ring removal information.
2
DO NOT REMOVE ANY BOLT(S) HOLDING THE HYDRANT
TOGETHER BEFORE THE HYDRANT IS DE-PRESSURIZED.
DISASSEMBLY OF HYDRANT WITH PRESSURIZED
WATER ACTING AGAINST THE MAIN VALVE COULD RESULT
IN EJECTION OF HYDRANT PARTS AND DEBRIS,
HIGH-PRESSURE WATER STREAM, OR OTHER DANGEROUS
CONDITIONS THAT COULD CAUSE SERIOUS BODILY
INJURY OR DEATH.
FOLLOW ALL COMPANY POLICIES AND OSHA
REQUIREMENTS FOR LOCK-
O
U
T
/
T
AG
OUT TO ENSURE THE
HYDRANT IS DEPRESSURIZED BEFORE DISASSEMBLY AND
DOES NOT INADVERTENTLY GET REPRESSURIZED.
WARNING