
Installation Instructions


4
Smart Stem
Installation:
The following instructions apply to the installation of the Smart
Hydrant Solutions Retrofit Kit. For the complete hydrant, install
the same way as a Super Centurion Fire Hydrant
(Reference AWWA M17).
CAUTION
MUELLER CO. RECOMMENDS FOLLOWING AWWA M-17
MANUAL FOR INSTALLATION, FIELD TESTING AND
MAINTENANCE OF FIRE HYDRANTS.
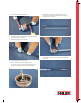
1.
Confirm the hydrant is depressurized.
2.
Place the hydrant in the closed position.
3.
Remove hold-down nut (Turn opposite of the opening
direction), anti-friction washer and operating nut
from bonnet.
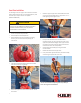
4.
Lubricate outside of brass sleeve and slide over threaded
stem end to prevent O-ring damage.
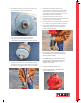
5.
Remove bolts (8) from bonnet and remove bonnet. remove
brass sleeve.
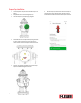
6.
Remove O-ring from upper barrel. Slide slotted end of A-359
over top of stem and engage the pin in upper stem. Turn ˝T˝
head tightening wrench against stem*.
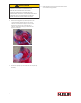
7.
Pull up on seat wrench to be sure the main valve is
completely closed. [The main valve must be closed, or the
upper valve plate will be damaged]. Lower support arm onto
top flange of the upper barrel and tighten thumb screw to
hold the main valve in the closed position.
8.
Unfasten main valve assembly by turning seat wrench
counterclockwise.
9.
Remove the seat wrench from upper stem.
10.
Pull up and remove upper & lower stem, main valve assembly
and seat ring from hydrant barrel as a unit.
*Review the Seat Wrench Operating Manual (F14285) for
more seat ring removal information.