
Installation Instructions


8
Activate
Smart
Hydrant
on
Sentryx
1.
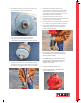
With a minimum of 20 psi pressure, the sensor will
come online. At this point the new stem is
communicating to the new Pump Cap Assembly
using the radio internal to the Hydrant (2.4Ghz).
2.
Open the Smart Hydrant App. Click on Activate and
follow steps on the screen.
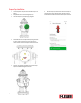
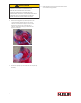
3.
Hold the phone near the location in the picture below.
4.
The "success" / confirmation email and/or text may take up
to 5 minutes to arrive. If feedback does not come, complete
the activation steps again. If there is no response 5 minutes
after the second attempt, confirm:
a) Hydrant main valve is CLOSED
b) Gate valve is Open
c) Water has been drained below the antenna near the top
of the lower stem (Necessary for the stem to
communicate with the Pumper Cap Assembly)
d) System water pressure is 20 psi or greater.
e) Retry Step 3.
If "success" feedback is not received within 5 minutes,
contact Customer Service. (Once installation has been
completed, auto-locating of hydrant using GPS will
automatically begin. Device location can take up to 72 hours
to complete.)
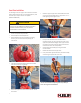
5.
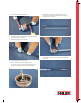
Unscrew one hose nozzle cap slightly to bleed air.
Open hydrant fully.
6.
Tighten hose nozzle cap when water starts flowing and
check all flange connections for leaks.
7.
Turn operating nut in closing direction to make sure main
valve is fully closed, then turn in opening direction
approximately ¼” turn to relieve tension on operating
mechanism. Remove hose cap to aid in the draining of the
hydrant. (Draining hydrants only). After hydrant is drained,
replace, and tighten hose cap.
8.
At this point the Smart Hydrant has been successfully installed.
The Smart Hydrant will take pressure and temperature
readings and transmit them over a cellular network. Please
adjust settings as needed on the Sentryx web interface.
CAUTION
DO NOT EXCEED 290PSIG ON PRESSURE SENSOR. IN
THE EVENT THAT THE SYSTEM PRESSURE WERE TO
EXCEED 290PSIG, ACCORDING TO THE MANUFACTURER’S
SPECIFICATION, THE SENSOR MAY ENDURE OVERPRESSURES
UP TO 420PSIG; HOWEVER, THE SENSOR WILL ONLY RECORD
PRESSURES UP TO 290PSIG.