
Installation Instructions


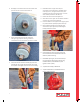


Table Of Contents

6
18.
Bend edges of lock washer over one flat on the lower valve
plate and one flat on the brass lower valve nut.
19.
Inspect and lubricate with grease top and bottom
seat ring O-rings (replace if necessary). Mueller Co.
recommends the use of Thred Gard
®
Anti-Seize on threads.
20.
Lower main valve into the barrel. Carefully align main valve
assembly with seat ring then thread clockwise into the base
of the hydrant. Hand tighten at first to avoid cross threading.
21.
Reassemble wrench to upper stem. Pull up on
seat wrench to e
nsure main valve is completely closed,
lower support arm, and tighten thumb screw, while
maintaining main valve in the closed position. Turn main
valve assembly clockwise to 100-190 ft-lbs.
22.
Remove the seat wrench from the upper stem.
23.
Attach brass sleeve to upper stem and lubricate outside to
protect O-ring seals from thread damage.
24.
Check the condition of the upper barrel O-ring (Flat gasket
for pre-1997 Centurion hydrants). Replace if necessary.
25.
Place the bonnet assembly on top of the upper stem,
slide it down to top of upper barrel, and hand tighten
bolts (8). Remove brass sleeve.
26.
Check condition of wiper ring and O-ring seals (on
the outer diameter and inner diameter of the hold
down nut) and bonnet O-ring.
27.
Reassemble operating nut, anti-friction washer (on
top thrust collar of operating nut), bonnet O-ring,
hold down washer, and hold down nut (hand-
tighten to secure in place).
28.
Torque bonnet bolts (8) to 40-80 ft-lbs.
29.
Torque the hold-down nut to 200-300 ft-lbs with
the A-311 hydrant wrench.