
Classic User Manual


Classic owner’s manual Rev H 2056
35 | P a g e 1 0 - 0 0 1 - 1 R E V : H
Note: If you plan to use the Local App to set the time and not the Classics Display “Time Sync” in the
“Tweaks” menu must be disabled to prevent the MNGP (display) from over writing what the Local App
does.
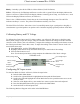
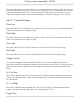
Configuring Auxiliary Input/Output
The Classic includes two auxiliary ports which can be configured to become inputs or outputs. These aux
ports can be used as a secondary power supply to be used for accessories such as vent-fan, Diversion
loads, Logic inputs, WBjr or the Clipper for example. The Aux output is limited to 200ma or less per
channel. Here is an explanation of how they work.
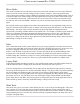
An internal, re-settable Positive Temperature Co-efficient (PTC) fuse protects the AUX internal
components from over current or a short circuit.
AUX 1 consists of either RELAY or LOGIC operation, depending on the user selection function.
AUX 2 could be set to become an INPUT or OUTPUT. One at a time this port could be reading
the state of a device connected and takes an action from there.
To configure the Classic's Aux ports:
Push the Main Menu button
Scroll left or right to highlight “AUX” and push the Enter button.
Scroll left or right to highlight the relay you wish to change. Push the right soft key labeled
“SETUP”.
Scroll up or down to change the function of the relay. Select the right soft key to set the parameters
of the function. When finished push the ENTER button to save the changes.
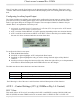
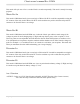
The Main Aux Screen shows both Aux1 and Aux2 functions
Off -
Places output to Low state (0 Volts)
Auto -
Selects the assigned function to the Aux output or input
On -
Sets output for Low state (12 Volts or Relay On)
Table 4
The Following is a list of the Aux 1 and 2 functions with brief descriptions of their function.
AUX 1 - Control Settings (12V @ 200Ma or Dry 1A Contact)
SOC %Low
This mode will set AUX1 to 0.0V according to the LOW % and HIGH % settings. HOLD (LOW) and
DELAY (HIGH) activation TIMES can be set in seconds. SOC %=HIGH=0V SOC %=LOW=12V
Screenshot 2