
Operating instructions


PROGRAMMABLE
FEATURES
Your Versa-Link ATX-300 can be used in a
wide variety of applications by changing the
programmable features.
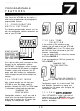
7.1 CONFIGURATION
SWITCH SETTINGS
The following programmable features are set
with the configuration switches located on the
back of your ATX-300:
AUTO
SEMI
STBY
START-UP MODE
--Wll
PROTECTED HOOK FLASH
~W$ONAL~J~
DELAY1
1
1
FAX TONE DETECTION
Use a pen or other small instrument to make
changes to the configuration switches.
IMPORTANT: Configuration switch changes
are not activated until AC power is re-applied.
Therefore, unplug and re-connect the AC
power cord after making any configuration
switch changes to enter these settings into
memory.
7.1
.1
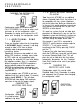
START-UP MODE
After a power outage you will want your
ATX-300 to enter the proper mode of
operation. Normally the AUTO or SEMI mode
is selected as the desired start-up mode.
CHANGING THE
START-UP MODE
Configuration switches 1 and 2 are used to
select your start-up mode. Remember to
unplug and re-connect the AC power after
changing the configuration switch.
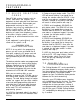
7.1.2 FAX TONE
SELECTION
If you connect a FAX machine to your
network, you will need to tell your ATX-300
which
DEVICE
port it is on. This allows auto-
dial FAX calls to be transferred to your FAX
machine automatically.
If you are adding FAX to a voice line, connect
the FAX to
DEVICE 2.
If you are expanding a FAX line, connect the
FAX to
DEVICE 1.
CHANGING THE
FAX TONE SELECTION
L-
- ON (FAX ON DEVICE 2)
OFF (NO FAX OR FAX ON DEVICE 1)
Configuration switch 6 is used to select FAX
tone detection. Remember to unplug and
re-connect the AC power after changing the
configuration switch.
7.1.3 CALL
OPTI-MIZER™
CALL OPTI-MIZER is useful if you want all
incoming calls to go to
DEVICE 2
when your
off ice is unattended. See section 4.2.3 for a
detailed description.
VERSA-LINK
ATX-300
19