® FaxFinder V.
FaxFinder® Administrator User Guide S000405E, Version E Models: FF120, FF220, FF420, and FF820 Copyright © 2008, by Multi-Tech Systems, Inc. This publication may not be reproduced, in whole or in part, without prior expressed written permission from Multi-Tech Systems, Inc. All rights reserved. Multi-Tech Systems, Inc. makes no representations or warranties with respect to the contents hereof and specifically disclaims any implied warranties of merchantability or fitness for any particular purpose.
CONTENTS CHAPTER 1 – PRODUCT DESCRIPTION & SPECIFICATIONS ............................................................... 4 Product Description ................................................................................................................................... 4 Safety Warnings ........................................................................................................................................ 6 Technical Specifications ......................................................
Chapter 1 – Product Description & Specifications Product Description This manual describes four Multi-Tech V.34 fax servers: the FF120 1-Port FaxFinder unit, the FF220 2Port FaxFinder unit, the FF420 4-Port FaxFinder unit, and the FF820 8-Port FaxFinder unit. All four of these units are complete, economical, easy-to-use network fax servers. With any of these units, you can receive faxes as emails and send faxes from any application that can print.
Chapter 1: Product Description and Specifications The FF420 and FF820 are both housed in chassis of the same size and shape. Similarly, the FF120 and FF220 are both housed in a chassis of the same size and shape, a chassis smaller and differently shaped than that for the FF420/820.
Chapter 1: Product Description and Specifications Safety Warnings Telecom 1. Never install telephone wiring during a lightning storm. 2. This product must be disconnected from power source and telephone network interface when servicing. 3. This product is to be used with UL and cUL listed computers. 4. Never touch uninsulated telephone wires or terminals unless the telephone line has been disconnected at the network interface. 5. Use caution when installing or modifying telephone lines. 6.
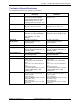
Chapter 1: Product Description and Specifications Technical Specifications The FaxFinder models meet the following specifications: FF120/220 RJ11 Line Jacks (1 or 2), Console Serial Port for RJ45-to-RS232 configuration/debug connection, Ethernet RJ48 connector, and Locking Screw on the Power Jack. FF420/820 RJ11-Line Jacks (4 or 8), RJ45 Ethernet Jack 6.4” W x 6.0” L x 1.2” H 17.3” W x 1.7” H x 8.4” L 16.3 cm x 15.2 cm x 3.0 cm 43.9 cm x 4.3 cm x 21.3 cm Weight 20.5 oz. (750 g) 7.4 lbs. (3.
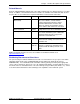
Chapter 1: Product Description and Specifications Related Manuals Each FF-120/220/420/820 FaxFinder unit comes with 4 manuals that serve different purposes (see table below). In addition, several FaxFinder Reference Guides are available on the Multi-Tech web site and they describe use of a FaxFinder in conjunction with PBXs of various brands and models.
Chapter 2: Installation Chapter 2 – Installation Introduction This chapter shows you how to set up your Multi-Tech Model FF120/220/420/820 FaxFinder. The setup process includes both cabling of the FaxFinder unit and configuration of the FaxFinder server software. The FaxFinder server software resides on the FaxFinder unit and does not need to be installed.
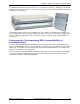
Chapter 2: Installation Mechanical Mounting The FF120/220 FaxFinder comes with chassis screw holes to facilitate attaching it to a flat surface. The FF420/820 are table-top units that can also be rack-mounted. Rack-mounting hardware is included. Multi-Tech Systems, Inc.
Chapter 2: Installation Quick Hookup FF120/220 FaxFinder FF-120/220 Hookup Cabling to computer running terminal software. Cabling to telco POTS lines For debugging purposes only. or PBX station ports. Connector at FaxFinder: RJ-45. Connector at computer: DB-9. LINE 2 LINE 1 Power Cable Receptacle CONSOLE LAN 1 RESET Reset Switch Cabling to your IP network. RJ-45 connector. Line 2 appears on FF220 only.
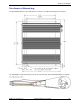
Chapter 2: Installation Earth Grounding for FF420/820 Product Ground Screw Ground Wire: Size 18AWG or thicker FF-420/820 Unit Grounding connectors must be secured permanently to product ground screw and earth ground screw. Earth Ground Screw: Connected to Permanent Earth Ground of Building’s Electrical System GND Multi-Tech Systems, Inc.
Chapter 2: Installation FaxFinder Operating Modes The FaxFinder Fax Server provides two-way fax service to PC client users on an Ethernet network. For outgoing service, users send faxes by using the Print command of any application program and selecting the FaxFinder as the target Printer. For incoming fax service, the FaxFinder converts the incoming faxes into graphic files that are sent as email attachments to fax recipients on the Ethernet network.
Chapter 2: Installation Installation Overview Part A: Cabling – Connecting the FaxFinder to Power, Phone Lines, and Ethernet Summary: Place the FaxFinder in a convenient location, and then connect it to your AC power outlet and Ethernet. 1. Connect FaxFinder to AC Outlet. A. FF120/220 Power. Plug the DC power transformer into a power outlet or power strip. Secure the other end to the Power Receptacle on your FF120/220 FaxFinder. Secure the power cord to the connector with the lock nut.
Chapter 2: Installation 2. Verify Powering. Status LED Status Power FF-120/220 Line 1 TD RD TR CD LAN 1 LNK 100 CF Line 2 TD RD TR CD Power LED Status LED R Power Status Ethernet LNK IOO Modem 1 TD Modem 2 RD CD TD RD CD Modem 3 TD RD CD Modem 4 TD RD CD Modem 5 TD RD CD Modem 6 TD RD CD Modem 7 TD RD CD Modem 8 TD RD CD FF-420/820 Power LED After power is applied, the Power LED comes on immediately but there is a 4-second delay before the Status LED comes on.
Chapter 2: Installation Part B: Connecting to Telephony Service The FaxFinder can either be connected to a PBX (for use in Automated Routing Mode) or to POTS lines (for use in Manual Routing Mode). Connection for Automated Routing Mode Plug one end of the phone cable into the FaxFinder’s LINE jack and the other into an available Station Port on the PBX. An RJ11-to-RJ11 cable is included with your FaxFinder.
Chapter 2: Installation Part C: Installing the Software There are two programs to install for configuring and using the FaxFinder unit. The Device Manager software is for the Administrator and primarily deals with the setup and logging functionality. The second is the Client software that is for general use of the FaxFinder, but it needs to be associated with a FaxFinder unit for proper operation. Installing the Device Manager software A.
Chapter 2: Installation C. Select the location where you would like the software to install. Click Next. D. The software is ready to be installed. Click Install. Multi-Tech Systems, Inc.
Chapter 2: Installation E. When the installation is completed, click Finish. Installation of the Device Manger software is complete. You may now move ahead and set up your FaxFinder unit using the Device Manager software, or continue with the Client software installation below. Multi-Tech Systems, Inc.
Chapter 2: Installation Installing the Client software A. Insert the FaxFinder Product CD into the CD-ROM drive of the client PC. If the CD does not auto start, use Windows Explorer to navigate to your CD drive and launch the installation program by double-clicking on cd_start.exe file on the CD. From the menu presented, click the Software button. From the new screen presented, select the Client Software button to install the Multi-Tech FaxFinder Client software for using the FaxFinder unit.
Chapter 2: Installation B. At the Welcome screen, click Next. C. At the Select Installation Folder screen, browse to the desired file location for the FaxFinder client software. In most cases, the default file location is recommended. Clicking on the Disk Cost button will show you the size of the software being installed as well as the available disk space of the target drive. When the destination location is correct, click Next. Multi-Tech Systems, Inc.
Chapter 2: Installation D. At the Confirm Installation screen, click Next to begin the installation.. E. A transient screen will appear while files are being copied. F. The FaxFinder Client software can place a shortcut in the Startup directory so that the client software will start automatically when the PC is booted. Multi-Tech Systems, Inc.
Chapter 2: Installation G. You will be asked if you want the Client software to automatically launch when the installation is complete. Select your preference H. You will be asked whether or not you want to associate .tif and .cpg files with the Multi-Tech Tiff Viewer. Click Yes (unless you prefer to use a different viewer program). If a Question screen appears asking "Warning - the extension .
Chapter 2: Installation Client Install on Terminal Service The process for installing the FaxFinder Client software in Terminal Services is as follows: • • • • Run the FaxFinder Client for Terminal Services installer as an administrator on the terminal server. Once the installation is complete, a shortcut to the FaxFinder Client is created in the Startup section of the start menu for All Users (C:\Documents and Settings\All Users\Start Menu\Programs\Startup).
Chapter 2: Installation FaxFinder Client Terminal Services MSI Installer The FaxFinder Client Terminal Services Installer is also available as an MSI package. • Run the FaxFinder Client for Terminal Services installer as an administrator on the terminal server. Once the installation is complete, a shortcut to the FaxFinder Client is created in the Startup section of the start menu for All Users (C:\Documents and Settings\All Users\Start Menu\Programs\Startup).
Chapter 2: Installation Part D: Configuring the FaxFinder Server Summary of Configuration Data The table below lists the information you will need to fill in on the various FaxFinder Server screen. Gathering this information in advance will expedite the FaxFinder configuration process.
Chapter 2: Installation Manual Routing Mode: Mapping of FF Ports to Phone Numbers FaxFinder Port Phone Number Port 1 Port 2 Port 3 Port 4 Port 5 Port 6 Port 7 Port 8 Automated Routing Mode: PBX Phone Number Ranges Start of Range Multi-Tech Systems, Inc.
Chapter 2: Installation 1. Setting Admin PC to Startup IP Address There are two ways that you can set the startup IP parameters. You can either • do steps 1A and 1B, then do the steps for your operating system from the table, and then skip to 2A, -or• do the “Alternative Method ...” using the Device Manager software and then go on to step 2A. A. Connect a pc to your network. B. Set the pc IP address to 192.168.2.x subnet (using any address except 192.168.2.1). Windows XP/2003 a.
Chapter 2: Installation Double-click on the FaxFinder in the Auto Discovery Monitor dialog box and change the IP Addresses. If you know the correct User ID and Password, you can change the IP Address, Subnet Mask or Gateway IP. Select the field you wish to change, enter the User ID and Password then click Update. If you click the Reset UID/PWD button, the telnet User ID and Password of the FaxFinder Server will be reset to factory defaults (admin/admin).
Chapter 2: Installation 2. Logging In A. Bring up a Web browser on your pc. At the browser’s address line, type the IP address of the FaxFinder: either type http://192.168.2.1 and press Enter, or type the IP address you set using the Auto Discovery dialog box (the “Alternative Method...” above) and press Enter. B. The Login screen will appear. At this point you can be assured that the FaxFinder is connected to the network.
Chapter 2: Installation E. Click the Login button. The Web Management Home screen will appear. From this screen, you can access all of the FaxFinder Server software screens. 3. Setting FaxFinder IP Addresses A. In the FaxFinder Administration screen, go to the IP Configuration fields. B. Fill in the IP information that applies to your FF120/220/420/820 FaxFinder Server unit. The fields for “IP Address,” “Subnet Mask,” “Default Gateway” and “Name Server” are required.
Chapter 2: Installation 5. Log In After Reset Having reset the IP address of the administrator’s PC, you must log into the FaxFinder Server software again. Go to the Login screen, enter admin as User Name and admin as Password. 6. Setting Administrative Functions Go to the FaxFinder Phone Book screen. The first several rows of the Phone Book list are for special purposes. The first row is for the “Administrator” function.
Chapter 2: Installation At this point, the FaxFinder ‘home’ page is displayed. Click on Phone Book to see the updated values. The next step (B1) will depend on the routing mode (automated or manual) used. B1.
Chapter 2: Installation B2. “Pots Line n” Rows: Finishing Click on Update in each of the “Pots Line n” rows after editing. The message “Success: POTS Line n was updated” will appear above the Phone Book list. C. Personal Email Address for Administrator (optional) i. Just below the last “Pots Line n” rows of the Phone Book screen, enter the name and user ID that the FaxFinder Administrator can use to send and receive (Automated Routing Mode only) personal faxes.
Chapter 2: Installation 7. Setting up the Mail Server A. In the FaxFinder Administration screen, go to the SMTP Configuration fields. B. Fill in the network IP address of your mail server. C. If needed, fill in SMTP Port values if different than 25 (which is the default value). D. If needed by the SMTP Server, fill in the SMTP Server User ID and SMTP Password (which you will need to retype to confirm). E.
Chapter 2: Installation D. Use the Routing field to set the FaxFinder’s operating mode. For Manual Routing Mode, set the Routing field to “Pots Line.” For Automated Routing Mode, set the Routing field to “DTMF Digits,” or, if a mode code for your PBX is listed in the drop-down box, select that mode code. E. Dial Prefix (or ‘access digit’).
Chapter 2: Installation J. Smart Dial. When Smart Dial mode is ON, the FaxFinder will look for a dial tone before dialing. If, under normal circumstances, no dial tone is presented to the FaxFinder, then set Smart Dial to OFF. When Smart Dial is OFF, the FaxFinder modem will seize the phone line and dial after a 3-second pause whether a dial tone is present or not. Hint: If ‘no dial tone’ messages appear consistently, set Smart Dial to OFF. K. Fax Direction.
Chapter 2: Installation 9. Changing Administrator Server Password A. In the Password Administration screen, enter a new Password for the FaxFinder Administrator (something other than “admin”). This password is to be used in that person’s capacity as administrator. Then re-enter the password in the “Confirm Password” field. Passwords can be as short as 1 character, as long as 40 characters, and are case-sensitive. Notes: 1. Changes to any “User ID” must be done in the Phone Book screen. 2.
Chapter 2: Installation 11. Sending Test Fax from Fax Machine to FaxFinder A. Using a conventional fax machine, send a fax to the fax number established for the FaxFinder Administrator. B. Verify that the fax message sent reaches the email inbox of the administrator. Watch the Current Status: System portion of the FaxFinder Server Administration screen to see when or if the FaxFinder sends the email.
Chapter 2: Installation C. Verify also that you can open the fax in a PDF viewer program on your computer. The PDF viewer could be any commercial viewer or any open source PDF viewer. You can also choose to have your fax messages delivered as TIF files. The TIFF viewer program you use could be either the MultiTech Tiff Viewer or a graphic file viewer included with or installed in your PC. (The Multi-Tech Tiff viewer is included on the Product CD and installed with other client programs.
Chapter 2: Installation 12. Adding Client-Users to the Phone Book A. In the Phone Book screen just below the entries for the FaxFinder administrator, make entries for the other persons in your office who will send and receive faxes through the FaxFinder. For each such FaxFinder client/user, enter the name, user ID, and email address in the appropriate fields. In Automated Routing Mode, enter, in the Ext column, the PBX extension assigned to each client user.
Chapter 3 – FaxFinder Server Software Screens Introduction In this chapter, we present the screens of the FaxFinder server software. We describe each field in each screen and some of the command buttons. (We do not describe command buttons that have functions that would be readily understood by users of Windows software. Examples of such self-evident functions include buttons like “OK,” “Cancel,” “Next,” etc.) Home Screen The FaxFinder Home screen offers access to all other FaxFinder software screens.
Chapter 3: FaxFinder Server Software Screens Login Screen The FaxFinder Server Login screen is the primary security device for the Server software. The FaxFinder has a default setting that allows use of “admin” as both the User Name and the Password at initial startup. After you have begun configuring your FaxFinder fax server system, you should change the password in the Password Administration screen described later in this chapter. Multi-Tech Systems, Inc.
Chapter 3: FaxFinder Server Software Screens Fax Log Screen Sorting Function. You can sort the entries of this screen by doing a mouse-over on the name/identifier of any column that has variable entries. After you click on the column name, the entries will be re-sorted by that column’s parameter in ascending alphabetical or numerical order.
Chapter 3: FaxFinder Server Software Screens Fax Details Screen The Fax Details screen is a secondary screen accessible from the Fax Log screen. It presents detailed technical information about a fax selected in the Fax Log screen.
Chapter 3: FaxFinder Server Software Screens Field Off-Hook Time Width Data Compression Modem Port Status Elapsed time Email Attachments Connect Time Height: Error Correction: Fax Details Screen Field Definitions Values Description mm/dd/yyyy The time at which the modem went off-hook for hh:mm:ss the fax transmission. numeric (in pixels) Width of fax. This is typically 1728 pixels.
Chapter 3: FaxFinder Server Software Screens Current Status Screen Current Status Screen Field Definitions Field Name Values System fields group Current Time weekday, mo, dd hh:mm:ss yyyy Pending Msgs numeric Email To: Subject: Time Server Status Multi-Tech Systems, Inc. a@b.c alphanumeric Initializing, No Errors, SNTP Error: type Description The present time of day. Emails that have arrived in the FaxFinder Server that have not yet been conveyed to clients.
Chapter 3: FaxFinder Server Software Screens Current Status Screen Field Definitions (cont’d) Field Name Values Description System fields group Operation time since last reboot. Up Time x days yy hours: zz minutes Email Status No Errors, Indicates whether the FaxFinder’s email Bad MailServer transmissions, both faxes and administrative Address, messages, are proceeding with or without errors.
Chapter 3: FaxFinder Server Software Screens The “Initialize Modem” and “Make Busy” button commands can be legitimately invoked only by a user with administrative rights. If a non-administrator clicks on either of these buttons, that party will be logged out of the FaxFinder Server program and the following error message will appear. Logout Option When you click on Logout in the FaxFinder Home screen, you will be logged out of the FaxFinder Server software.
Chapter 3: FaxFinder Server Software Screens Administration Screen Multi-Tech Systems, Inc.
Chapter 3: FaxFinder Server Software Screens Administration Screen Field Definitions Field Name Values Description IP Configuration Fields IP Address n.n.n.n for n = 0-255 The IP address of the fax server. Subnet Mask n.n.n.n for n = 0-255 This subnet mask is the subnet for the network to which the fax server is connected.
Chapter 3: FaxFinder Server Software Screens Administration Screen Field Definitions (continued) Field Name Values Description SMTP Configuration Fields SMTP Server User ID alphanumeric Identifier used by FaxFinder when interfacing with mail server. FaxFinder uses mail server to send call reports to administrator. Some email servers require authentication when accessed for this purpose. To satisfy this authentication requirement (where needed), a User ID must be specified for the FaxFinder unit.
Chapter 3: FaxFinder Server Software Screens Administration Screen Field Definitions (continued) Field Name Values Description Time Configuration Fields Time Server URL A real time clock has been enabled on the FaxFinder Server which can eliminate the need to use an external time server to get the Time of Day. To set the real time clock: Set the current time in 24-hour format in the Time (24 hr) hh:mm:ss field. Set the current date in the Date mm/dd/yy field. Select none for the Time Server.
Chapter 3: FaxFinder Server Software Screens Phone Book Screen The Phone Book screen maps the PBX extension phone numbers of clients to their respective email inbox addresses at which they will receive incoming faxes as viewable drawing files. Sorting Function. You can sort the entries of this screen by clicking on the column name; the entries will be re-sorted by that column’s parameter in ascending alphabetical or numerical order.
Chapter 3: FaxFinder Server Software Screens Phone Book Screen Field Definitions (cont’d) Field Name Pots Line n rows Values Description Each row in a group of rows immediately following the Administrator row corresponds to one of the FaxFinder’s modems. There is one such row for the FF120. There are two such rows for the FF220, four for the FF420, and eight for the FF820. These rows function differently in Manual Routing Mode than in Automated Routing Mode.
Chapter 3: FaxFinder Server Software Screens Modem Configuration Screen Modem Configuration Screen Field Definitions Values Description Field Name Modem Country Code POTS Modem #, All country names Answer On number of rings Routing Pots Line, DTMF Digits, Alcatel Mode Code, Siemens HiCom Mode Code, Avaya Mode Code, NEC Aspire Modem Code, Samsung Modem Code, User Defined Multi-Tech Systems, Inc. This field allows you to select one or all modems to change configuration.
Chapter 3: FaxFinder Server Software Screens Field Name Routing Definition Modem Configuration Screen Field Definitions (cont’d) Values Description Key link, Many PBXs send a series of DTMF Tones to the Server Description link when a call is being established. The Routing Definition -andfield defines where the Extentsion number is in the series Hide Key, of tones. The Extension number is used by the FaxFinder Hide Description Server to route the received fax to the appropriate email address.
Chapter 3: FaxFinder Server Software Screens “Modem Configuration: POTS Modem” Screen Field Definitions (cont’d) Field Name Values Description Dial Prefix Numeric string, When the FaxFinder is used on a phone line in a 5 characters, max. PBX or key system, this is the digit that must be Use of a comma is dialed to access an outside line (that is, a line on optional. The comma the PSTN rather than extensions of the PBX or denotes a brief delay to key telephone system).
Chapter 3: FaxFinder Server Software Screens “Modem Configuration: POTS Modem” Screen Field Definitions (cont’d) Field Name Values Description Error Correction on, off By setting Error Correction to "on," you are requesting that faxes be sent in an error-free condition, which can be achieved only if the remote fax machine with which you are communicating also supports Error Correction and has this feature enabled. The Error Correction feature slows down fax transmissions.
Chapter 3: FaxFinder Server Software Screens Password Administration Screen Use the Password Administration screen to assign password to client users in the FaxFinder system. In this screen, you specify each client’s name, user ID, and password. You must click “Update” to make changes for any client permanent. The User ID, Password, and Confirm Password fields are casesensitive. After making changes to a single line, make sure to click the update button as further changes will be discarded.
Chapter 3: FaxFinder Server Software Screens Shared Resources Screen Inbound Fax Backup gives you the ability to add a Share location to copy received faxes. This feature allows all incoming faxes to be copied to a share location before they are emailed. The Domain field is set to the domain of the user, if the user ID and password are a domain user account. Select Shared Resources from the Main Menu, to show the Inbound Fax Backup screen.
Chapter 4 – FaxFinder Client Software Configuration Establishing Client User’s ID in System When the FaxFinder Fax Client Software starts, you will be prompted to enter your own client user information in the Options | Identification screen. You will not be able to access or use the FaxFinder client until this step has been done.
Chapter 4: FaxFinder Client Software Configuration Associating Client with Specific FaxFinder Unit(s) Sometimes more than one FaxFinder unit is connected to an Ethernet network. In some cases, certain client users might be assigned to some FaxFinder units and not assigned to others. After the FaxFinder client software is installed, you must associate it with one or more FaxFinder units.
Chapter 4: FaxFinder Client Software Configuration NOTE: The Username entered here must match the entry used in the “User ID” field of the Phone Book screen in the FaxFinder Server Software. The password entered here must match the password entered for this client in the Password Administration screen in the FaxFinder Server software. Click OK. 4. A new FaxFinder entry should appear on the “Device Status” tab of the FaxFinder Fax Client Software screen.
Chapter 4: FaxFinder Client Software Configuration Disassociating the Client from a Specific FaxFinder Unit In this procedure, you will un-do the procedure “Associating Client with a Specific FaxFinder Unit.” This situation might occur when changes are being made in the network faxing system. In any event, this procedure severs the tie between your PC and a specific FaxFinder unit so that you will no longer be connected to it for sending fax messages.
Chapter 4: FaxFinder Client Software Configuration Disabling and Re-Enabling a Client’s FaxFinder Service Disabling a FaxFinder’s service to a specific client is simply a temporary version of disassociating the client from that FaxFinder. When a client has disabled the FaxFinder’s service to that client, the client/user cannot send faxes through the FaxFinder.
Chapter 4: FaxFinder Client Software Configuration FaxFinder Fax Client Software Menu Command Definitions FaxFinder Fax Client Software Menu Command Definitions Command Name Values Description File menu commands Send Fax -- Pause Scheduler -- Multi-Tech Systems, Inc. Brings up the FaxFinder Send Fax screen, the first step in transmitting a fax message via the FaxFinder system.
Chapter 4: FaxFinder Client Software Configuration The FaxFinder Send Fax Screen The FaxFinder Send Fax screen appears (a) when you ‘print to FaxFinder’ from any application program, or (b) when you select the Send Fax command from the File menu of the FaxFinder Fax Client Software screen. FaxFinder Send Fax Screen Definitions Command/Field Name Values Recipients pane Name (column) alphanumeric Fax Number (column) Multi-Tech Systems, Inc. numeric Description Party to whom the fax will be sent.
Chapter 4: FaxFinder Client Software Configuration FaxFinder Send Fax Screen Definitions (cont’d) Command/Field Name Values Description Recipients pane Brings up the Enter a Fax Recipient window. At this window, you enter the name and fax number of the party to whom the fax will be sent. After you click OK in this window, the FaxFinder-Add Recipient window will appear and prompt you as to whether or not you want to add this recipient to the Address Book.
Chapter 4: FaxFinder Client Software Configuration FaxFinder Send Fax Screen Definitions (cont’d) Command/Field Name Values Cover Page pane Use Cover Page Cover Page Style View/Edit (button) Y/N BoldComplete, BoldComplete2, FaxComplete, LongComment, PlainComplete, PlainShort -- Subject alphanumeric Cover Page Notes alphanumeric Send Fax (button) Preview Fax (button) --- Cancel (button) -- Multi-Tech Systems, Inc. Description Check this checkbox to include a cover page with your fax.
Chapter 4: FaxFinder Client Software Configuration FaxFinder Fax Client Software Menu Command Definitions Option tab Description Identification tab. The Fax Header Local ID can be used to set the ID of the Sending Modem when Sending a Fax using the FaxFinder Client. The Modem ID string is displayed in the header information of a sent fax. For many Fax machines, it is the phone number of the sending fax machine.
Chapter 4: FaxFinder Client Software Configuration FaxFinder Fax Client Software Menu Command Definitions (cont’d) Command Name Values Description Edit menu commands Add Fax Server -Brings up the Add Device Address screen so that a FaxFinder or HylaFax server on the network can be associated with the client. A client can be served by more than one FaxFinder unit. See the procedure “Associating Client with Specific FaxFinder Unit(s)” earlier in this chapter.
Chapter 4: FaxFinder Client Software Configuration FaxFinder Fax Client Software Menu Command Definitions (cont’d) Field Name Values Description Device Status tab Device (column) alphanumeric Shows status of FaxFinder or HylaFAX server units with which the client is associated. Also shows status of the “Print Capture” function and the “Outlook Synchronizer” function.
Chapter 4: FaxFinder Client Software Configuration FaxFinder Fax Client Software Menu Command Definitions (cont’d) Command Name Description Device Status tab (cont’d) Commands accessed by Right-Clicking on a selected FaxFinder delete Dis-associates the client from the selected FaxFinder or HylaFAX unit so that the client can no longer send faxes through that FaxFinder unit. (The FaxFinder Server’s IP address is removed from the Device Status list of the FaxFinder Client Software.
Chapter 4: FaxFinder Client Software Configuration FaxFinder Fax Client Software Menu Command Definitions (cont’d) Field Name Values Description Fax Ports tab Device (column) alphanumeric Shows FaxFinder units with which the client is associated. Port (column) ttys0 for FF120, The fax modem (within) the FaxFinder server ttys0, ttys1 unit, the status of which is being tracked.
Chapter 4: FaxFinder Client Software Configuration FaxFinder Fax Client Software Menu Command Definitions (cont’d) Field/Command Name Values Description Fax Log tab Recipient (column) Identifies recipient of each outgoing fax. Time/Date Sent (column) day, date, time, zone Indicates when each outgoing fax was sent. in the form ddd mmm nn hh:mm:ss zzzzzz Pages (column) Status (column) integer Shows the number of pages in each fax.
Chapter 4: FaxFinder Client Software Configuration FaxFinder Fax Client Software Menu Command Definitions (cont’d) Field/Command Name Values Description Address Book tab Name (column) alphanumeric Shows the name of the the selected Address Book entry. alphanumeric Organization (column) Shows the organizational affiliation of the the selected Address Book entry. Fax Number (column) integers Shows the fax number of the selected Address Book entry.
Chapter 4: FaxFinder Client Software Configuration FaxFinder Fax Client Software Menu Command Definitions Command Name Values Address Book menu commands -Add Contact Description Brings up the New Contact screen for adding entries to client-user’s personal address book. These entries are for parties to whom the client-user may want to send faxes. The contact info includes the party’s name, their organizational affiliation, phone numbers, fax numbers, and land address information.
Chapter 5 – FaxFinder Client Software Operation Introduction This chapter describes the things that a client user can do with the FaxFinder system. Three software programs are involved: the FaxFinder Client Software, the Multi-Tech Tiff Viewer (or designated PDF viewer), and the Multi-Tech Cover Page Generator. The programs work together with the FaxFinder Client Software acting as the hub of activity.
Chapter 5: FaxFinder Client Software Operation Sending a Fax To send a fax by printing from an application program on a client PC, follow the steps listed below. 1. The FaxFinder client software must be installed on the PC. (See the section “Installing FaxFinder Client Software” earlier in this manual.) 2. The client PC and the FaxFinder server must both be connected to the same Ethernet LAN system. (See the section “Chapter 3, Part C: Configuring the FaxFinder Server” earlier in this manual.) 3.
Chapter 5: FaxFinder Client Software Operation 5. At the application program (for example, a word processing program or drawing program), print to the FaxFinder. Setting the destination of the printing job varies from program to program. For the common Notepad text editor program, for example, you must set the destination printer in the Page Setup screen. In most cases, however, the destination printer can be set in a Print menu that appears when each printing job is initiated. Multi-Tech Systems, Inc.
Chapter 5: FaxFinder Client Software Operation After the FaxFinder has been chosen as the target printer, a ‘Properties/Preferences’ screen can be accessed by clicking on either “Properties” or “Preferences” on the Print dialog box (for most application programs, it’s a “Properties” button; for a few, it’s a “Preferences” button). Then a screen labeled either MULTI-TECH FAXFINDER Properties or Printing Preferences screen will appear and its “Device Settings” tab will be shown.
Chapter 5: FaxFinder Client Software Operation 6. After the printing has been initiated by the application program, the FaxFinder Send Fax screen will appear. Click on Address Book. When the Address Book screen appears, click “New.” At the New Contact screen, enter the recipient’s name, fax number, and any other contact information you want to retain. The recipient’s fax number should be entered as you would dial it from a phone on the public phone network (as from a residential phone). Click OK.
Chapter 5: FaxFinder Client Software Operation You can also access the Address Book directly to add and edit entries. At the FaxFinder Fax Client Software screen, go to Edit | Add Contact. 7. If you want to include a cover page with your fax, click in the “Use Cover Page” checkbox. Enter information as needed in the “Subject” and “Cover Page Notes” fields. Automated fields, like sender information (individual name, company name, street address, phone number, fax number, etc.
Chapter 5: FaxFinder Client Software Operation The “Cover Page Style” chosen will determine how this information will appear on the fax cover page. You can select a standard style from the “Cover Page Style” drop-down menu or create a style of your own in the Template Editor. To access the Template Editor software, click on the “View/Edit” button. (For more information, see the section “Creating or Modifying Cover Page Styles” later in this chapter.
Chapter 5: FaxFinder Client Software Operation Scheduling Fax Transmissions The FaxFinder allows you to send a fax immediately or delay its transmission until a later time. Perhaps the most common motivations for delayed faxing are to enjoy the lower phone rates that may apply at night and on weekends or to broadcast faxes after business hours to avoid tying up fax transmission resources during the busiest weekday hours. In any case, it is easy to schedule faxing for a later time. 1.
Chapter 5: FaxFinder Client Software Operation 7. The fax will be sent at the scheduled time. You can view the event as it happens in the FaxFinder client software Device Status screen or after the fact in the Fax Log screen. Re-Sending a Failed Fax Locate the failed fax in the Fax Log tab of the FaxFinder Fax Client Software. Select the failed fax and right-click on it. In the menu that appears, select Resend. Multi-Tech Systems, Inc.
Chapter 5: FaxFinder Client Software Operation Putting Pending Faxes on Hold and Removing the Hold Suppose you have sent a fax to 10 recipients and, shortly after clicking on Send Fax, you realize that there is something incorrect in the content of your fax (it may be something you want to add, delete, or change). You can prevent any pending faxes from being sent by selecting “Pause Scheduler” in the File menu of the FaxFinder Fax Client screen.
Chapter 5: FaxFinder Client Software Operation 2. While the fax is being sent to the second party, the client user realizes that there is something wrong with the fax. She brings up the FaxFinder Fax Client Software screen, opens the File menu, and selects “Pause Scheduler.” At that point, the FaxFinder will complete the fax in progress that is being sent to the second recipient.
Chapter 5: FaxFinder Client Software Operation She could view the details of the fax and, at her option, view the fax again. She could re-schedule the fax for a later time. Multi-Tech Systems, Inc.
Chapter 5: FaxFinder Client Software Operation She could “delete” the fax, which means that that fax transmission would never be completed. Pause is canceled on reboot. If she shuts down her computer for the day while leaving this fax in a “pending” state, that fax will be sent shortly after booting up her computer again, that is shortly after the FaxFinder client software is functioning again.
Chapter 5: FaxFinder Client Software Operation Setting Fax Retry Number and Interval You can set the FaxFinder client software to retry a fax transmission if it fails on the first attempt. You can set both the number of additional attempts and the interval between each additional attempt. You can set these parameters as follows. 1. In the FaxFinder Fax Client Software screen, open the File menu and select “Options.” When the Options screen appears, click on the Fax Retry tab. 2.
Chapter 5: FaxFinder Client Software Operation Sending One Fax Containing Multiple Documents The FaxFinder allows you to include multiple documents in a single fax transmission. Those multiple documents could come from the same or different application programs. 1. Consider the example below where a text file and a drawing file are included in the same fax with a single cover letter. Here’s how this multiple-document fax was sent. a.
Chapter 5: FaxFinder Client Software Operation 3. You can also add to the list of files to be faxed out by including items that you have stored. In the “Documents” pane of the FaxFinder Send Fax screen, click +. You could then browse to find, for example, a fax that you had received earlier, had stored as a TIF file, and now want to forward to another party. (Faxes received as PDF files cannot be added to the list.) 4.
Chapter 5: FaxFinder Client Software Operation Forwarding a Fax Suppose you receive a fax using the FaxFinder system. Suppose that fax message is something you want to pass along to another party in fax form at a later date (for example, Rocky Mountain Construction Company receives tax information about lots on which it intends to build houses). In this case, you should note the name of the TIF file in question. You can then browse to that TIF file and re-send it as a fax message.
Chapter 5: FaxFinder Client Software Operation 4. In the FaxFinder Send Fax screen, specify a recipient for the fax. The recipient could either come from your Address Book or be entered by clicking “+” in the “Recipients” pane and then typing the Name and Fax Number in the Enter a Fax Recipient dialog box. Then click OK. Finally, you would click Send Fax. The TIF file will be reconverted into a fax message that can be received by a fax machine.
Chapter 5: FaxFinder Client Software Operation 4. The incoming fax arrives in the client’s email inbox as a message with an attachment. The email message is marked as being from the FaxFinder Administrator. The sender’s “Remote ID” and the client’s name appear in the “Subject” line of the email message. (The Remote ID comes from the sending fax machine and is typically the sender’s fax number or name.) 5. The FaxFinder client opens the email message.
Chapter 5: FaxFinder Client Software Operation Receiving Faxes in Automated Routing Mode In Automated Routing Mode, the FaxFinder Server delivers incoming faxes to client PCs in their email inboxes. 1. A PBX extension number must be assigned to the client PC at the FaxFinder Server. 2. For fax reception, the client PC and the FaxFinder server need not both be connected to the same Ethernet LAN system.
Chapter 5: FaxFinder Client Software Operation 5. The fax recipient (a client of the FaxFinder Server) opens the email message. The incoming fax message takes the form of a graphic file attachment. The FaxFinder Server has assigned the file an automatic file name. 6. The FaxFinder client can open the file or save the file. a. Opening the fax message graphic file. Incoming fax messages are PDF or TIFF files.
Chapter 5: FaxFinder Client Software Operation Multi-Tech Systems, Inc.
Chapter 5: FaxFinder Client Software Operation While most of these features are common to many graphical programs, some warrant a bit of explanation. Copy. The Copy function allows you to copy the fax file and insert it into a different application program. See “Importing Fax Images into Other Application Programs” below. Panning (Omni-Directional Scroll). The “hand” icon allows you to bring any desired portion of the image into view. Zoom to Selection.
Chapter 5: FaxFinder Client Software Operation Spot Magnifying Glass. In this viewing mode, a magnifying glass icon (cursor) appears. It can be used in one of three ways to magnify any portion of the image: (a) Click over Area, (b) Click-andHold Over Area, (c) Scan the Graphic. Click over Area. A secondary window will appear that shows the ‘clicked-on’ area magnified. You can adjust the size of the secondary window by dragging on its borders.
Chapter 5: FaxFinder Client Software Operation Click-and-Hold over Area. Two additional windows will appear. The cursor itself becomes a small secondary window of fixed size. The same image also appears on a third window. You can adjust the size of the secondary window by dragging on its borders. You can re-locate the secondary window by putting the cursor inside the window, clicking and dragging. Scan the Graphic. If you click, hold, and drag, you can scan the image in a magnified view.
Chapter 5: FaxFinder Client Software Operation Importing Fax Images into Other Application Programs The Copy command in the Multi-Tech Tiff viewer program allows you to import the fax image into other application programs. In the illustration below, a fax has been Copied from the Multi-Tech Tiff viewer program and Pasted into a Microsoft Word document. Multi-Tech Systems, Inc.
Chapter 5: FaxFinder Client Software Operation Setting up Your Address Book Manually The Address Book in the FaxFinder Client Software adds significant convenience to the system. When recipient contact information has been entered in the Address Book, this information will appear automatically in the corresponding fields of the fax cover page. 1. In the FaxFinder Fax Client Software screen, click on the “Address Book” tab. 2. In the Edit menu, select “Add Contact.” 3.
Chapter 5: FaxFinder Client Software Operation 5. A Contact – Recipient screen will appear presenting the contact info for this particular recipient. 6. When you click on “Address Book” at the FaxFinder Send Fax screen, this same contact list will appear. Multi-Tech Systems, Inc.
Chapter 5: FaxFinder Client Software Operation 7. When you select an item from this list and select Use Cover Page, contact info will be added automatically to the appropriate fields of the cover page. 8. To delete an entry from your Address Book, select the entry and right-click on it. In the menu that appears, select delete. In order to complete the deletion command, you must click “Yes” in the confirmation screen. Multi-Tech Systems, Inc.
Chapter 5: FaxFinder Client Software Operation Setting up Your Address Book by Synchronizing with Outlook What Synchronization Means During synchronization, entries from the FaxFinder Client Address Book and from the specified folder of MS Outlook are merged into one list saved in both applications. When “Synchronize With Outlook” command is invoked in the FaxFinder Client software, each list is updated with changes from the other. Synchronization Procedure 1.
Chapter 5: FaxFinder Client Software Operation 3. Click on Browse. Select the desired folder from the Select Contact Folder (Outlook:) screen. Click OK. If a confirmation screen appears, click OK. At the Options screen, click OK. 4. In the FaxFinder Fax Client Software, go to the Device Status tab and select Outlook Synchronizer in the “Device” list. Multi-Tech Systems, Inc.
Chapter 5: FaxFinder Client Software Operation 5. Right-click on Outlook Synchronizer and select Synchronize with Outlook. The attempt to synchronize the FaxFinder Address Book with MS Outlook will cause Outlook to present a security screen at which you must click the “Allow access for” checkbox and choose a
Chapter 5: FaxFinder Client Software Operation Setting Up Address Books with CSV Files Files in CSV format (comma separated values) consist of spread-sheet data presented in ASCII (plain text) form. As such, the data can be transferred between different application programs. Many common programs (like MS Excel and MS Outlook) can do both importing and exporting of CSV files. The FaxFinder Client software can also do both importing and exporting of CSV files.
Chapter 5: FaxFinder Client Software Operation Suppose you had a list of potential customers exported to CSV format from an MS Excel spreadsheet and, for each customer, there were 10 fields of data, including their names and fax numbers.
Chapter 5: FaxFinder Client Software Operation Exporting a FaxFinder Address Book to CSV File Format 1. At the FaxFinder Client software, go to Address Book | Export. The Address Book Export screen will appear. 2. Use the “Delimiter” drop-down list to choose the kind of character that will be used to separate the fields of information in the Address Book entries. 3. Click Export. 4. The Save Delimited Address Book screen will appear. Save the CSV file with an appropriate filename.
Chapter 5: FaxFinder Client Software Operation Importing CSV Files into FaxFinder Address Book with Fitted Template 1. In the FaxFinder Fax Client software, go to Address Book | Import. The Address Book Import screen will appear. 2. Under “CSV Import file,” click Browse. A list of CSV files will appear. Select the CSV file that you want to import. (The CSV file will likely be a file outputted from MS Outlook or a file containing contacts from another client-user of the FaxFinder system.) 3.
Chapter 5: FaxFinder Client Software Operation 6. To find out whether or not the new entries are being properly placed into the Address Book format, click Preview Import. The Template Mapping screen will appear. Use the Next Record and Previous Record buttons to page through the entries as they would appear if you proceed with importing. If the entries are to your liking, click OK. If the entries are not properly organized, will may need to adjust your Delimiter and/or First Line Heading settings.
Chapter 5: FaxFinder Client Software Operation For example, if the first record has a literal value of “Name” in the Name field, a literal value of “Organization” in the Organization field, etc., then your import CSV file did indeed have First Line Headings and you may have failed to check the “First Line Heading” check box. To clean up your file import, you must correct this by checking the First Line Heading checkbox.
Chapter 5: FaxFinder Client Software Operation Importing CSV Files into FaxFinder Address Book with a Customized Template CSV contact lists can be created in many applications (MS Outlook, MS Excel, Notepad, etc.). In general, those contact lists may contain information that does not fit directly into the format of the FaxFinder’s New Contact screen. Suppose a useful CSV file exists but its contents (data fields) are not in the same order as data in the New Contact screen.
Chapter 5: FaxFinder Client Software Operation 2. In the FaxFinder Client software, go to Address Book | Import. The Address Book Import screen will appear. Browse to find the CSV file that you want to import. 3. Click Define Template. The Template Mapping screen will appear. The Imported Fields drop-down box presents a list of all of the fields present in the CSV file. 4.
Chapter 5: FaxFinder Client Software Operation 6. When one field name from the drop-down list has been added (with the + button), the next CSV field name in the drop-down list will appear. Click + on the next line to associate that CSV field with the next New Contact screen field (if the association makes sense). Sometimes the field names will differ but it will be appropriate to map the CSV field to the New Contact screen field anyway.
Chapter 5: FaxFinder Client Software Operation Finish mapping all appropriate CSV fields to New Contact screen fields. 11. When the mapping is complete, click OK. You will then be prompted to name the template file that you have just created to accommodate this CSV file. Multi-Tech Systems, Inc.
Chapter 5: FaxFinder Client Software Operation 12. The Address Book Import screen will return. It will list both the CSV import file and the template file you have just created. 13. To confirm that the field mapping is appropriate, click on Preview Import. At this screen, you can view each entry before importing. If the entries are correct, click OK to return to the Address Book Import screen. 14. If the entries are not right, you can use the Modify Template command to revise the template as needed.
Chapter 5: FaxFinder Client Software Operation 15. When you are satisfied that the mapping is set up correctly, click Import at the Address Book Import screen. The importing activity will be indicated in the Device Status tab of the FaxFinder Fax Client Software screen. 16. The new entries from the CSV file will now appear in your Address Book. Multi-Tech Systems, Inc.
Chapter 5: FaxFinder Client Software Operation Transferring an Established Standard FaxFinder Address Book to a New ClientUser A FaxFinder Address Book can be created in any of several ways: new contacts can be added manually, they can be added when faxes are being sent, they can be added by synchronizing with Outlook, and they can be added by importing CSV files.
Chapter 5: FaxFinder Client Software Operation 4. At the FaxFinder Client software, the new client-user should go to Address Book | Import. At the Address Book Import screen, the client-user should browse to the established CSV import file at the top of the screen and browse to the standard client-to-client import template file in the lower part of the screen (the file name will be FaxFinder Client Import_template.
Chapter 5: FaxFinder Client Software Operation Cover Pages Faxes are often accompanied by a cover page that specifies from whom it was sent, to whom it was sent, the date, and other details about the sending and receiving parties. Using Stock Cover Pages The FaxFinder system offers several ready-made (stock) cover pages that can be used. These stock cover pages can also be modified or customized to meet individual needs (see “Creating or Modifying Cover Page Styles” later in this chapter).
Chapter 5: FaxFinder Client Software Operation 3. When the FaxFinder Send Fax screen appears, it will list the document we want to fax in its “Documents” pane. Next we must specify a recipient. The recipient could either be chosen from the Address Book (by clicking on the Address Book button) or specified directly by clicking on + in the Recipients pane and completing the Name and Fax Number fields.
Chapter 5: FaxFinder Client Software Operation 4. The FaxFinder Send Fax screen appears again but this time our recipient has been entered. Multi-Tech Systems, Inc.
Chapter 5: FaxFinder Client Software Operation 5. Since we intend to use a cover page, we click “Use Cover Page” and then select a stock cover page from the “Cover Page Style” drop-down list. We can then type a subject for the fax message and type a cover page note, each in the appropriate fields. Suppose we choose the style called “BoldComplete.” We can view it by clicking “View/Edit” on the FaxFinder Send Fax screen. The requested file will appear in the Template Editor screen. Multi-Tech Systems, Inc.
Chapter 5: FaxFinder Client Software Operation 6. To see how the cover page appears after the sender and recipient information has been automatically inserted, click Preview Fax. This is how the fax cover page will be sent. 7. To send the fax, simply click Send Fax in the FaxFinder Send Fax screen. Multi-Tech Systems, Inc.
Chapter 5: FaxFinder Client Software Operation Creating or Modifying Cover Page Styles The Multi-Tech Cover Page Generator program allows you either to produce custom cover pages or to use existing style templates. In this section, we will describe both processes, making a new template and customizing an existing stock cover page style template. Creating New Cover Page Templates 1. Open the Cover Page Generator program. Go to Start | Programs | FaxFinder Client Software | Cover Page Generator.
Chapter 5: FaxFinder Client Software Operation 3. Several types of objects can be added to a cover page file. These are listed in the Insert pull down menu. The commands to create these objects can be invoked either here or from buttons on the Tool Bar. We will invoke various commands from these toolbar buttons throughout this procedure. 4. Decide on the categories for which you want automated fields on the fax cover page.
Chapter 5: FaxFinder Client Software Operation The FaxFinder supports the automated field types listed in the table below.
Chapter 5: FaxFinder Client Software Operation 6. Enter the field label in the Static Text box. Be sure to allow enough room for the size of font you have chosen. If the box is too small for the font size, the text will be cut off. To select font, the font style, and font size, use the cursor. You can also access font settings from the Settings pull down menu. To align the text to the left edge, right edge, or center of the box, use the cursor.
Chapter 5: FaxFinder Client Software Operation You might want the automated field value to be placed on a line or in a rectangle. If so, you could use the line cursor to put a line beneath the edit box or use the rectangle cursor to place a rectangle around the edit box. You can place lines, rectangles, and ellipses on the page for any purpose. Rectangles and ellipses can have a solid fill or a shading (called “hilight”). These graphic functions are described in the table below.
Chapter 5: FaxFinder Client Software Operation 8. To add a graphic file to the cover page template, click on the Image icon . Then browse to the directory that contains the desired graphic file. Files of type bmp and tif can be inserted into cover pages. Insert graphics files into your cover page template as needed. 9. Save the file to the Cover Pages directory in your operating system. The .cpg file must be saved in this location in order for it to be accessible to the FaxFinder client software.
Chapter 5: FaxFinder Client Software Operation Modifying Existing Cover Page Templates Note: While all five stock cover page styles can be readily customized, the styles “PlainComplete” and “PlainShort” are especially well suited to customization. In most cases, one can start with these files and simply add one’s own company name in text or insert one’s graphical company logo. 1. Open the Cover Page Generator program. Go to Start | Programs | FaxFinder Client Software | Cover Page Generator.
Chapter 5: FaxFinder Client Software Operation For our example, we will rename the file rmc1.cpg, for the purposes of our fictitious company, Rocky Mountain Construction, Inc. 4. You can use the Tab key to skip from field to field in the template. Note, however, that any values added to template fields will be overwritten by values specified in the Address Book (in “New Contact” screens launched from Edit | Add Contact in the FaxFinder Fax Client Software program). Multi-Tech Systems, Inc.
Chapter 5: FaxFinder Client Software Operation 5. Add company logo at top of cover page. For our example, we will add the graphic file “ff-rocky-mtn-logo1.bmp” to the cover page. In the Insert menu of the Template Editor, select “Image.” Browse to the location of the graphics file to be used. Click Open. Move the + cursor to the desired location of the graphic. Then click and drag to size the graphic.
Chapter 5: FaxFinder Client Software Operation 6. Add company slogan to bottom of template. For the purposes of our fictitious company, Rocky Mountain Construction, Inc., we will use the slogan “Building on New Horizons.” and drag Select the “Static Text” cursor labeled N to open a text box at the bottom of the template page. Enter the slogan. Multi-Tech Systems, Inc.
Chapter 5: FaxFinder Client Software Operation 7. In the File menu, select “Save As” and overwrite the file using the same filename used in step 3, saving it in the ‘Application Data’ directory for the FaxFinder client software. (For Windows NT4/2000, this will be C:\Winnt \ Profiles \ \ Application Data\ FaxFinder Client Software \ Cover Pages. For Windows XP, this will be C:\Documents and Settings\\Application Data\Fax Finder Client\Cover Pages.
Chapter 5: FaxFinder Client Software Operation 9. When the fax is sent, the ‘automated’ fields on the cover page template will be filled in with information from the Address Book (if the recipient is listed there). Click on “Preview Fax” in the FaxFinder Send Fax screen to examine the fax with cover page. Multi-Tech Systems, Inc.
Chapter 5: FaxFinder Client Software Operation Cover Page Generator Menu/Icon Command Descriptions File Menu FaxFinder Cover Page Generator Software Menu Command Definitions (cont’d) ShortCommand Name Icon Description cut File Menu commands New Ctrl + N Creates new cover page template file. Open Ctrl + O Save Ctrl + S Opens an existing cover page template file for viewing or editing. Saves cover page cpg file at current path. Save As -- -- Print Ctrl + P Exit -- Multi-Tech Systems, Inc.
Chapter 5: FaxFinder Client Software Operation Edit Menu The Undo command (also accessible using the keyboard shortcut Ctrl + Z and the button) reverses the effect of the last command. Insert Menu FaxFinder Cover Page Generator Software Menu Command Definitions (cont’d) Command Name Icon Description Insert menu commands Image Use to insert a bmp or tif image into the cover page template. Field Text Use to insert an automated field into the cover page OR template.
Chapter 5: FaxFinder Client Software Operation FaxFinder Cover Page Generator Software Menu Command Definitions (cont’d) Command Name Icon Description Insert menu commands Static Text Use to insert text objects needed in the cover page template. These uses include labels for automated fields (TO, FROM, DATE, etc.) and plain text like a company name or slogan. Use icons to align text to left, center, or right. Use “Font” icon or command in Settings menu to alter font, font size, and font style.
Chapter 5: FaxFinder Client Software Operation View Menu FaxFinder Cover Page Generator Software Menu Command Definitions (cont’d) Command Name Icon Description View Menu commands Zoom In Use to view a smaller area of the cover page template file in greater magnification. Zoom Out Use to view a larger area of the cover page template file in a lesser magnification. Fit to Width Use to get magnification of file such that its -horizontal dimension fits proportionally into the window.
Chapter 5: FaxFinder Client Software Operation Reporting Failed Faxes to the Administrator Occasionally clients will receive email messages from the FaxFinder that pertain to faxes that have failed partially or entirely. That is, some or all of the intended pages of the fax may arrive in a form that cannot be read. Here is the sequence of events you may encounter and the proper response. 1. The client user receives an email message from the FaxFinder about a partially or wholly failed fax sent to him/her.
Chapter 6 – Server Operation Fax Log Email Messages The FaxFinder administrator will receive an email after every user-specified n faxes have been handled by the FaxFinder (n is the total of faxes sent and received). The subject of the email will be: Subject: FaxFinder: Fax Log Text File From: 'FaxFinder ID' (a.b.c.d) The actual log is a text file attached to the email. The fax log gives you a summary of events going on in the system.
Chapter 6: Server Operation Front Panel LEDs Label Name Identifier General LEDs Power Power Status Status CF Compact Flash Line 1/2 LEDs (on FF-120/220) or Modem 1-4 or 1-8 (on FF-420/820) TD Transmit Data RD Receive Data TR Data Terminal Ready CD Carrier Detect Ethernet or LAN1 LEDs LNK Data Link 100 Speed Multi-Tech Systems, Inc. Description Solid (constant) green if unit is on. Approximately 30 seconds after power is on, the Status LED will be blinking green to show normal, working state.
Chapter 6: Server Operation Dealing with Failed Fax Reports Occasionally clients will receive email messages from the FaxFinder that pertain to faxes that have failed partially or entirely. That is, some or all of the intended pages of the fax may arrive in a form that cannot be read. Each FaxFinder-generated email of a fax with any failed pages will have one additional file attached: a modem log file with a name like modem0modem1_date-time.txt.
Chapter 7 – Device Manager Operation Introduction The process of installing the Device Manager software is explained in Chapter 2. This chapter will describe the options available to an administrator using the Multi-Tech Device manager software. Opening the Device Manager Software 1. To launch the Device Manager program from the Windows desktop, go to Start | Programs | Device Manager | Device Manager. 2. The Device Manager main screen will appear. Multi-Tech Systems, Inc.
Chapter 7: Device Manager Operation Device Manager Main Screen The Device Manager’s main screen lists the devices (FaxFinders, CallFinders, or Multi-Access units) that are working together as a system. In a FaxFinder system, for example, the system generally can consist of one FaxFinder functioning as a master or server unit (designated as Primary) and one or more FaxFinders functioning as client or slave units (designated as Copy).
Chapter 7: Device Manager Operation Access to Commands The commands of the Device Manager software are accessible in the program’s pull down File and Edit menus, and through a right-click menu that becomes available when a particular device (FaxFinder, CallFinder, or Multi-Access unit) is selected in the program’s main screen. Right-Click ‘Device’ Menu These are command options that are available once you right-click on a specific FaxFinder in the Device column of the Device Manager software.
Chapter 7: Device Manager Operation Main Screen Menu or Column Description File menu Also contains the Exit command which closes the Device Manager program. From here, you can launch the Options screen from which the Logging function can be configured. Edit menu Allows you to add a device (FaxFinder, CallFinder, or Multi-Access unit) to the system. Allows you to synchronize phonebooks from Primary FaxFinder units to Copy FaxFinder units within the system.
Chapter 7: Device Manager Operation Device Manager “File” Menu File Menu Command Options Description of Fields & Buttons Logging Options can be used to alter the default logging options for the Device Manager. Normally, changes to these options are not required, unless directed by Multi-Tech Technical Support. Save Log on Exit: Check this to ensure the Log file exists after the application is closed. Trace Level: Denotes the amount of trace output recorded by Device Manager. Range = 1-9. Default= 5.
Chapter 7: Device Manager Operation Device Manager “Edit” Menu Edit Menu Command Description Synchronize Phonebooks Transfers phonebook data from a Primary FaxFinder unit to all FaxFinders designated as Copy units. The phonebook sharing statuses of the FaxFinders (Primary, Copy, or Independent) involved must be set in advance. That is, one FaxFinder must be set as the Primary unit.
Chapter 7: Device Manager Operation Synchronizing Phonebooks When FaxFinder phonebooks are synchronized, all non-administrative listings match. One FaxFinder unit (the Primary unit) holds the master list that is transmitted (using the Synchronize Phonebooks command) to other FaxFinder units in the system (Copy units). FaxFinder units can operate in same system but have independent phonebooks, in which case they are designated Independent. Synchronizing phonebooks entails three steps: 1.
Chapter 7: Device Manager Operation 3. Using synchronization. In the main Device Manager screen, open the Edit menu and select Synchronize Phonebooks. The Synchronize Phone Books screen will appear along with a series of transient screens (denoting tftp data transfers) and confirmation screens (where you click OK to proceed).
Chapter 7: Device Manager Operation Adding Devices Any FaxFinder/CallFinder/MultiAccess unit to be added to the system and come under the management of the Device Manager software must be connected to the same IP network as the computer running the Device Manager software. To add a FaxFinder/CallFinder/MultiAccess unit to the system, start at the main Device Manager screen. Open the Edit menu and select Add Device.
Chapter 7: Device Manager Operation Using the Auto-Discovery Monitor The Auto-Discover Devices command of Device Manager will automatically search the network for FaxFinder, CallFinder, or Multi-Access units. The Auto-Discover Devices command is in the Edit Menu. When invoked, the Auto Discovery Monitor screen will appear and will display FaxFinders, CallFinders, and Multi-Access units on the system and identify each (with Host Name, IP Address, and Mac Address).
Chapter 7: Device Manager Operation Viewing Parameters of a Selected Device. If you double-click on a device in the list in the AutoDiscovery Monitor’s main screen, another screen with details about that device will appear. That second screen specifies the device’s Mac Address, IP-related parameters, and presents blank fields for its Username (User ID), and password. Changing Parameters of a Selected Device.
Chapter 7: Device Manager Operation Deleting a Device Invoking the Delete command removes the selected device (FaxFinder, CallFinder, or Multi-Access unit) from the system. Once deleted, the device will no longer be under the management of the Device Manager software. Click Yes at the ‘confirmation’ screen to complete the deletion command. Multi-Tech Systems, Inc.
Chapter 7: Device Manager Operation Saving a Configuration Each type of device in the FaxFinder/CallFinder/MultiAccess family saves all of its settings (IP address, password, modem parameters, DID channel parameters, phone book settings, etc.) internally. This group of settings is its configuration. This same group of settings can be saved on the computer running the Device Manager software.
Chapter 7: Device Manager Operation Restoring a Configuration To re-install on the device (FaxFinder, CallFinder, or MultiAccess unit) a group of settings (configuration) previously saved on the computer running the Device Manager software, use the Restore Configuration command. Device Manager will browse, by default, to an automatically determined directory that contains a saved configuration. Multi-Tech Systems, Inc.
Chapter 7: Device Manager Operation Exporting a CSV Phonebook By using the export CSV phonebook command, you will create a comma separated file that is easily imported into other FaxFinder units. Right click on the server that you want to export from and select export CSV phonebook. This will export the user defined portion of the phone book as a delimited (CSV) file. The CSV Export window will appear. Select the type of delimiter you would like to use and click Export. Multi-Tech Systems, Inc.
Chapter 7: Device Manager Operation You will be prompted for a location to save the CSV file. The default directory location is the IP address of the FaxFinder. The phone book in ‘FaxFinderComma.csv’ can be edited and then imported into another FaxFinder server. Multi-Tech Systems, Inc.
Chapter 7: Device Manager Operation Importing a CSV Phonebook The companion to exporting a CSV phone book, importing a CSV phone book takes a file created by the export command and replaces the current phone book with that of the unit the file was exported from. This is useful to make wholesale changes to the FaxFinder server’s user defined phone book entries. The following procedure and screens will illustrate this feature.
Chapter 7: Device Manager Operation You will be asked to select the folder where you want the configuration file to be saved to. The default folder location is the IP address of the FaxFinder. A window will show that the file was saved successfully. Multi-Tech Systems, Inc.
Chapter 7: Device Manager Operation After the Configuration file is saved, the Server Import Dialog appears. You can select the file to import, select a file-mapping template or define a new template. Then you can preview the Import to check for accuracy. Click Import when you are ready to copy the Phone book to the FaxFinder Server. The next few steps will complete the process. Multi-Tech Systems, Inc.
Chapter 7: Device Manager Operation 1. Click Browse after the File name field and select the file you wish to import. In most cases this would be a CSV file exported previously from a FaxFinder server. Check the First Line Headings check box if the CSV import file has headings. Files exported with CSV Export contain first line headings to make editing of the phone book easier. 2. Browse to an import template. FaxFinder Server Import_template.
Chapter 7: Device Manager Operation 3. Click the Preview button to view the Mapping of the Import Phone book to compare it to the Contact Field Names. 4. Select the Import button to begin copying the Phone Book to the FaxFinder Server and verify by clicking OK. 5. Click Modify Template to make changes to an existing template. You can select fields from the Imported Fields drop down and map them to existing Contact Fields listed in the Field Assignment column.
Chapter 7: Device Manager Operation 6. Once the Import is finished you will be asked to reboot the FaxFinder Server. The updated phone book will not be used until a reboot occurs. Multi-Tech Systems, Inc.
Chapter 7: Device Manager Operation The importation is complete, and the FaxFinder Server Phone Book has been replaced. Multi-Tech Systems, Inc.
Chapter 7: Device Manager Operation Retrieving Received Faxes Retrieve Received Faxes provides a way to FTP faxes off a FaxFinder Server when there are problems with the email server. If problems occur with the delivery of faxes via email you may retrieve them from the FaxFinder Server. Normally, this option would not be required, unless directed by Tech-Support. Right Click the FaxFinder Server and select Retrieve Received Faxes. Clicking OK will begin the process of retrieving faxes.
Chapter 7: Device Manager Operation Setting Phone Book Sharing The phonebook of a Primary FaxFinder unit is a source or central phonebook. Phone numbers should be entered into this phonebook. The central phonebook list is downloaded (by use of Synchronize Phonebooks command) from the Primary FaxFinder unit into the phonebook of each Copy FaxFinder unit. If phone numbers are added to the phonebook of a Copy FaxFinder phonebook, they will be overwritten and lost at the next Synchronize Phonebooks command.
Chapter 7: Device Manager Operation Firmware Updating Process Over time, new versions of firmware will be issued. When these newer versions become available, you will want to secure the firmware files (typically by downloading them from the Multi-Tech web site) and install them. There are two parts to a full firmware update: (a) updating modem firmware for all modems For POTS modems, the form of the file name is dwqgXy.hex; where X is a version number and y is a version letter.
Chapter 7: Device Manager Operation For the remainder of this procedure, we will illustrate modem updating with an 8-port FaxFinder (8 POTS modems). The procedure will be essentially the same for Multi-Access units. For current CallFinder models, DID channel modem updating is not necessary. For the FF110 FaxFinder, both a POTS modem and a DID channel modem would need to be updated separately. 2. The Update FaxFinder N.N.N.N screen will appear.
Chapter 7: Device Manager Operation 3. Browse to the location of the most recent firmware file. Again, confirm that the update file has a higher version level than the firmware file that it will replace. 4. Click Start Update. 5. The FaxFinder – Confirm Update screen will appear. Click OK. Multi-Tech Systems, Inc.
Chapter 7: Device Manager Operation 6. The updating process will take as long as a minute. During this time, several messages will appear in the Update FaxFinder N.N.N.N window. A transient TFTP screen may appear briefly. If the updating process has been successful, the final message line will say “Finished – The FaxFinder is ready.” If you chose to update all modems with a single command, it will take about the same length of time for each modem to be updated. 7.
Chapter 7: Device Manager Operation Server Firmware Update 1. Bring up the Device Manager software main screen. In the Device column, identify the FaxFinder unit on which the update is to be done. Be sure that the Status of that unit is idle before continuing. (You cannot update the FaxFinder/CallFinder/MultiAccess unit while it is handling a call.) Select that FaxFinder unit and right-click on it. In the menu that appears, select Update.
Chapter 7: Device Manager Operation 3. Browse to the location of the most recent firmware file. Again, confirm that the update file has a higher version level than the firmware file that it will replace. Click on the name of the correct file and then click on the open button. 4. Click Start Update. 5. The FaxFinder – Confirm Update screen will appear. Click OK. Multi-Tech Systems, Inc.
Chapter 7: Device Manager Operation 6. The updating process will take as long as a minute. During this time, several messages will appear in the Update FaxFinder N.N.N.N window. A transient TFTP screen may appear briefly. If the updating process has been successful, the final message line will say “Finished – The FaxFinder is ready.” The network connection to the FaxFinder may be reset several times. Multi-Tech Systems, Inc.
Chapter 7: Device Manager Operation 7. Close the Update FaxFinder N.N.N.N window. In the main Device Manager window, the updated version will be listed. 8. Repeat steps 1-7 for each FaxFinder unit in the system. NOTE: For proper operation of the FaxFinder system, including the sharing of Phone Book data, the server firmware version for all FaxFinder units must be the same. 9. The updating process is now complete. Multi-Tech Systems, Inc.
Appendix A – Troubleshooting 1. What if I can't see the web page for my FaxFinder? REMEDY: Verify that the Admin PC is actually on the same subnet as the FaxFinder and that it can be “pinged.” Launch a Command Prompt. (In WinXP, go to Start | All Programs | Accessories | Command Prompt. In Win2000, go to Start | Programs | Accessories | Command Prompt.) Type ipconfig to verify that the Admin PC’s IP address is in the same network as the FaxFinder’s IP address. Then type ping 192.168.2.
Appendix A: Troubleshooting CAUSE A: During transmission, the name server’s address could not be resolved (that is, the FaxFinder unit could not contact your name server). RESPONSE A: Contact the FaxFinder unit using telnet and try to ping the name server. telnet 192.168.x.x user: admin password: admin # ping 192.168.y.y (where this is the address of the name server) If the name server ping fails, you must determine why it failed. The name server may not be reachable because it is on a different subnet.
Appendix A: Troubleshooting No email message after mail server setup (cont’d) CAUSE E: The email server does not support SMTP. RESPONSE E: Contact the FaxFinder unit using telnet either at its IP address or name (if a name server is present) and specify the SMTP Port Number (25 is the common/standard port number, but this number is configurable in the FaxFinder Administration: SMTP Configuration screen). telnet 192.168.x.x 25 OR ... telnet mailserver.somecompany.
Appendix A: Troubleshooting 4. What if the FaxFinder doesn't answer a fax call? REMEDY for Manual Routing Mode Use this procedure if during a test call to the FaxFinder, you fail to see the "Waiting for Connect" State in the Current Status: POTS Modem n screen and if you fail to hear modem dialup/negotiation tones. -- both the state and the sound must be observable). A. Situate yourself in a place where you can see the FaxFinder unit and, simultaneously, use a phone on a regular POTS line. B.
Appendix A: Troubleshooting 6. SMTP Error Code List Many messages now contain the last response from the email server. These error codes may be looked up to give more details of exactly what occurred. Error Message Bad Mail Server Address Mail Server Connect Failed Authentication Error No reply from Email Server EHLO Error MAILFROM Error Send To Error CC Error Message Data Error Error ending email Error opening attachment Error resolving email host name Client Timeout Multi-Tech Systems, Inc.
Appendix B – Regulatory Information 47 CFR Part 68 Telecom 1. This equipment complies with Part 68 of the 47 CFR rules and the requirements adopted by the ACTA. Located on this equipment is a label that contains, among other information, the registration number and ringer equivalence number (REN) for this equipment or a product identifier in the format: For current products is US:AAAEQ##Txxxx. For legacy products is AU7USA-xxxxx-xx-x. If requested, this number must be provided to the telephone company. 2.
Appendix B: Regulatory Information 12. Manufacturing Information on telecommunications device (modem) embedded in FF-120/220/420/820 units : Manufacturer: Multi-Tech Systems, Inc. Trade Name: Socket Modem Model Number: MT5634SMI Registration No: AU7USA-25814-M5-E Ringer Equivalence: 0.3B Modular Jack (USOC): RJ11C or RJ11W (single line) Service Center in USA: Multi-Tech Systems, Inc. 2205 Woodale Drive Mounds View, MN 55112 U.S.A.
Appendix B: Regulatory Information Fax Branding Statement The Telephone Consumer Protection Act of 1991 makes it unlawful for any person to use a computer or other electronic device, including fax machines, to send any message unless such message clearly contains the following information: • Date and time the message is sent • Identification of the business or other entity, or other individual sending the message • Telephone number of the sending machine or such business, other entity, or individual This i
Appendix B: Regulatory Information WEEE Statement (Waste Electrical and Electronic Equipment) July, 2005 The WEEE directive places an obligation on EU-based manufacturers, distributors, retailers and importers to take back electronics products at the end of their useful life. A sister Directive, ROHS (Restriction of Hazardous Substances) complements the WEEE Directive by banning the presence of specific hazardous substances in the products at the design phase.
Appendix B: Regulatory Information C-ROHS HT/TS Substance Concentration 依照中国标准的有毒有害物质信息 根据中华人民共和国信息产业部 (MII) 制定的电子信息产品 (EIP) 标准-中华人民共和国《电子信息产品污染控制管理办法》(第 39 号),也称作中国 RoHS,下表列出了 Multi-Tech Systems Inc. 产品中可能含有的有毒物质 (TS) 或有害物质 (HS) 的名称及含量水平方面的信息。 有害/有毒物质/元素 铅 (PB) 成分名称 汞 镉 (Hg) 六价铬 (CR6+) 多溴联苯 (PBB) 多溴二苯醚 (PBDE) (CD) 印刷电路板 电阻器 电容器 铁氧体磁环 继电器/光学部件 IC 二极管/晶体管 振荡器和晶振 调节器 电压传感器 变压器 扬声器 连接器 LED 螺丝、螺母以及 其它五金件 交流-直流电源 软件/文档 CD 手册和纸页 底盘 Multi-Tech Systems, Inc.
Appendix C – Warranty, Service, & Repair Multi-Tech Warranty Statement Multi-Tech Systems, Inc., (hereafter “MTS”) warrants that its products will be free from defects in material or workmanship for a period of two, five, or ten years (depending on model) from date of purchase, or if proof of purchase is not provided, two, five, or ten years (depending on model) from date of shipment.
Appendix C: Warranty, Service, & Repair Repair Procedures for International Customers (Outside U.S.A. and Canada) Your original point-of-purchase Reseller may offer the quickest and most economical repair option for your Multi-Tech product. You may also contact any Multi-Tech sales office for information about the nearest distributor or other repair service for your Multi-Tech product. The Multi-Tech sales office directory is available at www.multitech.
Appendix D: Example Systems Appendix D – Example Systems Sample FaxFinder Systems The FaxFinder system handles faxes in a non-conventional way. A regular fax machine is a centralized resource. The FaxFinder system decentralizes fax functions throughout a network of PCs served by the FaxFinder unit and by an email server in a common Ethernet network. Here we will give you the big picture of how the FaxFinder Server unit and the FaxFinder Client software can deliver this convenient functionality.
Appendix D: Example Systems FaxFinder Operating Modes Automated Routing Mode Manual Routing Mode PSTN PSTN T1 Line PBX Inbound Faxing: Station Ports Email attachments are sent directly to recipients. ... FaxFinder Inbound Faxes POTS Lines Outbound Faxing: Inbound Faxing: Users set FaxFinder as printing destination in application program. Then ‘print-to-FaxFinder.’ Email attachments are sent to Attendant(s) and forwarded to recipients.
Appendix D: Example Systems Server Setup for Sample FaxFinder System Administration: Time Configuration FaxFinder Server Software Setup Time Server time.nist.gov Add Time Server Request Interval Days 0 Minutes 0 Hours 24 Use Daylight Savings Time (DST) Administration: IP Configuration IP Address 192.168.4.89 Subnet Mask 255.255.255.0 Default Gateway 192.168.4.
Appendix D: Example Systems Receiving a Fax, Server Perspective 1 9 Customer faxes order to Joe at Acme99. FaxFinder Server fax log ( ) indicates successful fax reception.
Appendix D: Example Systems Receiving a Fax, Client Perspective Multi-Tech Systems, Inc.
Appendix D: Example Systems Sending a Fax, Server Perspective FaxFinder Server fax log ( ) indicates successful fax transmission. 7 6 Customer receives Mary’s FAX message about product specifications.
Appendix D: Example Systems Sample Client Setup Associating with Servers and Self Identification Multi-Tech Systems, Inc.
Appendix D: Example Systems Address Book: Methods of Management Multi-Tech Systems, Inc.
Appendix D: Example Systems Multi-Tech Systems, Inc.
Appendix D: Example Systems Multi-Tech Systems, Inc.
Appendix D: Example Systems Printing to FaxFinder What Administrators Must Tell Users Multi-Tech Systems, Inc.
Appendix D: Example Systems Sending a Fax, Client Perspective Multi-Tech Systems, Inc.
Appendix D: Example Systems Fax Message Components How the FaxFinder’s outgoing fax comes together. Sender Info Recipient Info FROM FF Fax Client Software Options screen FROM FFAddress Book Contact screen OR FF Send Fax screen Cover Page From: To: Subject : Comment : Main Body of Fax Message FROM file of application program. For example, word processor or graphics program.