
Manual

44
Chapter 6 - Deploying the VOIP Network
Multi-Tech Systems, Inc. MultiVOIP User Guide
Chapter 6 - Deploying the VOIP Network
For a Proprietary Phone Directory database, the VOIP administrator can deploy the pre-
configured slave MVP120s to their remote sites. The remote site administrators need only
connect power to the pre-configured MVP120, connect the MVP120 to the Ethernet LAN and
predefined telephone equipment, and then wait for the phone directory database to be
downloaded.
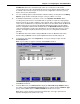
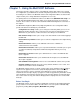
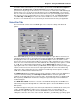
With the Gatekeeper option enabled on the Phone Directory Database dialog box, all MVP120s
are configured as Gatekeeper and cannot be downloaded. In this case, each MVP120 Phone
Book will be programmed with phone numbers for its own channel. The phone number is
registered with the H.323 Gatekeeper. See the “Registering with a Gatekeeper Phone Directory”
section discussed earlier.
Remote Site Administrator
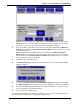
The following steps are for MVP120 H.323 endpoints. For non-MVP120 H.323 endpoints, refer to
the appropriate installation documentation.
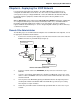
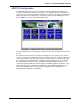
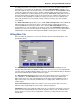
1. Connect one end of the power supply to a live AC outlet and connect the other end to the
Power connection on your MVP120 (See Figure 5).
ETHERNET
POWER
PHONE
Power Connection
Ethernet Connection
XFO
Voice/Fax Channel
Connection
FXO
PSTN
Remote Site Cable Connection
3. Connect a network cable to the ETHERNET (RJ-45) connector on the back of your
MVP120.
4. If you are connecting an FXO / PBX port or PSTN to your MVP120, connect one end of
an RJ-11 cable to the Phone connector on the back of the MVP120 and the other end to
the FXO or PSTN.
5. Turn on power to the MVP120 by placing the ON/OFF switch on the right side panel in
the ON position. Wait for the BOOT LED on the MVP120 to go off before proceeding.
This may take a couple of minutes.
6. At this time your VOIP network should be fully operational. Dial one of the sites in your
network.