Model RF102S Dual Serial Port Router with Built-in 4-Port 10/100 Switch Quick Start Guide
Quick Start Guide PN#S0000137Revision A Model RF102S Serial Port Router This publication may not be reproduced, in whole or in part, without prior expressed written permission from Multi-Tech Systems, Inc. All rights reserved. Copyright © 2001, by Multi-Tech Systems, Inc. Multi-Tech Systems, Inc. makes no representations or warranties with respect to the contents hereof and specifically disclaims any implied warranties of merchantability or fitness for any particular purpose.
Contents Introduction .................................................................................... 4 Related Documentation .................................................................. 5 Get Adobe Acrobat Reader ...................................................... 5 Get the User Guide ................................................................. 5 Save or Print the User Guide ................................................... 5 Hardware Installation ......................................
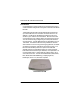
RouteFinder RF102S Quick Start Guide Introduction Congratulations on the purchase of one of the finest serial port routers available today, Multi-Tech Systems RouteFinder Model RF102S. The RouteFinder RF102S provides shared Internet access for up to 253 LAN users over a modem connection and one 1 IP address. Virtual Server (IP Mapping) enables remote client access to your network over the Internet. Remote clients can connect directly to the LAN by dialing into the asynchrous port.
Introduction Related Documentation This RF102S Serial Port Router Quick Start Guide is intended to be used by systems administrators and network managers. This guide provides the necessary information for a qualified person to unpack, cable, install software, and configure the device for proper operation. A detailed RF102S Serial Port Router User Guide in Adobe Acrobat PDF format is provided on the System CD included with your RouteFinder RF102S.
RouteFinder RF102S Quick Start Guide Hardware Installation Safety Warnings 1. Never install telephone wiring during a lightning storm. 2. Never install telephone jacks in a wet location unless the jack is specifically designed for wet locations. 3. This product is to be used with UL and cUL listed computers. 4. Never touch uninsulated telephone wires or terminals unless the telephone line has been disconnected at the network interface. 5.
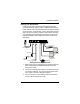
Hardware Installation Cabling your RouteFinder Cabling your RouteFinder requires making the appropriate connections to PCs, analog modem or ISDN TA (optional), AC power and the router. Because this device also provides DHCP server functions, remote access, routing, and firewall protection, after your device is properly cabled, you will need to complete your configuration by following the instructions provided in the Software Installation and Configuration section of this Quick Start Guide.
RouteFinder RF102S Quick Start Guide 4. To use the Uplink option to connect to another network segment, slide the Uplink/Normal switch into the Uplink position. Connect the LAN cable to LAN port number 1. Plug the other end of the LAN cable into another hub, router, or switch. Note: If you are not using the Uplink feature, place the switch in the Normal position. 5. Connect the provided power supply cable to the 5V DC power port on the back of the router.
Software Installation Software Installation and Configuration Before beginning the installation process, ensure that your system meets all hardware and software requirements: Intel 486 or higher processor. 10/100 BaseT cable to connect the RF102S to the network. One or two asynchronous analog modems or ISDN terminal adapters (also known as ISDN TA), or one of each . A networked computer with Windows 95/98/2000, Windows NT 3.5 or higher and TCP/IP protocol installed.
RouteFinder Quick Start Guide RouteFinder Monitor RouteFinder Monitor is a multi-purpose utility designed to let you know the status of your RF102S connection. The monitor offers the ability to point and click on an event to access context-sensitive troubleshooting procedures. Using RouteFinder Setup Wizard Note: Before beginning this procedure, ensure that your RF102S is properly connected to the network and that power is connected to the device.
Software Installation 4. When the software installation completes, the Setup Wizard dialog box displays. Click OK.
RouteFinder Quick Start Guide 5. The Setup Wizard: Device List dialog box displays. The Setup Wizard automatically checks your network for available network devices and displays them in the Device Name list. Select the device you want to configure from the Device Name list. Record the information in the Device Information area for later reference. Device IP Address ______________________ Device Firmware Version _________________ Click Next.
Software Installation 6. The Setup Wizard: Device IP Address dialog box displays. Enter the last octet of the local network IP address for this device. The Setup Wizard automatically detects the first three octets of your local IP address. You can change the network name of your RouteFinder. If you are connecting to an ISP, the device name can act as your computer name if required on the remote system. Click Next to continue. The device will search the network to ensure that the IP address is valid.
RouteFinder Quick Start Guide 7. The Select Function dialog box displays. Select IP Routing (NAT Enabled) to enable local LAN clients to share one external IP address for accessing the Internet. Select Remote Access to enable remote users to use a dial-up connection to log on to the network. Click Next.
Software Installation 8. If the Remote Access option was selected for one or both ports, the Setup Wizard: Remote Access dialog box displays. Remote Access You must define the location of your remote user account database by selecting Use Local Client List or Use RADIUS Server. Follow the instructions for the user database that your system will use. Note: The Local Client list enables you to add a maximum of 64 users.
RouteFinder Quick Start Guide Password Verification: Re-enter the remote dial-in users password. Callback Type: Select one of the following three callback options for each remote client: No Callback: Select this option to enalbe the remote user to immediately connect to the network after being authenticated. No Callback is the default setting. Fixed Callback: This option enalbes you to specify a fixed callback telephone number for the user.
Software Installation Use RADIUS Server Select this option to authenticate your remote clients on a RADIUS server. Enter the following RADIUS Server Settings: RADIUS Access Server IP Address: Enter the IP address of the RADIUS Access Server. RADIUS Accounting Server IP Address: Enter the IP address of the RADIUS Accounting Server. Secret: Enter your shared Secret RADIUS code or password. Secret Verification: To confirm your Secret code, reenter your code or password.
RouteFinder Quick Start Guide IP Routing (NAT Enabled) and IP Routing (NAT Disabled) If you select IP Routing for an asynchronous port, the Setup Wizard: IP Routing dialog box displays. Enter the information required to dial-up and login to your ISPs remote server: Telephone Number: Enter the phone number used to dial your remote server (ISP). Note: If you must dial a number to get an outside line (such as 9, or 0), enter the required number plus a w(wait) or a comma in the Telephone box.
Software Installation 9. The Setup Wizard: DNS IP Address dialog box displays. Enter your ISPs DNS Server IP address. If you are not sure of the IP address, contact your ISP. Refer to the Glossary in the User Guide for more information about the DNS Server. Click Next. 10. The Setup Wizard: Modem Settings dialog box displays.
RouteFinder Quick Start Guide The final step in configuring your RF102S for basic operations is to enter the model and DTE baudrate of the modem you are using. This is an important setting that determines the DTE baudrate or speed of communication between the RF102Ss ports and your modem or ISDN TA. Select your modem and baudrate as described on the following pages. Note: If you do not have a modem or ISDN TA attached to the RouteFinder ports, use the default modem values. 11.
Software Installation 13. The Setup Wizard: Modem Setting dialog box redisplays. Select the baudrate from the Asynchronous port settings list. Select the DTE speed (the speed of communication between the asynchronous port of the RF102S and the modem). For DCE speed compression modems, this can normally be set to about four times the speed of your modem. If you set the baudrate too high, the dial-up connection may fail.
RouteFinder Quick Start Guide 15. The Note dialog box displays indicating that you have completed the Setup Wizard. Read the IMPORTANT! information contained in the dialog box. Click Run Monitor (recommended), or click Run Manager to configure the RF102S, or click Exit. Testing your Connection When you select Run Monitor, the RouteFinder Monitor program opens. 1. To test your current settings, select Test Connection. Select Connect Port 1 to test serial port 1.
Software Installation Note: If a problem occurs while testing your connection, or you need to configure advanced options such as filtering, DHCP or routing, use RouteFinder Manager by selecting Start | Programs | RouteFinder Manager | RouteFinder Manager. Configuring your Route Finder RouteFinder Manager is the main program used to configure your RF102S. To open RouteFinder Manager, select Start | Programs | RouteFinder Manager | RouteFinder Manager. See the User Guide for more information.
RouteFinder Quick Start Guide Limited Warranty Multi-Tech Warranty & Repair Policies Multi-Tech Systems, Inc., (hereafter MTS) warrants that its products will be free from defects in material or workmanship for a period of two years from date of purchase, or if proof of purchase is not provided, two years from date of shipment. MTS MAKES NO OTHER WARRANTY, EXPRESS OR IMPLIED, AND ALL IMPLIED WARRANTIES OF MERCHANTABILITY AND FITNESS FOR A PARTICULAR PURPOSE ARE HEREBY DISCLAIMED.
Software Installation Technical Support Multi-Tech Systems has an excellent staff of technical support personnel available to help you get the most out of your Multi-Tech product. If you have any questions about the operation of this unit, or experience difficulty during installation you can contact Tech Support via the following: Phone: (800) 972-2439 (USA and Canada) (763) 785-3500 (international and local) Internet: http://www.multitech.
S0000137