SOHO Internet Security Appliance Model RF550VPN Quick Start Guide
Quick Start Guide RouteFinder Internet Security Appliance Model RF550VPN PN S000237E Revision E Copyright © 2003 This publication may not be reproduced, in whole or in part, without prior expressed written permission from Multi-Tech Systems, Inc. All rights reserved. Multi-Tech Systems, Inc. makes no representations or warranties with respect to the contents hereof and specifically disclaims any implied warranties of merchantability or fitness for any particular purpose.
Contents 1 – Introduction and Description .........................................................1 RouterFinder Documentation.............................................................1 RF550VPN Front Panel.....................................................................2 RF550VPN Back Panel .....................................................................3 2 – Installation .......................................................................................4 Safety Warnings ..................
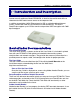
Chapter 1 – Introduction and Description 1 – Introduction and Description Welcome to the world of Internet security. Your Multi-Tech SOHO RouteFinder VPN Internet security appliance, Model RF550VPN, is ideal for the small branch office or telecommuter who needs secure access to the corporate LAN. In addition to providing a WAN Ethernet port for DSL or cable broadband Internet access, it offers both LAN-to-LAN and client-to-LAN connectivity.
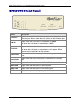
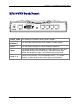
Multi-Tech Systems, Inc. RF550VPN Quick Start Guide RF550VPN Front Panel Link ACT 100 10 FDX COL 1 2 3 4 Serial WAN Data DCD Link RXD TXD PWR LEDs Description Link ACT Lights when the LAN client is correctly connected to the Ethernet port. Blinks when there is activity on the Ethernet port. 100/10 Lights when the LAN client is connected at 100MB. Off when the LAN client is connected at 10MB. Lights when the LAN client is connected as full duplex.
Chapter 1 – Introduction and Description RF550VPN Back Panel 5VDC WAN Serial Reset 4 3 2 1 Power 5VDC The power port connects the AC power adapter. 10 BT WAN (10Base-T) The WAN port connects the xDSL modem or cable modem. Serial The Serial port connects a standard modem (optional). Reset The Reset button resets the router to factory defaults. Press and hold button until the serial LEDs blink. Then release the reset button. Do not press it again - you will clear the current data.
Multi-Tech Systems, Inc. RF550VPN Quick Start Guide 2 – Installation Safety Warnings 1. Never install telephone wiring during a lightning storm. 2. Never install telephone jacks in a wet location unless the jack is specifically designed for wet locations. 3. This product is to be used with UL and cUL listed computers. 4. Never touch uninsulated telephone wires or terminals unless the telephone line has been disconnected at the network interface. 5. Avoid using a telephone during an electrical storm.
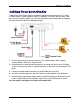
Chapter 2 – Installation Cabling Your RouteFinder Cabling your RouteFinder requires making the appropriate connections to PCs, Cable or xDSL modem, analog modem or ISDN TA (optional), AC power and the router. After your device is properly cabled, you will need to complete your configuration by following the instructions provided in the following chapter. 1. Turn the power off on all network devices (PCs, cable modems, DSL modems, analog modems, ISDN TAs, and the router). 2.
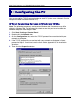
Multi-Tech Systems, Inc. RF550VPN Quick Start Guide 3 – Configuring the PC You must establish TCP/IP communication on each PC (make sure a Network Card or Adapter has been installed into each PC). If Your Operating System Is Windows 98/Me: Note: The following procedures are based on Windows 98. Procedures may differ slightly in Windows Me. For Windows 98, check to see that you have installed the Windows 98 patch dated August 1998. 1. Click Start | Settings | Control Panel. 2.
Chapter 3 – Configuring the PC 6. The TCP/IP Properties window displays. Click the IP Address tab to set your workstation’s IP Address. 7. In the IP Address dialog box, choose one of the following: · To set a Dynamic IP Address, check Obtain an IP Address Automatically. Dynamic Addresses are used in the Example Reference Guide in Example 2 – Site B and Example 3 – Site B. · To set a Fixed IP Address, check Specify an IP address.
Multi-Tech Systems, Inc. RF550VPN Quick Start Guide If Your Operating System Is Windows NT: 1. Click Start | Settings | Control Panel. 2. Double-click the Network icon. 3. The Network dialog box displays. Click the Protocols tab. Select the TCP/IP protocol line associated with your network card/adapter. If TCP/IP is not listed, see the User Guide, Appendix B, for installation directions. 4. Click the Bindings tab.
Chapter 3 – Configuring the PC 5. The Bindings dialog box displays. In the Show Bindings for drop-down list box, select all adapters. A list of all adapters displays on the lower part of the screen. Double-click the entry for your Ethernet card adapter. This expands the list. Verify that TCP/IP is included in the list below your adapter name. 6. TCP/IP and your adapter are now setup.
Multi-Tech Systems, Inc. RF550VPN Quick Start Guide 7. Next, select the Protocol tab to set your workstation’s IP Address. 8. Click the Properties button and choose one of the following: · To set a Dynamic IP Address, check Obtain an IP Address Automatically. Dynamic Addresses are used in Examples Reference Guide in Example 2 – Site B and Example 3 – Site B. · To set a Fixed IP Address, check Specify an IP address. Fixed Addresses are used in all the examples, except the two mentioned above.
Chapter 3 – Configuring the PC If Your Operating System Is Windows 2000/XP 1. Click Start | Settings | Control Panel. Double-click the Network and Dial-Up Connections icon. 2. The Network and Dial-Up Connections screen displays. Right-click the Local Area Connection icon and choose Properties. 3. The Local Area Connection Properties dialog box displays. · Select Internet Protocol [TCP/IP]. Once the protocol is selected, the name of your adapter card should display in the Connect using box.
Multi-Tech Systems, Inc. RF550VPN Quick Start Guide 4 – Navigating the Screens Buttons on the Main Menu When you select a function by clicking the button at the top of the screen, the button will change from red to blue denoting that this is now the active screen. Buttons on the Function Screens · Buttons at the Top of the Screen: These are the main function buttons.
Chapter 5 – Configuring the RF550VPN 5 – Configuring the RF550VPN About the Browser Interface Initial configuration is required in order for you to begin operation. The browserbased interface eases VPN configuration and management. About IPSec The VPN functionality is based on the IPSec protocol and uses 168-bit Triple DES (3DES) encryption to ensure that your information remains private. Start the RF550VPN Configuration 1. Connect your workstation.
Multi-Tech Systems, Inc. RF550VPN Quick Start Guide 5. The Password dialog box displays. Type your network password. · Type admin (admin is the default user name) in the user name box. Leave the password box empty. · Click OK. The Setup Wizard screen displays. Note: To change your password, select Advanced Settings, and then choose Administrative Settings. See the User Guide for details. 6. The Main Menu displays. On the Main Menu, click the Setup Wizard 14 button.
Chapter 5 – Configuring the RF550VPN Setup Wizard When the Setup Wizard screen displays, the Setup Wizard button will turn blue to indicate that the screen is active. The following screen is the first Setup Wizard screen. From here you will follow a stepby-step process that lets you input all of the basic settings to configure your RF550VPN. – Time Zone Selection Select the time zone, and then click the Next button to continue. You can also click the buttons on the left side of the screen.
Multi-Tech Systems, Inc. RF550VPN Quick Start Guide – Device IP Settings On this screen, enter the internal LAN IP address that you want to assign to the LAN port of the RF550VPN. This is not the IP address from your ISP – it is the local internal LAN IP address. Device IP Address: The default IP address of your RF550VPN: 192.168.2.1. Device IP Subnet Mask: The subnet mask can usually be left at its default of 255.255.255.0 Click the Next button.
Chapter 5 – Configuring the RF550VPN – ISP Settings On this screen you can select to have the program automatically get your IP settings from your ISP DHCP server or you can choose one of four options for manually inputting your IP settings. 1. From the drop down list box, select the type of settings you will be entering. The default screen is Static IP Settings. 2a. Static IP Settings Use this screen when your ISP requires you to enter your ISP settings and you want to use static IP settings.
Multi-Tech Systems, Inc. RF550VPN Quick Start Guide 2b. Other ISP Setting Options: Connect to Cable ISP and PPPoE Settings Connect to Cable ISP Use this screen to have the program automatically get your IP settings from your ISP DHCP server and to see a description of each option. · Select Connect to Cable ISP. · Click Next. 18 PPPoE Settings Use this screen when your ISP requires you to enter your ISP settings and you want to use PPPoE settings.
Chapter 5 – Configuring the RF550VPN 2b (Continued). Other Options: PPTP Settings, Telstra Settings PPTP Settings Use this screen when your ISP requires you to enter your ISP settings and you want to use PPTP settings. · Enter your User Name, Password, Retype the Password (for verification), select your idle time, enter your PPTP Client IP address, PPTP Server IP address, and your Connection ID or Name. · Select your Connection Type by clicking on the desired connection type button.
Multi-Tech Systems, Inc. RF550VPN Quick Start Guide – ISP Additional Settings If your ISP requires you to manually input your system information, use the fields on this screen to fulfill that requirement. 1. Check the box labeled Your ISP requires you to manually setup DNS settings if your ISP requires this. Then enter the DNS (Domain Name Server) address or addresses. These can be left as 0.0.0.0 for a LAN-to-LAN RouteFinder connection. 2.
Chapter 5 – Configuring the RF550VPN – Modem Settings (Optional) A modem can be used as a dialup backup to the Cable/xDSL connection. The checkbox Dialup Modem When Cable/xDSL is not connected should be checked in order to use the modem as a backup to cable or xDSL when the cable or xDSL are not working. To add the modem to your setup, connect the modem and input the ISP account settings.
Multi-Tech Systems, Inc. RF550VPN Quick Start Guide – VPN Settings Use this screen to input your LAN-to-LAN VPN settings and/or your Client-to-LAN VPN settings. 1. In the Connection Name field, type a name that describes a connection you would like to make. Example: Site A. 2. Click the Add button, and the VPN Settings detail screen will display (see the next screen). Once you have entered the settings, the Connection Name displays on the lower half of the screen (above). 3.
Chapter 5 – Configuring the RF550VPN – Enter the VPN Specific Settings Your Connection Name defaults into the Connection Name box. Enter the following: VPN Setting Name Description Enable/Disable UID Accept the default Disable UID. When Disable is selected the Local and Remote IPSEC Identifier fields are not active.
Multi-Tech Systems, Inc. RF550VPN Quick Start Guide Remote IPSec Identifier). Enable Keep Alive When enabled, will automatically renegotiate VPN if a Enabled tunnel is temporarily interrupted. Choose whether the remote site will be used by a Remote Site single user or a LAN. When enabled, will allow Microsoft File and Printer Enabled Enable NetBIOS sharing to communicate information about computers Broadcast on the network. 192.168.10.0 Remote IP Network Enter Remote IP Network address (LAN) for Site B.
Chapter 5 – Configuring the RF550VPN – Save and Restart After you have finished entering and/or editing the information on the previous screens, click the Save and Restart button on the left-hand side of the screen. This will save all of the preceding settings and restart the device. After the restart, the device will function according to the saved settings.
Multi-Tech Systems, Inc. RF550VPN Quick Start Guide 6 – Technical Support Multi-Tech provides free technical support for as long as your product remains in service. Before calling Technical Support, please read through the Troubleshooting chapter in the User Guide. Also, complete the Recording RouteFinder Information section below. Contacting Technical Support Country Using email By phone France India U.K. Rest of World Support@multitech.fr Support@multitechindia.com Support@multitech.co.
Warranty Multi-Tech Systems, Inc., (hereafter “MTS”) warrants that its products will be free from defects in material or workmanship for a period of two, five, or ten years (depending on model) from date of purchase, or if proof of purchase is not provided, two, five, or ten years (depending on model) from date of shipment. MTS MAKES NO OTHER WARRANTY, EXPRESS OR IMPLIED, AND ALL IMPLIED WARRANTIES OF MERCHANTABILITY AND FITNESS FOR A PARTICULAR PURPOSE ARE HEREBY DISCLAIMED.