
Instruction Manual

2 of 3
DocumentNumber:020007984 June06,2022
Subject: FreshBlender Water Filtration Retrofit
INSTALLATION
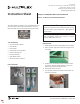
6. Carefully hang water filtration bracket on back of unit as
shown below.
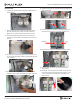
7. Position water filtration bracket so it does not extend
past the side of the unit. Make sure water filtration
gauges do not come in contact with the drain funnel.
8. Hold Assembly firmly against machine and mark the
location of the two holes in the bracket onto the rear of
the unit.
9. Remove water filter bracket and carefully pre-drill holes
in rear of unit with 3/32” drill bit to a maximum depth of
1/4”(6.35mm).
10. Hold Assembly firmly against machine and drill 2 self-
tapping screws in holes. Start with the bottom hole first.
11. Tighten the four (4) nuts located behind the gauges with
3/8” Drive Socket.
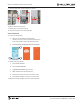
12. Use permanent marker to write install date on each filter.
13. Carefully insert the Pre-filter in the left assembly slot.
Carefully insert the Filter in the right assembly slot.
Pre-filter Filter
14. Connect water inlet line to left water line of assembly.
15. Connect water at rear of unit and turn ON water
shutoff valve.
16.Hold water line from right of assembly over bucket and
flush water line by pressing open quick connect. Flush
line for minimum of 5 minutes and until water is no
longer cloudy.