Operation and Parts Manual MODEL MB25HD REBAR BENDER (PORTABLE ELECTRIC) Revision #0 (04/05/10) To find the latest revision of this publication, visit our website at: www.multiquip.com THIS MANUAL MUST ACCOMPANY THE EQUIPMENT AT ALL TIMES.
Table of contents MB25HD REBAR BENDER Table of Contents...................................................... 2 Parts Ordering Procedures....................................... 3 Safety....................................................................... 4 Rules and Regulations.......................................... 5-6 Specifications........................................................... 7 General Information.................................................. 8 Components.........................
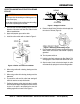
www.multiquip.com parts ordering procedures Ordering parts has never been easier! Choose from three easy options: Order via Internet (Dealers Only): Best Deal! Effective: January 1st, 2006 If you have an MQ Account, to obtain a Username and Password, E-mail us at: parts@multiquip. com. Order parts on-line using Multiquip’s SmartEquip website! ■ View Parts Diagrams ■ Order Parts ■ Print Specification Information To obtain an MQ Account, contact your District Sales Manager for more information.
safety FOR YOUR SAFETY AND SAFETY OF OTHERS! HAZARD SYMBOLS Safety precautions should be followed at all times when operating this equipment. Failure to read and understand the Safety Messages and Operating Instructions could result in injury to yourself and others. Potential hazards associated with the operation of this equipment will be referenced with Hazard Symbols which appear throughout this manual, and will be referenced in conjunction with Safety Message Alert Symbols.
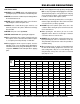
rules and regulations WARNING — Read This Manual Failure to follow instructions in this manual may lead to serious injury or even death! This equipment is to be operated by trained and qualified personnel only! This equipment is for industrial use only. general safety DO NOT operate or service this equipment before reading this entire manual. This equipment should not be operated by persons under 18 years of age.
rules and regulations electrical safety This unit is equipped with a 3-prong male power plug. DO NOT use a 2-prong adapter when plugging into a wall outlet. This will defeat the purpose of the ground circuit. If the plug does not fit into the receptacle, contact a qualified electrician to install a 3-conductor wall receptacle (outlet). ALWAYS test the POWER switch on the equipment before operating. The purpose of this switch is to shut down the power.
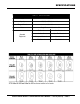
SPECIFICATIONS TABLE 1. SPECIFICATIONS Model MB25HD Capacity Ø6(1/4") - Ø25(1"), No.2 - No.8 Range of Bends 0° - 180° Motor Single Phase, 115 V, 60 Hz, 15A Standard Equipment Roller - 3 Allen Wrench - 2 Collar - 5 Open-End Wrench - 1 Waterproof Cover - 1 Screwdriver - 1 Tool Box - 1 Foot Switch - 1 MB25HD REBAR BENDER • operation and parts manual — rev.
GENERAL INFORMATION GENERAL INFORMATION The MQ MB25HD Rebar Bender is designed to be used as a portable on-site rebar bender, capable of bending in-place rebar to approved American Concrete Institute (ACI) radius. Labor time and injuries are greatly reduced from manually bending rebar. The MB25HD is capable of bends up to 180°. The MB25HD comes standard with 3 rollers and 5 collars which can be used in different combinations to match the diameter of the rebar to be bent.
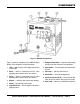
components Figure 1. MB25HD Components Figure 1 shows the components of the MB25HD Rebar Bender. These components are described below. 7. Emergency Stop Switch — Stops the rebar bending and moves the roller back to the starting position. 1. Table — Holds the roller, collar, stopper and the rebar to be bended. 8. Power Switch — Turns the power of the rebar bender on or off. 2. Roller — Works in combination with the collar depending on the diameter of the rebar to bend. 9.
operation SELECTION AND INSTALLATION OF ROLLER AND COLLAR REBAR WARNING Keep fingers from the bending area. Moving parts can cause serious injury. Do not drop anything into the machine from the bending area as this may damage the machine. 1. Select the roller and corresponding collar to match the diameter of the rebar to be bent. See Table 2 for the different combinations. CORRECT WRONG STOPPER Figure 3. Stopper Position 8.
operation using the foot switch WARNING Instead of the Start Switch, the Foot Switch can be used to start the bending process. See Figure 5. PLUG TO CONNECTOR ON FRONT PANEL PUSH PEDAL TO START BENDING Figure 5. Starting with the Foot Switch 1. Insert the plug of the foot switch to the Foot Switch Connector on the front panel of the rebar bender. The roller goes back to start position very quickly after bending because of the spring mechanism.
maintenance REMOVING STEEL DEBRIS 1. To remove steel debris from the machine, tilt it and clear all debris from the outlet. 1. Make sure that the power plug is not connected to the power source. WARNING Do not let debris or rust accumulate inside the machine as this could lead to malfunction of the machine. CARBON BRUSH CAP REPLACING CARBON BRUSHES Figure 8. Replacing Carbon Brushes WARNING Unplug unit from power source before replacing carbon brushes. 2.
Maintenance WARNING Unplug unit from power source before troubleshooting. TABLE 4. TROUBLESHOOTING SYMPTOM Steel bar will not end because of clutch slipping. Motor and clutch do not work while the current is on. Irregularity in bending angles. Abnormal noise from motor. POSSIBLE PROBLEM SOLUTION Is clutch worn out? Replace clutch. Is there an abnormal voltage drop? Check cause of abnormal voltage drop. Are steel bars too hard? Use steel bars with correct hardness.
explanation of code in remarks column The following section explains the different symbols and remarks used in the Parts section of this manual. Use the help numbers found on the back page of the manual if there are any questions. NOTICE The contents and part numbers listed in the parts section are subject to change without notice. Multiquip does not guarantee the availability of the parts listed. Sample partS liSt NO. 1 2% 2% 3 4 part NO. part Name QtY. remarKS 12345 BOLT......................1 .....
suggested spare parts MB25HD REBAR BENDER 1 to 3 Units Qty. P/N Description 2............M5CBC65D00.......HOLDER CAP 2............M5CBS65D00........CARBON BRUSH MB25HD REBAR BENDER • operation and parts manual — rev.
MB25HD — CASE assembly page 16 — MB25hd rEBAR BENDER • operation and parts manual — rev.
mb25HD — CASE assembly NO. A A1# A2# A3# A4# A5# A6# A7# A8# A9# A10# A11# A12# A13# A14#% A15#% A16# A17#% A18# A19 A20 A21 A22 A23 A24 A25 A26 A27 A28 A29 A30 A31 A32 A33 A34 A35 A36 A37 A38 A39 A40 PART NO.
MB25hd — CASE assembly (Continued) page 18 — MB25hd rEBAR BENDER • operation and parts manual — rev.
mb25hd — CASE assembly (continued) NO. A41 A42 A43 A44 A45 A46 A47 A48 A49 A50 A51 A52 A53 A54 A55 A56 A57 A58 A59 PART NO. 7410040 M5B6205Z00 3503500 3601890 M5K0707300 3602180 M5B6004000 M5SNR47H00 M5B6005Z00 M5T4330000 M5T4329600 M5CLMMC500 M5SRP05260 7513000 M5T4336300 M5B6004000 M5T2073500 3300100 3300090 PART NAME STOP RING S24 BALL BEARING 6205Z COLLAR NO.1 FOR GEAR NO.5 GEAR NO.5 KEY FOR GEAR NO.5 GEAR NO.6 BALL BEARING 6004Z STOP RING H47 BALL BEARING 6005Z GEAR NO.4 COLLAR NO.
mb25HD — HOUSING assembly page 20 — MB25hd rEBAR BENDER • operation and parts manual — rev.
mb25hd — HOUSING assembly NO. B1 B2 B3 B3 B3 B3 B3 B3 B4 B5 B6 B7 B7 B7 B7 B7 B8 B9 B10 B11 B12 B13 B14 B15 B16 B17 B18 B19 B20 B21 B22 B23 B24 B25 B26 B27 B28 B29 B30 B31 PART NO.
mb25hd — HOUSING assembly (continued) page 22 — MB25hd rEBAR BENDER • operation and parts manual — rev.
mb25hd — HOUSING assembly (CONTINUED) NO. B32 B33 B34 B35 B36 B37 B38 B39 B40 B41 B42 B43 B44 B45 B46 B47 B48 B49 B50 B51 B52 B53 B54 B55 B56 B57 B58 B59 B60 B61 B62 B63 B64 B65 B66 B67 B68 B69 B70 B71 PART NO.
mb25hd — HOUSING assembly (continued) page 24 — MB25hd rEBAR BENDER • operation and parts manual — rev.
mb25hd — HOUSING assembly (CONTINUED) NO. B72 B73 B74 B75 B76 B77 B78 B79 B80 B81 B82 B83 B84 B85 B86 B87 B88 B89 B90 B91 B92 B93 B94 B95 B96 B97 B98 B99 B100 B101 B102 B103 B104# B105# B106# B107 B108 B109# B110# B111# B112 PART NO.
mb25HD — tool box and tools assembly page 26 — MB25hd rEBAR BENDER • operation and parts manual — rev.
mb25HD — tool box and tools assembly NO. 1 2* 3 4 5 6 7 8 9 10 11* 12* 13* 14* PART NO. 9010060 8103030 3150570 9000850 9000840 9000890 3505720 3505730 3505740 3505750 8201020 8201510 8200020 8200120 PART NAME QTY. REMARKS TOOL BOX SET..................................................... 1............INCLUDES ITEMS W/# TOOL BOX 1 ROLLER NO. 25 (ø51) 1 ROLLER NO.19 (ø92) 1 ROLLER NO.16 (ø138) 1 COLLAR NO.25 (ø125) 1 COLLAR NO.22 (ø110) 1 COLLAR NO.19 (ø95) 1 COLLAR NO.16 (ø56) 1 COLLAR NO.
mb25hd — WIRING DIAGRAM page 28 — MB25hd rEBAR BENDER • operation and parts manual — rev.
terms and conditions of sale — parts PAYMENT TERMS 5. Parts must be in new and resalable condition, in the original Multiquip package (if any), and with Multiquip part numbers clearly marked. 6. The following items are not returnable: Multiquip reserves the right to quote and sell direct to Government agencies, and to Original Equipment Manufacturer accounts who use our products as integral parts of their own products. a. SPECIAL EXPEDITING SERVICE Terms of payment for parts are net 30 days.
Operation and Parts Manual HERE’S HOW TO GET HELP PLEASE HAVE THE MODEL AND SERIAL NUMBER ON-HAND WHEN CALLING United StateS Multiquip Corporate Office 18910 Wilmington Ave. Carson, CA 90746 Contact: mq@multiquip.com MQ Parts Department Tel. (800) 421-1244 Fax (800) 537-3927 Mayco Parts 800-427-1244 310-537-3700 Fax: 800-672-7877 Fax: 310-637-3284 Warranty Department 800-306-2926 310-537-3700 Fax: 800-672-7877 Fax: 310-637-3284 Service Department 800-421-1244, Ext. 279 310-537-3700, Ext.