
user manual

HTN- SERIES • RIDE-ON POWER TROWEL — OPERATION MANUAL — REV. #0 (06/06/07) — PAGE 27
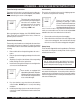
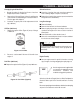
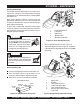
1. Air Cleaner Cover
2. Latch Spring
3. Lever Latch
4. Latch Lever Pin
5. Wing Nut
6. Inner Air Cleaner Cover
7. Precleaner Element
8. Air Cleaner Element
9. seal
10. Air Cleaner Bracket
11. Air Cleaner Base
12. Air Cleaner Base Gasket
13. Intake Manifold Gasket
14. Intake Manifold
15. screw
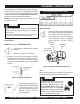
1. Release the latches located on either side of the air cleaner
cover (Figure 13), and remove the cover.
2. Remove the wing nut, element cover, seal and air cleaner
element.
3. Remove the precleaner (if so equipped) from the paper
element.
4. Do not wash the paper element or use pressurized air, as
this will damage the element. Replace a dirty, bent, or
damaged element with a new element as prescribed by
the engine manufacturer. Handle new elements carefully;
do not use if the sealing surfaces are bent or damaged.
5. Reinstall the seal, paper element, precleaner, element
cover, flat washer and wing nut.
6. Reinstall the air cleaner cover and secure the latches.
Paper Element Service (Standard Type)
Check the paper element every 100 hours of operation (more
often under extremely dusty or dirty conditions). Replace the
element as necessary.
Refer to the following steps and to Figure 13:
NOTE
Make sure the correct depth air
cleaner element and rubber seal are
used for the engine spec. involved.
HTN-SERIES — MAINTENANCE
Disassembly and Reassembly (Standard Type)
If the base plate on the standard type must be removed, proceed
as follows:
1. Remove the air cleaner components as described
previously.
2. Remove the hex flange screws securing the bracket and
base.
3. Remove the base and gasket. Carefully pull the rubber
breather tube through the base
4. Remove the tube from under side of base if necessary.
5. Reverse the foregoing steps to reinstall new or service
components. Tighten screw to 9.9 N-m (88 in. lb.) torque.
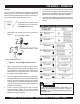
Air Cleaner - Components to Check
Whenever the air cleaner cover is removed, or the paper element
or precleaner is serviced, check the following:
■
Air Cleaner Element Cover and Seal - Make sure the
element cover is not bent or damaged. Make sure the wing
nut, washer and seal are in place to ensure the element is
sealed against leakage.
■
Air Cleaner Base - Make sure the base is secured tightly to
carburetor and not cracked or damaged.
■
Breather Tube - Make sure the tube is installed to both the
air cleaner base and the breather cover.
Air Intake/Cooling System
To ensure proper cooling, make sure the grass screen and fan
cooling fins and other external surfaces of the engine are kept
clean at all times.
Every 100 hours of operation (more often under extremely dusty
or dirty conditions:
Operating the engine with a blocked grass screen, dirty or
plugged cooling fins, and/or cooling shrouds removed, will
cause engine damage due to overheating.
1. Remove the blower housing and other cooling shrouds.
2. Clean the cooling fins and external surfaces as necessary.
3. Make sure the cooling shrouds are reinstalled.
CAUTIONCAUTION
CAUTIONCAUTION
CAUTION
Air Cleaner Components - See Figure 13.