
Specifications


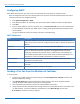


HARDWARE AND INSTALLATION
1. Position a mounting bracket on the right side as shown.
2. Secure the bracket to right side using three provided screws as shown.
3. Position a mounting bracket on the left side.
4. Secure the bracket to left side using three provided screws.
5. Remove feet (4) from the unit.
6. Secure the unit to rack rails by the brackets and mount the FaxFinder in the rack enclosure per the rack
manufacturer's mounting procedure. Because equipment racks vary, screws for rack-rail mounting are not
provided. Follow the instructions of the rack manufacturer and use screws that fit.
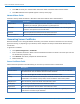
Mounting a FaxFinder Expansion Module in a 19-inch Rack
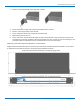
Images below show the dimensions for both the 8-port and 16-port FaxFinder Expansion Modules. To rack mount
an Expansion Unit, follow the steps for rack mounting the FaxFinder Fax Server.
Dimensions with brackets attached for rack mounting (top view)
Dimensions with brackets attached for rack mounting (front view)
FaxFinder
®
Fax Server FF240, FF440, FF840 Administrator Guide 23