Model MTPSR2-201 User Guide
User Guide 88301800 Revision A ProxyServer with 56K DSU (Model No MTPSR2-201) This publication may not be reproduced, in whole or in part, without prior expressed written permission from Multi-Tech Systems, Inc. All rights reserved. Copyright © 1998, by Multi-Tech Systems, Inc. Multi-Tech Systems, Inc. makes no representations or warranties with respect to the contents hereof and specifically disclaims any implied warranties of merchantability or fitness for any particular purpose.
Contents Chapter 1 - Introduction and Description Introduction ................................................................................................................................................ 6 Preview of this Guide ................................................................................................................................. 6 Front Panel Description ............................................................................................................................
Chapter 6 - Warranty, Service and Tech Support Introduction .............................................................................................................................................. Limited Warranty ...................................................................................................................................... On-line Warranty Registration ............................................................................................................ Tech Support .....
Chapter 1 - Introduction and Description
DSU ProxyServer User Guide Introduction Welcome to Multi-Tech's new DSU ProxyServer, model number MTPSR2-201, a single, secure gateway that provides multiple LAN users with high performance Internet access over a leased line. The DSU ProxyServer functions as a TCP/IP proxy server that resides on the outer edge of your firewall and provides up to 56K of bandwidth to LAN users.
Chapter 1 - Introduction and Description Chapter 5 - Remote Configuration and Management Chapter 5 provides procedures for changing the configuration of a remote ProxyServer. Remote configuration allows you to change the configuration of a unit by simply connecting two modems between the two ProxyServers and remotely controlling the unit. Chapter 5 also describes typical client applications (i.e., Telnet and Web-based management) used for remote configuration of the ProxyServer.
DSU ProxyServer User Guide Front Panel Description The front panel, shown in Figure 1-2, contains three groups of LEDs that provide the status of the Ethernet connection, 56K DSU port, WAN port, and general status of the ProxyServer. The Ethernet LEDs indicate the status LAN activity, the 56K DSU LEDs indicate the status of the internal DSU port (WAN 1), and the WAN Link LEDs indicate the status of the external DCE device (WAN 2).
Chapter 1 - Introduction and Description Back Panel Description The cable connections for the ProxyServer are made at the back panel. Connectors include Power, Command Port, 10BASET (Ethernet), 56K DSU and RS232/V.35. The cable connectors are shown in Figure 1-3 and defined in the following groups. RS232/V.35 56K DSU 10BASET COMMAND POWER ON OFF Figure 1-3. Back Panel RS232/V.35 Connector The RS232/V.
DSU ProxyServer User Guide Specifications • Protocols - Point-To-Point Protocol (PPP), Multilink Point-To-Point Protocol (MLPPP), and Serial Line Internet Protocol (SLIP) • One 1 Meg by 32 byte at 70 nanosecond SIMM is 4Mb DRAM Caution: SIMM speed and size cannot be mixed • One Megg of flash memory Ethernet Port • Single Ethernet Interface - 10Base-T (twisted pair) RJ-45 connector. 56K DSU Port • Single 56K bps DDS 4-wire RJ45/48 connector Command Port • Single 19.
Chapter 2 - Installation
DSU ProxyServer User Guide Safety Warnings 1. Never install telephone wiring during a lightning storm. 2. Never install telephone jacks in wet locations unless the jack is specifically designed for wet locations. 3. Never touch uninsulated telephone wires or terminals unless the telephone line has been disconnected at the network interface. 4. Use caution when installing or modifying telephone lines. 5. Avoid using a telephone (other than a cordless type) during an electrical storm.
Chapter 2 - Installation 8-Position DIP Switch The ProxyServer is equipped with a 8-position DIP switch. Figure 2-2 shows the DIP switch, and the chart that follows details the default positions and other options. 1 2 3 4 5 6 7 8 Figure 2-2. 8-position DIP switch Position 1: OPEN* (up) Normal Mode operation Closed (down) Loopback Mode operation Position 2: OPEN* (up) DDS clocking Closed (down) Internal Clocking Positions 3 - 8: Reserved for future use.
DSU ProxyServer User Guide 5 Pry the shunt out of the RS232 position, and insert it in the V.35 position. 8-Position DIP Switch LEDs Back Panel Connectors 5 6 7 8 RAM Sockets V.35 Shunt Position RS232C Shunt Position Figure 2-4. Shunt Positions Note: if you wish to make changes to the 8-position DIP switch, do so at this time. For details on DIP switch settings, refer to the previous section, 8-Position DIP Swtich.
Chapter 2 - Installation Cabling Your ProxyServer Cabling your ProxyServer involves making the proper Power, Command Port, Ethernet and 56K DSU connections. An optional WAN connection is provided to connect to an external WAN device. Figure 2-5 shows the back panel connectors and the associated cable connections. RS232/V.35 56K DSU 10BASET COMMAND POWER ON OFF Power Connection DCE Connection DDS WAN Connection PC Connection Ethernet Connection Figure 2-5.
DSU ProxyServer User Guide 16
Chapter 3 - Software Loading and Configuration
DSU ProxyServer User Guide Loading the Proxy Server Software The following loading procedure does not provide every screen or option in the process of installing the ProxyServer software. The assumption is that a technical person is doing the installation and that a thorough knowledge of Windows and the software loading process is understood. Additional information on the ProxyServer software is provided in Chapter 4 - Proxy Server Software, as well as in the on-line help system provided with the software.
Chapter 3 - Software Loading and Configuration 5. The following dialog box selects the COM port of your PC connected to the Command port of the ProxyServer. From the Select Port window, click on the down arrow and choose the COM port of your PC. Click OK to continue. 6. The following screen appears. Click Finish to continue. 7. The following screen appears. Click Yes to download the default setup.
DSU ProxyServer User Guide 8. The IP Setup dialog appears. 8. Select the proper port from the Port Selection list. By default, LAN is selected. Change the default IP Address and Net Mask to your unique LAN address. Highlight WAN 1, and choose either ISP Assigns Dynamic Address (default) to allow the ISP to automatically assign the ProxyServer IP address and Net Mask, or disable ISP Assigns Dynamic Address by clicking the check box, and statically assign the IP Address and Net Mask.
Chapter 3 - Software Loading and Configuration 11. The configuration is written to the ProxyServer and the following screen is displayed. 12. After the setup is written to the ProxyServer, the unit is rebooted. 13. Check to ensure that the FAIL LED on the ProxyServer is off after the download is complete and the ProxyServer is rebooted. 27. Win3.1 users - you are returned to your Program Manager where the Proxy Server program group and Program Item (Windows icons) have been created.
DSU ProxyServer User Guide 22
Chapter 4 - Proxy Server Software
DSU ProxyServer User Guide Introduction This chapter describes the Proxy Server software from an applications standpoint, showing how to make changes in the configuration with recommendations on the impact of any such changes. The major configuration parameters were set when the software was loaded into your PC and the setup configuration was downloaded to the ProxyServer at the conclusion of the software installation. The Proxy Server software is designed for the Microsoft WindowsTM environment.
Chapter 4 - ProxyServer Software Download Default Setup This feature allows you to download the default settings, configured during installation, to the ProxyServer. If you are installing for the first time, you will download this setup at the end of the installation before operating the ProxyServer. If you have made changes to the Proxy Server Configuration and wish to revert to the default setup, you can do so through the Proxy Server 2.01 program group.
DSU ProxyServer User Guide Proxy Server Configuration To view or change your ProxyServer configuration in Windows 95, click Start | Programs | Proxy Server 2.01 | Proxy Server Configuration, or double click on the ProxyServer Configuration icon in the Proxy Server 2.01 program group. After loading, the Proxy Setup menu will appear.
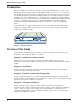
Chapter 4 - ProxyServer Software Typical Application A typical application for a ProxyServer is shown in Figure 4-1 below. In this application, the ProxyServer has been configured for a 56K DSU leased line connection to the Internet. The LAN users at the various workstations on the LAN share dial-up services to the Internet and the ProxyServer maintains secure access to the network from the Internet. Internet 56K DSU Connection DSU ProxyServer LAN Connection IP Address 192.168.0.101 Mask 255.255.255.
DSU ProxyServer User Guide The WAN ports were configured during setup so that WAN 1 (DSU) is enabled and WAN 2 is disabled. The sections that follow provide examples of how to add some of the advanced features that enhance and build upon this basic setup.
Chapter 4 - ProxyServer Software Adding an Optional DCE Device In the application shown below, the ProxyServer has been configured for both a 56K DSU leased line connection to the Internet, and an RS232/V.35 connection via the WAN 2 port (i.e., external modem, T1 CSU, etc.). Each WAN port can be configured with a unique User Name and Password or, as in this application, can be configured to use Multi-Link PPP (see, Enabling MultiLink PPP, in this chapter for more details).
DSU ProxyServer User Guide The User Name and Password for both ports are unique to the port, and WAN 2 has been configured for use with an external modem (the Dial Number field should be configured with the telephone number of the ISP).
Chapter 4 - ProxyServer Software Enabling Multi-Link PPP If you have an optional DCE device connected to WAN 2, the ProxyServer can be configured to make use of Multi-Link Point-to-Point Protocol (MLPPP). This feature allows the ProxyServer to bond the WAN ports (56KDSU and RS232/V.35) together and dynamically allocate bandwidth to LAN users.
DSU ProxyServer User Guide Adding Proxy Applications Certain software on your LAN may require a TCP or UDP port usage that is not currently supported by the ProxyServer. If this is the case, you can refer to RFC 1700 on the Internet which defines the Internet Protocol suite. RFC 1700 identifies the parameters, such as Internet address, domain names, autonomous system numbers, protocol numbers, port numbers, and much more.
Chapter 4 - ProxyServer Software Enabling the DHCP Server The DHCP Server feature of the ProxyServer manages all IP address assignments within a workgroup. IP address management becomes completely transparent. To enable the DHCP Server ability in the ProxyServer, click on the DHCP Server button in the Proxy Setup menu. The DHCP Server Setup dialog box appears. The DHCP Server Setup menu allows you to customize each client PC configuration from one central point.
DSU ProxyServer User Guide Enabling Virtual Servers The Virtual Server Setup dialog box allows you to assign a virtual address to a statically assigned server. For example, if the ISP assigns static address of 200.2.9.1, you can set up a virtual server so that any requests sent to 200.2.9.1 will access 192.168.0.102. Click on the Virtual Servers button in the Proxy Setup menu. The Virtual Server Setup dialog box appears. To add a Virtual Server, type a valid IP address (200.2.9.
Chapter 4 - ProxyServer Software Applications In addition to local configuration, the ProxyServer supports various applications which allow it to be configured remotely from anywhere on the connected Internet. To manage these applications, click Others in the Proxy Setup menu. The Applications Setup dialog box appears. Enter a valid Server Password and Server IP Address (the IP address of the ProxyServer) and then verify that the desired applications are enabled.
DSU ProxyServer User Guide Diagnostics The ProxyServer is equipped with a built-in diagnostics utility that can be accessed through the COM port of your PC (remote users cannot access diagnostics). Click Built-in Test in the Proxy Setup menu and the Diagnostics dialog is displayed. Select the port you wish to run diagnostics on from the Test Port group (Ethernet, WAN 1 or WAN 2), then click Test to start the test.
Chapter 5 - Remote Configuration and Management
DSU ProxyServer User Guide Introduction This chapter provides procedures for changing the configuration of a remote unit. Remote configuration allows a PC at one site (local site) to dial a remote ProxyServer and change the configuration of that remote unit. Remote configuration can be accomplished either directly through the LAN or remotely using modems.
Chapter 5 - Remote Configuration and Management In the Dial String field, enter the AT command for dialing (ATDT) plus the phone number of the remote ProxyServer. If your Modem Initialization String, Initialization Response, or Connect Response values are different than the defaults in the dialog box, refer to your modem user documentation and change the default values to match your modem. Click OK when you are satisfied with your selections. 6 Run the Proxy Server Configuration program.
DSU ProxyServer User Guide LAN-Based Remote Configuration Procedure Windows Sockets Compliant TCP/IP Stack The configuration program requires a Windows Sockets compliant TCP/IP stack. TCP/IP protocol software must be installed and functional before the configuration program can be used. 1 You must assign an Internet (IP) address for the PC and for each node that will be managed by the configuration program. Refer to the protocol software documentation for instructions on how to set the IP addresses.
Chapter 5 - Remote Configuration and Management The Reading Setup dialog box is displayed. 6 The Proxy Setup dialog box is displayed. This is the dialog box of the remote ProxyServer. Refer to the on-line help provided with your ProxyServer for the definition of each dialog box and field within a dialog box. 7 After you have changed the configuration of the remote ProxyServer, click Download Setup to update the configuration.
DSU ProxyServer User Guide Remote Management This section describes typical client applications that can be used to configure the ProxyServer remotely. It is important to note that although any subsequent changes to configuration can be made using these applications, the initial setup and configuration of the ProxyServer must be done on the local PC, using the ProxyServer software provided with your unit.
Chapter 5 - Remote Configuration and Management Proxy Server Management Menu The Proxy Server management menu provides five basic options: Dial-out, Proxy Server Management, Proxy Server Configuration, WAN Device Configuration, and Remote User Data Base. A further option enables you to close the Telnet session from this menu by pressing the Esc key.
DSU ProxyServer User Guide Proxy Server Configuration This menu provides options that correspond to seven buttons on the Proxy Setup screen or Main Menu. They include IP, Internet, WAN, Others, Proxy Server, DHCP Server, and Virtual Servers. WAN Device Configuration The WAN Device Configuration option enables you to gain direct access to the ISDN Line on the WAN port in WANTalk mode.
Chapter 5 - Remote Configuration and Management WEB Management The ProxyServer can be accessed, via a standard web-browser, from anywhere on the connected Internet. In order to provide this support, the WEB Server option has to be enabled in the Applications Setup dialog box (see Chapter 4 - Proxy Server Configuration, Applications). Once enabled, users can access the ProxyServer by entering its IP address in the destination field of their web browser. The following screen appears.
DSU ProxyServer User Guide 46
Chapter 6 - Warranty, Service and Tech Support
DSU ProxyServer User Guide Introduction This chapter starts out with statements about your Dual Ethernet ProxyServer 2-year warranty. The next section, Tech Support, should be read carefully if you have questions or problems with your ProxyServer. It includes the technical support telephone numbers, space for recording your product information, and an explanation of how to send in your ProxyServer should you require service.
Chapter 6 - Warranty, Service and Tech Support Tech Support Multi-Tech has an excellent staff of technical support personnel available to help you get the most out of your Multi-Tech product. If you have any questions about the operation of this unit, call 1800-972-2439. Please fill out the ProxyServer information (below), and have it available when you call. If your ProxyServer requires service, the tech support specialist will guide you on how to send in your ProxyServer (refer to the next section).
DSU ProxyServer User Guide Service If your tech support specialist decides that service is required, your ProxyServer may be sent (freight prepaid) to our factory. Return shipping charges will be paid by Multi-Tech Systems. Include the following with your ProxyServer: • a description of the problem. • return billing and return shipping addresses. • contact name and phone number. • check or purchase order number for payment if the ProxyServer is out of warranty.
Chapter 6 - Warranty, Service and Tech Support The Multi-Tech BBS For customers who do not have Internet access, Multi-Tech maintains a bulletin board system (BBS). Information available from the BBS includes new product information, product upgrade files, and problem-solving tips. The phone number for the Multi-Tech BBS is (800) 392-2432 (USA and Canada) or (612) 785-3702 (international and local).
DSU ProxyServer User Guide 5. Enter D. You will see a list of the files you have marked. Enter E if you would like to edit the list; otherwise enter D again to start the download process. 6. Select a file transfer protocol by typing the indicated letter, such as Z for Zmodem (the recommended protocol). 7. If you select Zmodem, the file will transfer automatically. If you select another protocol, you may have to initiate the transfer yourself.
Appendixes
DSU ProxyServer User Guide Appendix A - TCP/IP (Transmission Control Protocol/Internet Protocol) Description TCP/IP is a protocol suite and related applications developed for the U.S. Department of Defense in the 1970s and 1980s specifically to permit different types of computers to communicate and exchange information with one another. TCP/IP is currently mandated as an official U.S. Department of Defense protocol and is also widely used in the UNIX community.
Appendix A - TCP/IP Description UDP, described in RFC 768 (ftp://ds.internic.net/rfc/rfc768.txt) provides an end-to-end datagram (connectionless) service. Some applications, such as those that involve a simple query and response, are better suited to the datagram service of UDP because there is no time lost to virtual circuit establishment and termination. UDP’s primary function is to add a port number to the IP address to provide a socket for the application.
DSU ProxyServer User Guide Internet Protocol (IP) IP is the Internet standard protocol that tracks Internetwork node addresses, routes outgoing messages and recognizes incoming messages, allowing a message to cross multiple networks on the way to its final destination. The IPv6 Control Protocol (IPV6CP) is responsible for configuring, enabling, and disabling the IPv6 protocol modules on both ends of the point-to-point link. IPV6CP uses the same packet exchange mechanism as the Link Control Protocol (LCP).
Appendix B - Scripting Appendix B - Scripting The script file can be used to automate certain operation. The script file is a text file containing a sequence of commands. The structure of a script file is succinctly expressed by the following grammar.
DSU ProxyServer User Guide Argument to procedures can be passed by value or address. To pass an argument by address, prefix the argument name in the formal parameter list by the keyword VAR; otherwise the argument is passed by value. Only variables can be passed by address. Expressions like A+B, where A and B are integer variables can be passed by value but cannot be passed by address.
Appendix B - Scripting Script Commands (by Function) Dial, Connection and Remote BAUDRATE BREAK GETCTS GETDCD HANGUP PARITY RGETC RGETS RXFLUSH SETDTR SETRTS STOPBITS THISLAYERUP TRANSMIT TXFLUSH WAITFOR Mathematical functions DEC INC Miscellaneous EXIT WAIT Program constructs FOR IF SWITCH WHILE PROC String operations ATOI ITOA STRCAT STRCMP STRCOPY STRFMT STRLEN TOLOWER TOUPPER 59
DSU ProxyServer User Guide Example Script: proc main; string login_prompt; string user_name; string password_prompt; string password; string shell_menu; string shell_menu_response; integer timeout; timeout=10; login_prompt=”login:”; user_name=”user1”; password_prompt=”Password:”; password=”user1”; shell_menu=”choice:”; shell_menu_response=”1”; transmit(“A”); wait(1) transmit(“T^M”); waitfor (“OK”,10); transmit (“A”); wait (1); transmit (“T”); wait (1); transmit (“DT963^M”); if (waitfor (login_prompt,60)) t
Index Index Symbols 10Base-T (Ethernet) Connector ....................... 9 56K DSU Connector ..................................................... 9 LEDs ............................................................. 8 Port Specifications ...................................... 10 56K DSU Connector ......................................... 9 8-Position DIP Switch ..................................... 13 A About CompuServe ........................................ 52 About the Internet ......................
DSU ProxyServer User Guide M MTPSR2-201 ................................................... 6 Multi-Tech Fax-Back Service .......................... 52 Multi-Tech Web Site ....................................... 52 MultiLink PPP Enabling ...................................................... 31 MultiLink PPP (MLPPP) ................................. 20 O On-line Warranty Registration ........................ 48 Out of Service .................................................. 8 P Ping ...................