LAN-to-LAN Routing for Central-Site and Branch Office Networks Model MTASR3 Quick Start Guide
Quick Start Guide 82087400 Revision A RouteFinder (Model MTASR3) This publication may not be reproduced, in whole or in part, without prior expressed written permission from Multi-Tech Systems, Inc. All rights reserved. Copyright © 1998, by Multi-Tech Systems, Inc. Multi-Tech Systems, Inc. makes no representations or warranties with respect to the contents hereof and specifically disclaims any implied warranties of merchantability or fitness for any particular purpose.
Contents Introduction .................................................................................... 4 Related Documentation ................................................................. 5 Safety Warnings ............................................................................ 6 Unpacking your RouteFinder ......................................................... 7 Cabling your RouteFinder .............................................................. 8 Changing Shunt Positions ................
RouteFinder MTASR3 Quick Start Guide Introduction Welcome to Multi-Tech's new RouteFinder™, model MTASR3, a Multi-Protocol Router for remote dial-in access and LAN-to-LAN routing capability. The RouteFinder is a remote access device that supports up to three concurrent dial-in sessions and IP or IPX remote access. The RouteFinder features a 10BaseT or 10Base5 port for local LAN connection, and Command Port for configuration.
Introduction Related Documentation This MTASR3 Quick Start Guide is intended to be used by qualified systems administrators and network managers. This quick start provides the necessary information for a qualified person to unpack, cable, load software, and configure the unit for proper operation. A detailed User Guide is also provided with your unit. This user guide provides in-depth information on the features and functionality of the RouteFinders.
RouteFinder MTASR3 Quick Start Guide Safety Warnings 6 1 Never install telephone wiring during a lightning storm. 2 Never install telephone jacks in wet locations unless the jack is specifically designed for wet locations. 3 Never touch uninsulated telephone wires or terminals unless the telephone line has been disconnected at the network interface. 4 Use caution when installing or modifying telephone lines. 5 Avoid using a telephone (other than a cordless type) during an electrical storm.
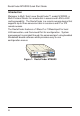
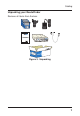
Cabling Unpacking your RouteFinder Remove all items from the box. Æ Tech Systems MADE IN U.S .A MADE IN U.S.A Figure 3.
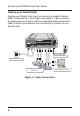
RouteFinder MTASR3 Quick Start Guide Cabling your RouteFinder Cabling your RouteFinder involves making the proper Ethernet, WAN, Command Port, and Power connections. Figure 4 shows the back panel connectors and the associated cable connections. Table 2 details the procedures for connecting the cables to your RouteFinder. ETHERNET 10BASE T AUI LINK 3 RS232/V.35 LINK 2 RS232/V.35 COMMAND PORT LINK 1 RS232/V.
Cabling Table 2. Cabling Procedure Step Procedure 1 If one or more links need to be changed to a V.35 interface, perform the procedures in Table 3. 2 If additional RAM is needed, refer to the procedure in Chapter 2 of the User Guide. 3 Connect the RouteFinder to your PC with a standard RS232 cable with DB25 connectors on both ends. Plug one end of the cable into the DB25 Command Port on the RouteFinder. Connect the other end to the PC's serial port . See Figure 2.
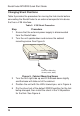
RouteFinder MTASR3 Quick Start Guide Changing Shunt Positions Table 3 provides the procedure for moving the link shunts before connecting the RouteFinder to an external composite link device that has a V.35 interface. Table 3. V.35 Shunt Procedure Step Procedure 1 Ensure that the external power supply is disconnected from the RouteFinder. 2 Turn the unit upside down and remove the cabinet mounting screw. See Figure 5. ® Tech Systems Enclosure Mounting Screw (center, back) 10 3 Figure 5.
Cabling Link 1 RS232 Shunt Position Link 1 V.35 Shunt Position Link 2 V.35 Shunt Position Link 3 V.35 Shunt Position 6 7 Figure 6. V.35 Shunt Slide the base back into the enclosure with the LEDs going toward the front and the back side grounding tabs pressing against the side of the cabinet. Turn the unit upside down and replace the cabinet mounting screw that was removed in step 2. ® Tech Systems Enclosure Mounting Screw (center, back) Figure 7.
RouteFinder MTASR3 Quick Start Guide Loading your Software 1 Run Windows on the PC that is connected to the RouteFinder’s Command Port. 2 Insert the RouteFinder 3.00 Disk 1 into the disk drive on the PC that is connected to the RouteFinder. 3 Win3.1 users - access Run by clicking on the File menu in the Program Manager, then click Run. In the Run dialog box, type a:\setup.exe or b:\setup.exe (depending on the letter of your floppy disk drive) in the Command Line field and then click OK.
Software 6 Press Enter or click Next> to continue. 7 When the Select Program Folder dialog box appears, double-click the word “RASFinder” and delete it (and preceding spaces, etc.) leaving the word “RouteFinder” in the text box; this will become the name of the icon group. Press Enter or click Next> to continue. 8 The next dialog box enables you to designate the COM port of the PC that is connected to the RouteFinder.
RouteFinder MTASR3 Quick Start Guide Click OK to continue. 9 The Setup complete dialog box is displayed. Click the Finish button to continue. 10 The following message is displayed. 11 Click No to skip the upgrade process.
Software 12 Click Yes to download the default setup. Clicking on the No button prevents the defaults from being downloaded to the RouteFinder. 13 The Novell IPX Protocol Default Setup dialog box appears. Note: To configure your RouteFinder, you now will use a series of dialog boxes -- Novell IPX Protocol Default Setup, IP Protocol Default Setup, and WAN Ports Default Setup. 14 If your network protocol is IPX, continue with the following steps.
RouteFinder MTASR3 Quick Start Guide ASCII string of up to 47 characters. The RouteFinder will use this name to advertise its service in the IPX internetwork. 16 Ethernet: You can enable Auto Learn Ethernet Network Numbers by leaving the default (Yes) checked, or you can manually assign the network numbers after disabling the Auto Learn option by clicking on No. If no file server is connected to the Ethernet segment, then you should select No.
Software The WAN network numbers have to be assigned by the network administrator and must be unique throughout the entire internetwork. Note: Unlike the Ethernet port, the WAN ports do not have the capability of learning the network number (i.e., the WAN ports do not have a file server). 18 Click OK when you are satisfied with your selections. 19 If you clicked OK from the Novell IPX Protocol Default Setup dialog box (step 13), the IP Protocol Default Setup dialog box is now displayed.
RouteFinder MTASR3 Quick Start Guide 25 If any WAN port is being set up to answer a call, click its Answering check box to enable it; otherwise, (i.e., for dial-out ports) enter the telephone number to be dialed in the Dial Number field. 26 Click OK when you are satisfied with your selections. 27 The Checking Router dialog box is displayed. Click OK.
Software Next, the Rebooting dialog box is displayed. 28 Check to ensure that the Fail LED on the RouteFinder goes Off after the download is complete and the RouteFinder is rebooted (the Rebooting dialog box goes away). 29 Win3.1 users - you are returned to your Program Manager where the RouteFinder Program Group and Program Items (RouteFinder icons) have been created. Win95/NT users - you are returned to your desktop. Your RouteFinder is operational at this time.
RouteFinder MTASR3 Quick Start Guide Setting Up Your Remote User Database The remote user database lets you gather information about your remote users. You can add remote users, remove users from the database, or you can edit information in the database. 1 Win3.1 users - From the Program Manager, click the Remote User Data Base icon. Win95/NT users - From your desktop, click the Start button, point to Programs, then RouteFinder, and then click Remote User Data Base.
Dial-Up Network 2 Click the Add User button and the Add Users dialog box is displayed. 3 Build your user database by filling in the following fields for each user. User Name. The User Name can have as many as 39 characters. All printable characters are permitted; however, no blanks are allowed in the user name. In dial-in and dial-out applications, the user name is treated as a case insensitive string.
RouteFinder MTASR3 Quick Start Guide User Password. The User Password can have as many as 7 characters. In places where the password is used as a character string, it is treated as a case insensitive string. Elsewhere (PPP’s CHAP), it is treated as a case sensitive pattern. Call Back You have to click this check box in order to access the following three Call Back functions.
Dial-Up Network Dial Out Ports This enables you to select the port over which the user is permitted to dial out from the RouteFinder. 4 After each user is defined on the Add Users screen, click the OK button to display the updated Users List dialog box. Click the Add User button to continue adding users to your database. 5 When you have added all your users to the data base, from the Users List dialog box, click the Download button to load the database into the RouteFinder.
RouteFinder MTASR3 Quick Start Guide Setting Up the Dial-up Networking Setting up a dial-up network involves checking for hardware components and if the necessary software is loaded and configured properly. The setting up a dial-up network procedure looks at what software is loaded and if it is not loaded, a separate procedure is provided so that you can continue down a single path to the point of making a call on your network.
Dial-Up Network A list of items will appear in a panel under the label The following network components are installed:. 3 If your network protocol is installed, continue with the next step, Select the Primary Network Logon. If your network protocol is not installed, refer to Loading your Protocol procedure in this section. After installing the protocol, allow your computer to reboot. Your computer may ask you if you want to restart it now. Click the Yes button. 4 Select the Primary Network Logon.
RouteFinder MTASR3 Quick Start Guide 6 Install your modem. If you are using a new modem and have NOT installed it already, you will need to install it now, refer to the Installing Your Modem procedure in this section. 7 Create a Dial-up connection icon for the RouteFinder. 8 Open the Dial-up Networking software. Double-Click the Dial-up Networking icon in the My Computer window. 9 Select Make New Connection. Double-click the Make New Connection icon. 10 Name the new connection.
Dial-Up Network 11 Continue to the next window. Click the Next> button at the bottom of the window. 12 Enter your RouteFinder’s telephone number. In the Telephone number box, enter your RouteFinder’s telephone number. Do NOT enter the area code in the "Area code" box unless the call is a long-distance call for you. 13 Continue to the next window. Click the Next> button at the bottom of the window. 14 Exit the window. Click the Finished button at the bottom of the window.
RouteFinder MTASR3 Quick Start Guide 16 Select Server types. Click the Server Type button. A window will appear. 17 Select server type. Near the top of the window you will see a Type of Dial-Up Server drop-down list. Select the "PPP: Windows 95, Windows NT 3.5, Internet" option. 18 Ensure that all Advanced Options: are not checked. 19 Select your network protocol from Allowed Network protocols: Click the check box to the left of your network protocol. NetBEUI is not supported.
Dial-Up Network 20 Select Specify Name Server address. If the circle to the left of the Specify Name Server address label does NOT have a dark center, Click it. 21 Enter the Primary DNS server address. In the "Primary DNS" server box, enter the Primary DNS number supplied by your network administrator; e.g., 190.2.9.1. In the "Secondary DNS" server box, enter the Secondary DNS number supplied by your network administrator; e.g., 190.2.9.2. 22 Select Use IP header compression.
RouteFinder MTASR3 Quick Start Guide 23 Select Use default gateway on remote network. If the circle to the left of the Use default gateway on remote network label does NOT have a dark center, Click it. 24 Exit the TCP/IP Settings window. Click the OK button. This button will appear two more times. Each time, Click it. You will be returned to the "Dial-up Networking" window. 25 Dial in. Double-click your RouteFinder icon. A Connect To window will appear. 26 Enter your User name.
Dial-Up Network Note: This step is OPTIONAL. If you are concerned about the security of your account, do NOT save your password. You will have to manually reenter it every time you log on. To save your password, click on the Save password check box. 29 IF YOU HAVE CALL WAITING, select Dial Properties. Click the Dial Properties button. A new window will appear. 30 Turn on the call waiting disabling option.
RouteFinder MTASR3 Quick Start Guide This string will only disable call waiting for a single phone call, and call waiting will automatically turn back on as soon as you hang up. 32 Exit the Dialing Properties window. Click OK to return to the Connect To window. 33 Connect to your RouteFinder. Click the Connect button. Loading Dial-Up Network Software 1 Locate your Windows 95 CD-ROM installation disk or floppies. Put it in the CD-ROM drive (or your floppy drive) and wait for it to show up on your desktop.
Dial-Up Network 4 Select Communications. Click the check box to the left of the Communications option in the window, so that it shows a checkmark. Make sure that this is the ONLY box that shows a checkmark - if any other boxes are marked, click them so that the checkmark disappears. Double-click the Communications option in the window. A Communications window appears. 5 Select Dial-up Networking. Click the check box next to the "Dial-up Networking" option so that a checkmark appears in it.
RouteFinder MTASR3 Quick Start Guide Loading Your Protocol 34 1 From the Control Panel window, click the Network icon. 2 From the Network window, click the Add button. The Select Network Component Type window with a list of options will appear.
Dial-Up Network 3 Open the protocol options window. Double-click the Protocol option. The Select Network Protocol window will appear with protocol options. 4 Select the Manufacturer of your protocol. Click the Manufacturer of your protocol option on the left side of the window to highlight it. A list of options will appear at the right side of the window. 5 Select your Network Protocol. Click your Network Protocol option at the right side of the window. 6 Exit the add option. Click the OK button.
RouteFinder MTASR3 Quick Start Guide Loading Client for Microsoft Networks 36 1 From the Control Panel window, click the Network icon. 2 From the Network window, click the Add button. The Select Network Component Type window with a list of options will appear.
How to Get a Copy of the User Guide 3 Open the client options window. Double-click the Client option. The Select Network Client window will appear with client options. 4 Select the Manufacturer of your client. Click the Manufacturer of your client option on the left side of the window to highlight it. A list of options will appear at the right side of the window. 5 Select your Network Client. Click your Network Client option at the right side of the window. 6 Exit the add option.
RouteFinder MTASR3 Quick Start Guide Installing Your Modem Install your modem. If you are using a new modem and have NOT installed it already, you will need to install it now. 1 Select Add New Hardware. In the Control Panel window, Double-click the Add New Hardware icon. 2 Follow the instructions shown by Windows 95. You will be given a short, simple series of instructions by Windows 95. Windows 95 will do most of the work of configuring your modem with its "sniff and sense" software.
Warranty, Service and Regulatory Information Service Multi-Tech has an excellent staff of technical support personnel available to help you get the most out of your Multi-Tech product. Refer to your RouteFinder User Guide for Warranty and Service information. FCC Regulations for Telephone Line Interconnection 1 This equipment complies with Part 68 of the Federal Communications Commission (FCC) rules.
RouteFinder MTASR3 Quick Start Guide contact the telephone company to determine the maximum REN for the calling area. 4 If this equipment causes harm to the telephone network, the telephone company will notify you in advance that temporary discontinuance of service may be required. But if advance notice isn’t practical, the telephone company will notify the customer as soon as possible. Also, you will be advised of your right to file a complaint with the FCC if you believe it is necessary.
Warranty, Service and Regulatory Information Modular Jack: RJ11 Service Center in the USA: Multi-Tech Systems, Inc. 2205 Woodale Drive Mounds View, MN 55112 (800) 328-9717 (612) 785-3500 (612) 785-9874 FAX NOTE: This equipment has been tested and found to comply with the limits for a Class B digital device, pursuant to Part 15 of the FCC Rules. These limits are designed to provide reasonable protection against harmful interference when the equipment is operated in a residential installation.
RouteFinder MTASR3 Quick Start Guide Canadian Limitations Notice Notice: The ringer equivalence number (REN) assigned to each terminal device provides an indication of the maximum number of terminals allowed to be connected to a telephone interface. The termination of a interface may consist of any combination of devices subject only to the requirement that the sum of the ringer equivalence numbers of all the devices does not exceed 5. Notice: The Industry Canada label identifies certificated equipment.
Warranty, Service and Regulatory Information This digital apparatus does not exceed the Class B limits for radio noise emissions from digital apparatus set out in the Radio Interference Regulation of the Canadian Department of Communications. Le présent appareil numérique n’émet pas de bruits radioélectriques dépassant les limites applicables aux appareils numériques de la classe B prescrites dans le Règlement sur le brouillage radioélectrique édicté par le ministère des Communications du Canada.
82087400