Handheld Terminal (PDA) Quick Guide
Overview Receiver Data light Power Button HOME Scan Power light Volume+/Scan Scan key Delete Microphone Menu Speaker Return Enter Scan window Card reading area Camera Flash lamp Battery cover Buckles for battery cover Hot button / Custom button: 1.Screen capture : "power" + "Volume -" 2.Custom button : Setting → Feature → Custom Key 3.
STRAP INSTALLATION Buckle ( As Pic 1) Follow the direction of the arrow in Pic 1, pull out the buckle.
Open the battery cover 1. Please turn the knob down to open the back cover. 2. Open the battery compartment cover. 3. As the picture shown, insert the battery into the jack in the battery compartment, then press down the top of the battery. Please remove the positive and negative insulation, a yellow sticker on the battery before turning on the device.
Install TF/SIM card 1.
Equipment charging DEVICE CHARGING: 1.Pull out the waterproof USB plug insert the Type - C USB cable. Type - C interface 2.Use cradle to charge.(Cradle should be purchased separately) 1. The battery can be fully charged after 4 hours of charging,and the standby time is over 48 hours. 2. Cradle can charge 1 battery and 1 device together. 3. The left indicator light is the battery charging indicator, when the battery is charging, it's red. It becomes green once fully charged. 4.
Scan (optional) If your PDA with scan function, you can configure and test in our “scanner” app: 1.Please find the “scanner” app, and open it. ( As Pic 1) 2.In the ‘Content’ of app, you can press scan button to test the barcoding. 3.
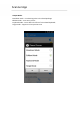
Scanner App Output Mode: Broadcast mode:For obtaining value in the developed app; Editbox mode:Scan at any cursor; Keyboard mode:Enter data in the form of a simulated keyboard; Single mode:Support to clear previous scan
Scanner App Symbology config: You can get the ‘Symbology config’ in the ‘Barcode setting’, then enable/disable the code type. Advanced configuration: You can get the barcode Advanced configuration in the ‘Barcode setting’, to set up the check digit, system digit and add-on code etc.
Scanner App Additional content You can change the default terminator in this settings, CR and Tab OCR function (Only for IPDA030/035 2D-N6603 version): You can get the ‘OCR’ in the ‘Barcode setting’. It can identify the number on the document, such as the passport information *If you purchased the 1D version, the ‘Symbology config’ and ‘Advanced configuration’ will not be included in the ‘scanner’ App, you can kindly download the honeywell documents via the link below to set the decoding.
NFC (optional) If your PDA have NFC function, you can test the NFC with our demo app: 1.Please find the “NFC” app, and open it. ( As Pic 1) 2.In the home page of the app, you can read the NFC tags on NFC reading area.
LF 125K (optional) If your PDA have LF function, please operate it as below: 1.Please find the “LF EXAMPLE”app, and open it. ( As Pic 1) 2.In the home page of the app, you can read the LF tags on LF reading area. ( As Pic 1) ( As Pic2) LF reading area Warm tips: LF is optional function. Please make sure the PDA is equipped with LF function before using it.
UHF (optional) If your PDA is equipped with the function of UHF RFID, you can test the NHF with our demo app: 1.Please open the APP of UHF.( As Pic 1) 2.In the Interface of UHF, please read the card in UHF reading area. ( As Pic 1) Step2:Power on Step1:Connect MCU Step3:Start Inventory UHF RFID reading area Warm tips: UHF RFID is optional function. Please make sure the PDA is equipped with UHF RFID function before using it.
FINGERPRINT(optional) If your PDA is equipped with the function of FINGERPRINT IDENTIFICATION, you can test it with our demo app: 1.Please open the APP of fingerprint.( As Pic 1) 2.Please collect and identify the fingerprint in the fingerprint test interface. ( As Pic 1) ( As Pic2) Fingerprint identification area Warm tips: Fingerprint identification is optional function. Please make sure the PDA is equipped with fingerprint identification function before using it.
PRINT(optional) If your PDA is equipped with the function of Thermal printing , please operate it as below: 1.Please open the APP of Thermal printing.( As Pic 1) 2.Press the print icon to test printer operation. Open the paper cover Warm tips: Printer is optional function. Please make sure the PDA is equipped with printer function before using it.
OTA(update online) Our PDA support OTA (update online) function, you can update the latest firmware by OTA, operate it as below: 1.Please enter into ”Settings” — About phone. 2.Press ”System update” and enter into the updating firmware interface. 3.Press “Check now” to update the OS.
FAQ: 1. How to restore factory settings? Select“Setting”→ “Backup&reset” →“Factory date reset” 2. Why can not power up the PDA? (1) If the new device does not turn on, please make sure the insulation sticker on battery has been removed. (2) It needs about 4s to press and hold the power button to turn on , so please hold the power button until the screen showing contents . (3) Please check the if the battery are in low power, and charge the PDA for 30mins, then restart it.