ITPP047 Thermal Printer FAQ 1.00 Document Name: ITPP047 FAQ-1.00.
Version History Date By 2020-1-26 Phillip Changes Contents and layout Version 1.00 Page2of30 ITPP047 Thermal Printer Hardware Manual Version 1.
Contents Version History...................................................................................................................................... 2 1.0. Prepare.............................................................................................................................................4 2.0. Connection Problems......................................................................................................................5 2.
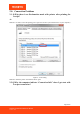
1.0. Prepare Driver download:https://munbyn.biz/POS80CD-v064 Instruction:https://munbyn.biz/ITPP047-SFmanual Printer Test V5.0C: Find the setting tool in driver folder as below: -> -> Page4of30 ITPP047 Thermal Printer Hardware Manual Version 1.
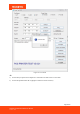
2.0. Connection Problems 2.1 Q:Why there is an Exclamation mark with printer after printing the receipt? A: Method1: we need to ensure the printing port is right(the first time you install the driver in your computer) Figure 2- 1 Port Setting Method 2: delete the printer and install the driver again. 2.2 Q:Why the computer indicate “Connection fails” when I get start with Lan port connection? Page5of30 ITPP047 Thermal Printer Hardware Manual Version 1.
Figure 2- 2 Lan Fault A: 1) Ensure that your printer and computer are connected in the same router via Lan cable. 2) Ensure the inputted Printer IP is right(print a self-test to check as below) Page6of30 ITPP047 Thermal Printer Hardware Manual Version 1.
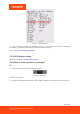
Figure 2- 3 IP Information 3) After connecting correctly and inputting the right IP, the computer will indicate “Connection successfully”. Then follow the instruction to finish the Lan printer setting. Demo video:https://munbyn.biz/047lan 2.3 Q:WiFI printer setting: A: Demo video:https://munbyn.biz/047wifi 2.4 Q:How to connect printer by serial port? A: 1)Connect the serial cable with the serial port, as below: Figure 2- 4 Serial Port Then turn on the printer.
Figure 2- 5 Baud Rate Setting Page8of30 ITPP047 Thermal Printer Hardware Manual Version 1.
3.0. General Setting 3.1 Q:Printer can not cut paper after printing the receipt. A:For Windows: please check if the cutter option is opened in the printer properties, as below. Figure 3- 1 Cutter Setting For Mac: in the Printer features, choose Cut options, select Partial cut and print. Page9of30 ITPP047 Thermal Printer Hardware Manual Version 1.
Figure 3- 2 Cut Setting For Software: check the cutter commands in the software--1D,56,42,00 Such as Loyverse. Page10of30 ITPP047 Thermal Printer Hardware Manual Version 1.
Figure 3- 3 Cutter Command 3.2 Q:How to print Chinese characters? A: ①open the Printer Test V5.0C tool. ②connect printer with windows computer via USB cable. ③Set up as below. Page11of30 ITPP047 Thermal Printer Hardware Manual Version 1.
Figure 3- 4 Chinese Setting 3.3 Q:How to print Euro character € A:Open the setting tool and set up as below. Figure 3- 5 € Setting 3.4 Q:Cash drawer setting A: ①Install the driver in your computer and connect with cash drawer port, as below. Page12of30 ITPP047 Thermal Printer Hardware Manual Version 1.
②For Windows: Change the option in the printer properties and apply. Figure 3- 6 Cash Drawer Setting Page13of30 ITPP047 Thermal Printer Hardware Manual Version 1.
For Mac: In the printer features, choose “Cash Drawer Control”, select “Cash Drawer 1 Before Printing or After Printing”. Figure 3- 7 Cash Drawer Setting 3.5 Q:Alarm setting A: For Windows: Find the corresponding setting in the printer properties. Page14of30 ITPP047 Thermal Printer Hardware Manual Version 1.
Figure 3- 8 Alarm Setting For Mac: In the printer features, choose “Buzzer Control”, select “Page Before or Page After”. Page15of30 ITPP047 Thermal Printer Hardware Manual Version 1.
Figure 3- 9 Buzzer Setting 3.6 Q:How to add my “LOGO” in the printed receipt? A: Find the setting tool as 2.2Q, then set up as below. ①Add your “LOGO” in the printer. Figure 3- 10 Add Logo ②Set up the “LOGO” in printer properties. Page16of30 ITPP047 Thermal Printer Hardware Manual Version 1.
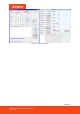
Figure 3- 11 Open the Logo 3.7 Q:How to set up code page according to my language? A: ①Check the corresponding code page in self-test page. Page17of30 ITPP047 Thermal Printer Hardware Manual Version 1.
Figure 3- 12 Code Page ②Then open the setting tool and setup as below. Figure 3- 13 Code Page Setting 3.8 Q:How to reset the printer when the setting gets messed. Page18of30 ITPP047 Thermal Printer Hardware Manual Version 1.
A:Make sure the printer is connected with the power and turn it off. ①Press the “FEED” button and simultaneously turn on the power. ②Hold on pressing the “FEED” button for about 20 seconds, then “ERROR LED” on until “ERROR” and “PAPER LED” double- flash again, release the “FEED” button when buzzer alarming. At this time the printer has been initialized, restoring factory settings. 3.9 Q:How to print hexadecimal characters? A:Make sure the printer is connected with the power and turn it off.
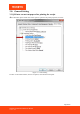
3.12 Q:How to customize the paper's specifications? According to personal needs, clients could alter the paper’s size by their own. Take WIN7 operating system for an example. The specific operations are as follows. Click the icon of the installed printer under the “Devices and Printers”. Then choose the “Printer Service Properties”. Figure 3- 15 Print Server Properties 1. After the menu popping up, firstly find the format of the paper’s specifications which has been installed through the printer driver.
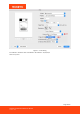
Figure 3- 16 Create the New Size 2. After finishing the above settings, click the “Save Menu” button. The Form’s name which has already been set up could be found in the tab of “Form”. As the following picture shown. Then, close the dialog box. Figure 3- 17Save Size Page21of30 ITPP047 Thermal Printer Hardware Manual Version 1.
3. Enter “Devices and Printers”, and press the right mouse on the option of “Printer Properties”. After the dialog box popping up, choose the “Preferences” option. Figure 3- 18 Enter Preferences 4. “Paper/Quality”—“Advanced”. See the following picture. Figure 3- 19 Page/Quality Page22of30 ITPP047 Thermal Printer Hardware Manual Version 1.
5. Find the new paper size which was set in the “Paper Specifications”. Press the “OK” button and close the dialog box. See the following picture. Figure 3- 20Page Size 6. Return to the tab of “Device Settings” and select “Paper Specifications”. Then click the “OK” button. See the following picture. Page23of30 ITPP047 Thermal Printer Hardware Manual Version 1.
Figure 3- 21 Device Setting 3.13 Queuing function setting 1. Add NV LOGO Printer Test V5.0C tool in CD Click Advanced-NV Download. Page24of30 ITPP047 Thermal Printer Hardware Manual Version 1.
Figure 3- 22 Open the Tool Add a “LOGO” download and print test. Figure 3- 23 Add a Logo Page25of30 ITPP047 Thermal Printer Hardware Manual Version 1.
Figure 3- 24 Printed Logo 2. Set queuing function Figure 3- 25 Set Queuing function Copies: set the print copies Function: ON Initail NO: set initial value TimeEn: set if print Date or Time(Default follow system time), after setting, click “SetTime” QueuEdit: Edit queuing receipt content 3. Queue edit Page26of30 ITPP047 Thermal Printer Hardware Manual Version 1.
Figure 3- 26 Queue Edit Click “Setting” to save the settings. After printer reboot, Press FEED button to see the queuing. Page27of30 ITPP047 Thermal Printer Hardware Manual Version 1.
Figure 3- 27 Template If the printer connect by LAN/Ethernet/COM, you can use the QueuMonitor tool. Page28of30 ITPP047 Thermal Printer Hardware Manual Version 1.
Figure 3- 28 QueuMonitor Notes: If restart the printer, the Date and Time will invalid. It does not affect normal printing except by pressing feed button. Page29of30 ITPP047 Thermal Printer Hardware Manual Version 1.
For more questions, please contact seller from Amazon or support. Email: support@munbyn.com Whatsapp: +86 1781788 1067 Skype:munbyn Page30of30 ITPP047 Thermal Printer Hardware Manual Version 1.