ITPP047 Thermal Printer Software Manual 1.02 Document Name: ITPP047 Software Manual-1.02.
Version History Date By Changes Version 2021-1-9 Ace 1.00 2021-6-5 James 2021-7-15 James Installation, Tool Guide Add the Chromebook Installation Add the Square Installation Fix some errors of WiFi connection Update the Square Installation Update the Printer Test V5.1 1.01 1.02 Page2of81 ITPP047 Thermal Printer Software Manual Version 1.
Contents Version History ..........................................................................................................................2 Get Started ......................................................................................................................5 USB Installation ..............................................................................................................6 Windows Installation .................................................................................
Advanced ................................................................................................................................... 71 Language Switching .................................................................................................................. 71 Setup Instructions for "advanced" Button................................................................................................ 71 NV Logo Test: .............................................................................
Get Started ITPP047 supports the following operating systems. ■ Windows: ・Windows 10 * 32-bit and 64-bit (except Windows 10 Mobile and Windows 10 IoT Core) ・Windows 8.1 * 32-bit and 64-bit (except WindowsRT 8.1) ・Windows 8 * 32-bit and 64-bit (except WindowsRT) ・Windows 7 32-bit and 64-bit ■ Mac: ・Mac OS X Lion – 10.7, Mac OS X Mountain Lion – 10.8 , Mac OS X Mavericks – 10.9, ・Mac OS X Yosemite – 10.10, Mac OS X El Capitan – 10.11, Mac OS Sierra – 10.12 ・Mac OS Sierra – 10.12.
USB Installation To use the ITPP047 in a Windows environment, you need to install this printer driver in advance. Windows Installation Tips: a) Make sure the printer is connected to your Windows computer by the attached USB cable and power on. b) The following are the simulated installation steps, the operating system used is Windows 7, on the basis of actual installation interface (System). Driver download link: https://munbyn.biz/ITPP047—Driver 1) Unzip the file and open it.
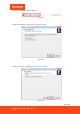
4) Open the "POS Printer Driver V8.03" exe. Figure 2-4 5) When the following window appears, click on the "Next". Figure 2-5 6) When the following window appears, click on the "Install". Figure 2-6 Page7of81 ITPP047 Thermal Printer Software Manual Version 1.
7) Wait for the progress bar to end and the following window will appear, click on the " Finish". Figure 2-7 8) Another installation window will pop up automatically, and the driver will automatically detect your computer system, not need change anything. Figure 2-8 Page8of81 ITPP047 Thermal Printer Software Manual Version 1.
) Clikc on the"Check the USB port". Figure 2-9 10) A USB port window will automatically pop up. Figure 2-10 Page9of81 ITPP047 Thermal Printer Software Manual Version 1.
11) The printer will automatically feed out a USB port detection ticket. Figure 2-11 12) Click on the "OK" and "Install now". Figure 2-12 Page10of81 ITPP047 Thermal Printer Software Manual Version 1.
13) A Succeed windows will automatically pop up and then click on the "OK". Figure 2-13 14) The printer will automatically feed out a "POS Printer" test page. Figure 2-14 Page11of81 ITPP047 Thermal Printer Software Manual Version 1.
Windows Test Page 1) Open any file on your desktop (example only). Figure 2-15 2) Find "Computer (the name of your personal computer)" on the left (names may vary, subject to actual conditions). Right click on the "Computer", click on the "Properties". Figure 2-16 Page12of81 ITPP047 Thermal Printer Software Manual Version 1.
3) Enter the system details interface, click on the "Control Panel" at the top of the page. Figure 2-17 4) Click on the "View devices and printers". Figure 2-18 5) Enter the Devices and Printers interface, right click on the "POS-80C". Figure 2-19 Page13of81 ITPP047 Thermal Printer Software Manual Version 1.
6) Click on the "Printer Properties". Figure 2-20 7) Click on the "Print Test page". Figure 2-21 Page14of81 ITPP047 Thermal Printer Software Manual Version 1.
8) A test page has been sent to the printer. Figure 2-22 9) The printer will print a Windows test page which means the printer is ready. Figure 2-23 Page15of81 ITPP047 Thermal Printer Software Manual Version 1.
Mac Installation To use the ITPP047 in a Mac environment, you need to install this printer driver in advance. 1) Open the file "P064 MUNBYN". Figure 2-24 2) Open the file "Driver". Figure 2-25 3) Open the file "Mac Driver". Figure 2-26 Page16of81 ITPP047 Thermal Printer Software Manual Version 1.
4) Open the "macOSDriver" dmg file. Figure 2-27 5) Choose the "macOSDriver_signed. pkg " file and the installation will get started. Figure 2-28 6) Follow the instruction and click on the "Continue" step by step. Figure 2-29 Page17of81 ITPP047 Thermal Printer Software Manual Version 1.
7) Enter your MAC’s password and click on the "install Software". Figure 2-30 8) Wait for a second and click on the "Close". Figure 2-31 Page18of81 ITPP047 Thermal Printer Software Manual Version 1.
9) Go to the "System and Preferences" and chose the "Printers & Scanners". Figure 2-32 10) Clikc on the "+" to add the new printer. Figure 2-33 Page19of81 ITPP047 Thermal Printer Software Manual Version 1.
11) A "Printer-80" window will pop up automatically. Figure 2-34 12) Wait for a few seconds and the detials will show up and then change the "Use" option. Figure 2-35 Page20of81 ITPP047 Thermal Printer Software Manual Version 1.
13) Choose "Select Software", search "80" and then choose "POS-80". Figure 2-36 14) Click on the "OK" and "Add" to add this new printer(POS-80C). Figure 2-37 Page21of81 ITPP047 Thermal Printer Software Manual Version 1.
Linux Installation 1) Open terminal input "sudo ./install.sh". Figure 2-38 2) Input your root password. (If you have not root password, open terminal and input"sudo password root"to set root password). Figure 2-39 Page22of81 ITPP047 Thermal Printer Software Manual Version 1.
3) Open cups at localhost: 631 in your browser and choose "Adding Printers and Classes" . Figure 2-40 4) Click on the "Add Printer". Figure 2-41 Page23of81 ITPP047 Thermal Printer Software Manual Version 1.
5) Choose "Unknow" and "AppSocket/HP JetDirect" and click on the "Contiune". Figure 2-42 6) Enter "PrinterName"(Anyone is fine) and click on the "Contiune". Figure 2-43 Page24of81 ITPP047 Thermal Printer Software Manual Version 1.
7) Choose "POS" and click on the "Continue". Figure 2-44 8) Choose "POS Label-80" and click on the "Add Printer". Figure 2-45 Page25of81 ITPP047 Thermal Printer Software Manual Version 1.
9) You can choose to further set as the default printer. Figure 2-46 10) The printer has been successfully installed. Page26of81 ITPP047 Thermal Printer Software Manual Version 1.
Chromebook Installation 1) Enter in Google Chrome: https://munbyn.biz/chromebookprint Figure 2-47 2) Click "Add to Chrome" first, and then click "Add extension" to download and add the extension. Figure 2-48 Page27of81 ITPP047 Thermal Printer Software Manual Version 1.
Figure 2-49 3) After successful installation, click on the connection interface. icon and select ‘Print Extension’ to enter the Figure 2-50 4) Click "Connect" and select "Printer-80-paired" to connect to the printer. Page28of81 ITPP047 Thermal Printer Software Manual Version 1.
Figure 2-51 Figure 2-52 5) Open any website, here is the ‘loyverse website’ as an example. Go to the print interface and select "See more" when selecting the printer. Page29of81 ITPP047 Thermal Printer Software Manual Version 1.
Figure 2-53 6) After selecting "Printer-80", we can use the printer to print. Figure 2-54 Page30of81 ITPP047 Thermal Printer Software Manual Version 1.
Figure 2-55 Demo video: http://munbyn.biz/chromebookvideo Page31of81 ITPP047 Thermal Printer Software Manual Version 1.
LAN Installation Get IP Address (Windows) a) Go to control panel (Please refer to chapter 2.2) and click on the "View network status and tasks". Figure 3-1 b) Click on the "Local connection". Figure 3-2 c) You can see the basic information of the network connection, click on the "Details". Page32of81 ITPP047 Thermal Printer Software Manual Version 1.
Figure 3-3 d) IPv4 address is the local IP. Figure 3-4 Tips: Install the USB driver, please refer to chapter 1.1.1. Prepare a router, three network cables, the first one is the access network to connect to the router, the second one connected to the computer, and the other one connected to the printer. Installation: Page33of81 ITPP047 Thermal Printer Software Manual Version 1.
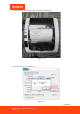
"Printer Test V5.1" Settings 1) Open "Printer CD" and "Tools". Figure 3-5 2) Open "Printer Test V5.1C ". Figure 3-6 3) Check the Port Select and Printer Type. Enter the Local IP, Printer IP. You can get the printer IP (IP address) by the Self-test page (Please refer to the Hardware Manual). Enter the New IP, the first three digits are consistent with Local IP, and the last digit is different from the last digit of Local IP. Click on the "Set New IP" after finishing.
Figure 3-7 4) Go to the Control Panel (Chapter 2.2) and Click on the "Printer properties". Figure 3-8 5) Cilck on the "Ports" and then "Add Port". Page35of81 ITPP047 Thermal Printer Software Manual Version 1.
Figure 3-9 6) Choose "Standard TCP/IP Port" and click on the "New Port". Figure 3-10 7) Enter the new IP set before and click on the "Next". Page36of81 ITPP047 Thermal Printer Software Manual Version 1.
Figure 3-11 8) Please wait for the detecting. Figure 3-12 9) Click on the "Next" and "Finish" Figure 3-13 Page37of81 ITPP047 Thermal Printer Software Manual Version 1.
10) Go back to the "Ports" and double check the TCP/IP Port is chosen or not ( Click on the "Configure Port" and compare with the step 7 ). Figure 3-14 11) Please refer to the chapter 2.2 and do a test page. DHCP Method 1) Open "Printer CD" and "Tools" Figure 3-15 Page38of81 ITPP047 Thermal Printer Software Manual Version 1.
2) Open NETtool V1.03->NETtool Figure 3-16 3) Click on the IP "192..." , switch the DHCP on, and click on the "Setting". A new IP address will come out automatically. Figure 3-17 4) For the remaining steps, please refer to the fourth step of chapter 3.2.1- 4) WiFi Installation For Mac Get IP Information a) Go to"System Preference"and click on the "Net Work". Page39of81 ITPP047 Thermal Printer Software Manual Version 1.
Figure 4-1 b) Double-check your WiFi connection and click "Advance". Figure 4-2 c) Click on the "TCP/IP". Page40of81 ITPP047 Thermal Printer Software Manual Version 1.
Figure 4-3 d) Double check the IP details. Figure 4-4 Connection Page41of81 ITPP047 Thermal Printer Software Manual Version 1.
1) Connect "WiFi Printer". Figure 4-5 2) Open a browser and enter "10.10.100.254". Figure 4-6 3) Enter "admin"(Username and Password). Figure 4-7 Page42of81 ITPP047 Thermal Printer Software Manual Version 1.
4) Click on the "STA Settings". Figure 4-8 5) Click on the "Scan" and choose the home or public WiFi. Tip: need to use the same public WIFI as 4.1.1(b) Figure 4-9 Page43of81 ITPP047 Thermal Printer Software Manual Version 1.
6) Enter the WiFi Password and the IP information (Refer to the step d of the chapter 4.1.1, The first three digits of the IP Address remian the same, the last digit is different, you can choose any value in the range of 2-253). Click on the "Save". Figure 4-10 7) A WiFi Printer ticket will pop up automatically that means the printer is now successfully connect to your home or public WiFi. Figure 4-11 8) Finally restart the printer, and then you can use the printer to print.
For Windows Get IP Information a) Go to the control panel (Please refer to chapter 2.2) and click on the "View network status and tasks". Figure 4-12 b) Click on the "Wifi connection". Figure 4-13 c) You can see the basic information of the network connection, click on the "Details". Figure 4-14 Page45of81 ITPP047 Thermal Printer Software Manual Version 1.
d) IPv4 address is the local IP. Figure 4-15 Page46of81 ITPP047 Thermal Printer Software Manual Version 1.
"Printer Test V5.1C" Settings 1) Open "Printer CD" and "Tools". Figure 4-16 2) Open Printer Test V5.1C and make sure the printer is connected to a Windows computer by USB cable. Figure 4-17 3) Check the "PortSelect" and "PrinterType". Figure 4-18 Page47of81 ITPP047 Thermal Printer Software Manual Version 1.
4) Click on the "Advance". Figure 4-19 5) Find " Net Setting" and click on the "Set Net". Page48of81 ITPP047 Thermal Printer Software Manual Version 1.
Figure 4-20 6) Enter the IP Address, NetMask and GateWay (Refer to step d of the previous chapter, The first three digits of the IP Address remain the same, the last digit is different), and then enter the Wifi name (SSID), password (WIFI Key). Click Setting All (example only). Figure 4-21 7) A WiFi ticket will pop up automatically that means the printer is successfully connected to the WIFI. Page49of81 ITPP047 Thermal Printer Software Manual Version 1.
Figure 4-22 Bluetooth Connection For Windows 10 1) Click on the information icon in the lower right corner of the screen. Figure 5-1 2) Right click on the Bluetooth icon and go to Settings. Figure 5-2 Page50of81 ITPP047 Thermal Printer Software Manual Version 1.
3) Click on the "+" and choose Bluetooth. Figure 5-3 4) Choose "Printer001" and enter the PIN code "0000". Figure 5-4 5) Bluetooth connection is successfully. Figure 5-5 Page51of81 ITPP047 Thermal Printer Software Manual Version 1.
6) Go to the Driver file and click on the "POS-80 Windows driver (With...)". Figure 5-6 7) Choose "Other" and click on the "Install Now". Figure 5-7 8) A succeed window will pop up automatically and click on the "Yes". Figure 5-8 Page52of81 ITPP047 Thermal Printer Software Manual Version 1.
9) Go to the "Devices and Printers", Double- Click on the "POS-80C", and then click on the "Hardware", you can see the com port connected to the printer. Figure 5-9 10) Go back to the "Ports" and select the com port. Figure 5-10 11) Refer to the chapter 2.2 and do a test page. Page53of81 ITPP047 Thermal Printer Software Manual Version 1.
Square Installation LAN Installation 1) Long press the Feed button and turn it on at the same time, let go after hearing a beep, and check the self-check page printed out by the printer to see if ‘Net DHCP’ is in the Enable state. Figure 6-1 2) If ‘Net DHCP’ is in the Disable state, you need to use a network cable to connect the printer and the computer to the same router, and then use the ‘NETtool’ tool to switch the ‘Net DHCP’ to the Enable state according to the steps in the figure below.
Figure 6-3 4) Connect Square and printer, and click "Settings". Figure 6-4 5) Click "Tours and Tutorials". Figure 6-5 Page55of81 ITPP047 Thermal Printer Software Manual Version 1.
6) Click "Hardware" & "Printers". Figure 6-6 7) Click "Create printer station"->"Select printer"->"Epson TM-m30 947"->"Print test". Figure 6-7 8) Print test paper. 9) Customize the name for this printer. Page56of81 ITPP047 Thermal Printer Software Manual Version 1.
Figure 6-8 10) Click "Receipts" -> "ON" -> “Save". Figure 6-9 11) Create your order on Square. Page57of81 ITPP047 Thermal Printer Software Manual Version 1.
Figure 6-10 12) Get the receipts. Figure 6-11 Demo video: http://munbyn.biz/squarevideo USB Installation 1) Open ‘Printer Test V5.1C’ and click on ‘Advanced’. Page58of81 ITPP047 Thermal Printer Software Manual Version 1.
Figure 6-12 2) Switch ‘EPSON mode’ to ‘ON’, and then click ‘Setting’ to complete the setting. Page59of81 ITPP047 Thermal Printer Software Manual Version 1.
Figure 6-13 3) Connect Square and printer, and click "Settings". Figure 6-14 4) Click "Hardware" & "Printers". Page60of81 ITPP047 Thermal Printer Software Manual Version 1.
Figure 6-15 5) Click "Create printer station"->"Select printer"->"Epson TM-m30 002"->"Print test". Figure 6-16 6) Print test paper. 7) Customize the name for this printer. Page61of81 ITPP047 Thermal Printer Software Manual Version 1.
Figure 6-17 8) Click "Receipts" -> "ON" -> “Save". Figure 6-18 9) Create your order on Square. Page62of81 ITPP047 Thermal Printer Software Manual Version 1.
Figure 6-19 10) Get the receipts. Figure 6-20 Application Compatibility Loyverse (Android) WiFi Setting Demo video: https://munbyn.biz/ITPP047-W-L 1) Setting as the below shown. Page63of81 ITPP047 Thermal Printer Software Manual Version 1.
Figure 7-1 2) Click "PRINT TEST". Page64of81 ITPP047 Thermal Printer Software Manual Version 1.
Figure 7-2 3) A Test receipt will pop up automatically that means WiFi printer is ready. Figure 7-3 Page65of81 ITPP047 Thermal Printer Software Manual Version 1.
Uninstallation/ Delete Printer 1) Go to the Control Panel and click on "View devices and printers". Figure 8-1 2) Right click on the POS-80 and click on the "Remove device". Figure 8-2 Page66of81 ITPP047 Thermal Printer Software Manual Version 1.
Configuration "Printer Test V5.1" This chapter will introduce the tool settings in detail. Figure 9-1 Communication Port Selection Contain parallel port, serial port, USB port and Ethernet port. Figure 9-2 Printer Type Default is POS-80 Figure 9-3 Page67of81 ITPP047 Thermal Printer Software Manual Version 1.
Parallel Port Settings (LPT Set) Parallel port Settings is consistent with the computer and will be automatically selected. Figure 9-4 Serial Port Settings (COM Set) Serial port Settings: set the serial port number, baud rate, flow. Figure 9-5 Ethernet Port Settings (NET Setting): Change the IP address of Ethernet port printer through Ethernet port Settings. Figure 9-6 "Local IP"--- computer’s local IP address which can be added automatically or by clicking "refresh" button.
Number of the Copies It refers to the printing quantity of the repeat print of the test content. Figure 9-7 HEX Data It can only be transmitted by inputting hexadecimal after having selected printing content. (It’s mainly used to send instructions to the printer). Figure 9-8 Printing Content Edit the printing content and send data by clicking "Print" button.
Print Print the information and data in the "content" edit box. Figure 9-11 Cut Paper paper cutting action. Figure 9-12 Open Cash drawer Test the cashbox function. Figure 9-13 Traditional Font Test Used for testing traditional fonts printing. Figure 9-14 Driver Print Test the Driver installation is successful or not. Figure 9-15 Firmware Update Tips: Under normal circumstances, firmware upgrades are not carried out. If you have specific needs, please contact our technical support team.
Figure 9-16 Advanced Click "advanced" button, and set up more features to have print test, below is the detailed introduction. Figure 9-17 Language Switching Swithch English and Chinese. Figure 9-18 Setup Instructions for "advanced" Button This chapter will introduce the tool settings in detail. Figure 9-19 NV Logo Test: a) Click the "NV Download "button, the menu below will pop-up: Page71of81 ITPP047 Thermal Printer Software Manual Version 1.
Figure 9-20 b) Size requirement and function selection of paper cutting of NV LOGO printing. Figure 9-21 c) Open Logo: Click and select BMP format picture or the "LOGO" file that you want to print. Figure 9-22 d) Download NV Logo: Click the download button after opening the BMP format file and the file will be downloaded to the printer. Print the file content by clicking "print LOGO" button. Figure 9-23 e) Print LOGO: Click this button to complete the "LOGO" image printing.
Figure 9-24 f) Clear LOGO: Remove the downloaded "NV LOGO". Figure 9-25 g) Multi NV LOGO menu. Show current NV LOGO Figure 9-26 2D Barcode Testing Edit and print test of two-dimension codes. Figure 9-27 Black Mark Settings To set special paper printing with black mark. Figure 9-28 File Data Send Page73of81 ITPP047 Thermal Printer Software Manual Version 1.
Choose and open TXT format file in the pop-up dialog box, and then the printer will print the contents of the file. Figure 9-29 Network Settings It includes "Network Settings" and "Bluetooth Settings". Figure 9-30 9.2.5.1. Net Setting Figure 9-31 a) Set up the Printer’s IP address. b) Set up the Subnet Mask. c) Set up the Gateway. d) WIFI SSID address settings. Note: the SSID address is the name of your Wireless Router’s name. e) WIFI password settings.
Encryption type". g) After filling the above information, click the "Setting All" option. The printer will "BEEP". Next, restart the printer. 9.2.5.2.BlueTooth Setting Figure 9-32 a).
Choose a variety of barcode types and height to test the print with a total of nine kinds of one-dimensional code choice. Figure 9-35 P80 Black Sens The adjustment of black mark sensitivity Settings for 80 series machines according to different black mark paper. Valid only when black mark function set is on. Figure 9-36 DIP Switches Settings P80 Set DIP (only for machines without DIP switches on bottom).
"SetCodePage" button. Click on the "PrintCodePage" button to view the setup code. Figure 9-38 Baud Rate Set"(only for P58 and P76E machines) Figure 9-39 Density Set Figure 9-40 Uncommon Settings Please contact technical support team for more details. Figure 9-41 Return Return to the former directory. Page77of81 ITPP047 Thermal Printer Software Manual Version 1.
Figure 9-42 Factory default. Connect the printer to the computer by a USB cable. Open "Printer Test V5.1C", clear the input field and enter "1F 1B 1F 11 11", check "HEX", and click on the "Print". Figure 9-43 Printer Settings Device management Tips: Please refer to the chapter 2.2 and enter the "Devices and Printers". 1) Right click on the "POS-80C" and choose "Printer properties" Figure 9-44 Page78of81 ITPP047 Thermal Printer Software Manual Version 1.
2) Click on the "Device Settings", enter POS-80C Device Settings. Figure 9-45 3) Choose the Cash Drawer after printing. Figure 9-46 Page79of81 ITPP047 Thermal Printer Software Manual Version 1.
4) Change the Printing Density if the default printing is Blurry. Figure 9-47 5) Choose Paper Feed after printing. Figure 9-48 Page80of81 ITPP047 Thermal Printer Software Manual Version 1.
Contact us Need Tech Support, contact us by: E-mail: support@munbyn.com Whatsapp: +8617817881067 Skype: live:munbyn Support time: Monday to Friday 24 hours. Page81of81 ITPP047 Thermal Printer Software Manual Version 1.