
Installation Manual
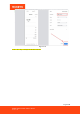
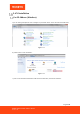
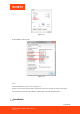
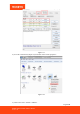
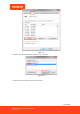
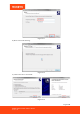
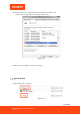
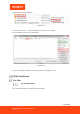
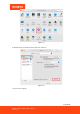
Table Of Contents
- Version History
- 1.0. Get Started
- 2.0. USB Installation
- 3.0. LAN Installation
- 4.0. WiFi Installation
- 5.0. Bluetooth Connection
- 6.0. Square Installation
- 7.0. Application Compatibility
- 8.0. Uninstallation/ Delete Printer
- 9.0. Configuration
- 9.1. "Printer Test V5.1"
- 9.1.1. Communication Port Selection
- 9.1.2. Printer Type
- 9.1.3. Parallel Port Settings (LPT Set)
- 9.1.4. Serial Port Settings (COM Set)
- 9.1.5. Ethernet Port Settings (NET Setting):
- 9.1.6. Number of the Copies
- 9.1.7. HEX Data
- 9.1.8. Printing Content
- 9.1.9. Automatically Sending, Cycle, CutPaper
- 9.1.10. Print
- 9.1.11. Cut Paper
- 9.1.12. Open Cash drawer
- 9.1.13. Traditional Font Test
- 9.1.14. Driver Print
- 9.1.15. Firmware Update
- 9.1.16. Advanced
- 9.1.17. Language Switching
- 9.2. Setup Instructions for "advanced" Button
- 9.2.1. NV Logo Test:
- 9.2.2. 2D Barcode Testing
- 9.2.3. Black Mark Settings
- 9.2.4. File Data Send
- 9.2.5. Network Settings
- 9.2.6. USB Mode Setting
- 9.2.7. Printing Width Set
- 9.2.8. Barcode Test
- 9.2.9. P80 Black Sens
- 9.2.10. DIP Switches Settings
- 9.2.11. Code Page Set
- 9.2.12. Baud Rate Set"(only for P58 and P76E machines)
- 9.2.13. Density Set
- 9.2.14. Uncommon Settings
- 9.2.15. Return
- 9.3. Factory default.
- 9.4. Printer Settings
- 9.1. "Printer Test V5.1"

Page34of81
ITPP047 Thermal Printer Software Manual
Version 1.02
"Printer Test V5.1" Settings
1) Open "Printer CD" and "Tools".
Figure 3-5
2) Open "Printer Test V5.1C ".
Figure 3-6
3) Check the Port Select and Printer Type. Enter the Local IP, Printer IP.
You can get the printer IP (IP address) by the Self-test page (Please refer to the Hardware Manual).
Enter the New IP, the first three digits are consistent with Local IP, and the last digit is different from
the last digit of Local IP.
Click on the "Set New IP" after finishing.