WLAN61xx EB CF Evaluation Kit User’s Guide V0.5 3/08/2006 Confidential Information Note: SyChip, Inc. reserves the right to make changes in specifications at anytime and without notice. The information furnished in this document is believed to be accurate and reliable. However, no responsibility is assumed by SyChip for its use, nor any infringements of patents or other rights of third parties resulting from its use.
WLAN61xxEB CF EVK User’s Guide Document Revision Control Revision Date V0.1 4/20/2004 Initial draft for 61xx CF EVK user guide V0.2 7/17/2005 Preliminary release V0.3 10/28/2005 V0.4 1/10/2006 V0.5 3/08/2006 Document updated with new driver release and User Interface update. Document updated with new driver release and User Interface update. Language updates per regulatory needs.
WLAN61xxEB CF EVK User’s Guide Table of Contents 1 INTRODUCTION .............................................................................................................................................................. 4 2 EVALUATION KIT CONTENTS .................................................................................................................................... 6 3 SUPPORTED EVALUATION ENVIRONMENT .....................................................................................
WLAN61xxEB CF EVK User’s Guide 1 Introduction WLAN61xx EB is SyChip’s NextGen 802.11g WLAN module. WLAN61xx EB module has many advantages over the previous 6060, 6065 and 6061products. It is similar in size (15.90x12.70x1.79) and has lower power consumption. It’s upgraded to support 802.11g instead of 802.11b. It also supports multiple host interfaces such as SDIO and CF. Check with SyChip for the datasheet.
WLAN61xxEB CF EVK User’s Guide Note: This equipment has been tested and found to comply with the limits for a Class B digital device, pursuant to part 15 of the FCC Rules. These limits are designed to provide reasonable protection against harmful interference in a residential installation. This equipment generates, uses and can radiate radio frequency energy and, if not installed and used in accordance with the instructions, may cause harmful interference to radio communications.
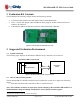
WLAN61xxEB CF EVK User’s Guide 2 Evaluation Kit Contents The WLAN61xx EB CF EVK package contains the following contents:1 • • • A test board with antennas and a WLAN61xx EB CF embedded module Two 1” coaxial cable jumper ended with Hirose W.FL plugs for the RF connections from the module to the antennas A WLAN61xx EB CF module driver software and documentation CDROM Figure 1 61xx CF EVK (actual layout may vary) 3 Supported Evaluation Environment 3.
WLAN61xxEB CF EVK User’s Guide 4 Driver Setup for Pocket PCs Along with the WLAN61xxEB EVK package, there is a User’s Manual for Pocket PCs. Based on the evaluation platform you use, refer to the appropriate sections in the enclosed document for installation and usage instructions. The manual provides easy to follow step-by-step directions. Anyone can set up and configure a laptop computer or a Pocket PC to communicate with a host or enterprise hub following these steps.
WLAN61xxEB CF EVK User’s Guide 4.3 WLAN Setup using connection manager in PPC 2003 The connections manager (WZC) in Windows CE 4.20 or PPC2003 plays a generic role for managing various network connections. 4.3.1 • Automatic network detection The PPC 2003 connection manager scans for wireless networks periodically. If it detects any network and has not connected to any network yet, it will first try to connect to one of the preferred networks.
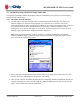
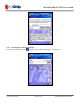
WLAN61xxEB CF EVK User’s Guide Figure 4 WEP key entry 4.3.2 Accessing the connection manager Click on the Connectivity icon to bring up the connection manager. See Figure 5.
WLAN61xxEB CF EVK User’s Guide 4.3.3 Advanced Connections Click on Settings link, and select Advanced tab. You will see the following screen. Alternatively, you can follow Start->Settings->Connections->Connections icon ->Advanced Tab to get to the same screen, as shown by Figure 6. A list of Access Points and their connectivity/availability status will appear on the screen Figure 6 Configure Wireless Networks 4.3.4 WEP Key Entry Click on the AP you want to connect to, a configuration screen will appear.
WLAN61xxEB CF EVK User’s Guide Figure 7 Configure Network Authentication 4.3.5 Connecting to an AP Tap and hold on the AP entry you wish to connect to, and select Connect option on the popup menu as shown in Figure 8. The red LED on the WLAN61xxEB EVK should start to blink, indicating it is trying to associate, and eventually turn red steadily, which means it is connected successfully. The screen will also be updated to show the new connection. See Figure 9.
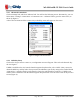
WLAN61xxEB CF EVK User’s Guide Figure 9 Connection to a new AP 4.3.6 Verifying network connectivity If the Pocket PC is not connected with a host PC via a sync cable, then the Connectivity icon indicates the WLAN connection is properly established. You can also check on the Network Adapters tab to check if the IP address obtained from DHCP is correct. See Figure 10, click “SyChip Cheetah 802.11 CF Card” to see the IP address information (Figure 11).
WLAN61xxEB CF EVK User’s Guide Figure 11 IP Address 4.3.7 Peer-to-peer mode Peer-to-peer mode is also known as the “Ad-Hoc” mode. There are two ways for your device to connect to other devices in peer-to-peer mode. The first way is that you create an Ad-Hoc network on your device, and then allow other devices to connect to yours by joining the network. The second way is simply connect your device to an existing Ad-Hoc network if such a network is already created by the peer device. 4.3.7.
WLAN61xxEB CF EVK User’s Guide Figure 12 Configuring an Ad-Hoc network 2. Type in the network name in the Network Name field (txtest, for example). Then check the box This is a device-to-computer (Ad-Hoc) connection.
WLAN61xxEB CF EVK User’s Guide 3. OK to go back to the previous screen. Click and hold the network name and select connect. Figure 14 Connecting to the Ad-Hoc network 4. Now the new Ad-Hoc network has been created, and it is visible to other WLAN devices. Your device is connected to the Ad-Hoc network as shown in Figure 15.
WLAN61xxEB CF EVK User’s Guide 4.3.7.2 Connecting other devices to the Ad-Hoc network Once the Ad-Hoc network is created, it is available for other devices to join. To join the network, go to the Configure Wireless Networks screen (Figure 14) using a second device. Repeat step 3 (Figure 14) and step 4 (Figure 15), the second device should now be connected to the newly created Ad-Hoc network, e.g. txtest. You can go to the Network Adapters screen (Figure 10) to find the devices’ IPs.
WLAN61xxEB CF EVK User’s Guide • Channel Shows the RF channel currently being used by the card. • TX Rate Shows the current transmit rate. This can be 1Mb/s, 2Mb/s, 5.5Mb/s, or 11 Mb/s. • Strength Gives signal strength of the receiver in both percentage and graphical display. • IP Address – IP address of the card or module Note: Check with your network administrator for IP configuration information. • Help button: open a context sensitive help window. 4.4.1.
WLAN61xxEB CF EVK User’s Guide 4.4.2.1 Information Fields • Preferred Networks On the top of the window is a list of preferred profiles one has created, or added from the Active SSIDs table below. It will start searching for the APs to associate with in the order of the listed profiles. This table is blank after the initial SyChip software installation. It can be kept blank with no automatic association preference.
WLAN61xxEB CF EVK User’s Guide • Active Networks The Active SSIDs table lists all the access points or peer stations (creator of IBSS) in the vicinity with each record displaying the following six fields (The table may not display all the fields on the screen. Use horizontal scroll bar to check all): SSID – Network Name of the access point or peer station. An associated icon shows whether it , or a peer station . is an access point Signal – Signal Strength in percentage for that SSID.
WLAN61xxEB CF EVK User’s Guide 4.4.2.3 Profile Settings Window 4.4.2.3.1 Network Profile Window Figure 19 Network profile window To create a new profile to the preferred list one can click the New button (described in Section 4.4.2.1) without selecting (highlighting) any existing profile. An Add New Preferred SSID window will pop up as shown in Figure 19. To modify a profile one can select (highlight) a profile and click the Edit button.
WLAN61xxEB CF EVK User’s Guide • Preamble Mode Long TX Preamble – Where Sync field consists of 128 bits. Short TX Preamble – Where Sync field consists of 56 bits. Auto TX Preamble – Automatically change between long and short preamble mode transmission based on the AP configurations. This is the default Preamble Mode. Note: A Preamble consists of a Synchronization (Sync) field and a 16-bit Start Frame Delimiter (SFD) field. • AP Roaming: Used for wireless client roaming between APs.
WLAN61xxEB CF EVK User’s Guide Enable authentication & encryption – Check this box allows you to enter security keys and enable 802.1x o Authentication Algorithm - Five options, only configurable when WEP Method is enabled. 1. Open - Should match AP's WEP setting for "Open." 2. Shared - Should match AP's WEP setting for "Shared." 3. Auto Switch- Automatically matches AP's setting. 4. WPA3 - Need network certificate for authentication. 5. WPA-PSK - Need Pre-Shared Key for access.
WLAN61xxEB CF EVK User’s Guide 4.4.2.3.3 Encryption Tab Figure 21 Encryption Tab 4.4.
WLAN61xxEB CF EVK User’s Guide 4.4.3.1 Information fields This tab show all related IP address information including DHCP, DNS, WINS server and gateway etc. for advance users. 4.4.3.2 Operation Buttons • Renew – Renew IP address from DHCP server for this NIC card. • Ping – Ping another IP/Host address in the network (Figure 23). o IP Address/Host Name: Enter an IP address or host name to ping. When a host address (eg. www.yahoo.com) is entered, the Resolve target name box needs to be checked.
WLAN61xxEB CF EVK User’s Guide o IP Address/Host Name: Enter an IP address or host name to ping. When a host address (eg. www.yahoo.com) is entered, the Resolve target name box needs to be checked. o Timeout for each reply (ms): Default is 2000, can be increased or decreased from the spin button. o Maximum number of hops: Default is 10, can be increased or decreased from the spin button. o Resolve target name: Check it if a host name is entered.
WLAN61xxEB CF EVK User’s Guide Figure 25 IP configuration 4.4.
WLAN61xxEB CF EVK User’s Guide 4.4.4.1 Information fields and buttons • Power Save Mode Disable – Choosing this option will disable the power save mode. Always Enable – Choosing this option will have the power save mode always enabled. This is the default setting. Auto Enable – When internal battery is being used it will be in Power Save mode; when external power supply is being used the Power Save mode will be disabled automatically.
WLAN61xxEB CF EVK User’s Guide 4.4.5 About Tab Figure 27 About Window This tab provides information about the version number and time of the build for Network Driver, Configuration Utility and firmware, the MAC address / Serial Number of the CF card. 5 Troubleshooting The following scenarios could be encountered when using the WLAN61xxEB in a Pocket PC or notebook computer: • WLAN61xxEB CF card is not recognized The device displays an Unrecognized Card dialog box when the test board is inserted.
WLAN61xxEB CF EVK User’s Guide 6 Contact Information Customer Support SyChip Inc provides its customers with prompt and accurate customer support. If the SyChip Customer Support specialists cannot solve a problem, access to all technical disciplines within SyChip becomes available for further assistance and support. SyChip Customer Support responds to calls by email, telephone or fax within the time limits set forth in individual contractual agreements.