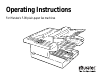
Operating Instructions For Muratec’s F-98 plain-paper fax machines
Muratec F-98 Quick Reference Guide One-Touch Keys Press Program “ “ To: A “ “ 1 2 3 Enter Enter Enter Enter a one-touch key Erase a one-touch key Print a list of one-touch keys B “ “ 1 2 3 Enter Enter Enter Program a speed dial number Erase a speed dial number Print a list of speed dial numbers Speed-Dial Numbers Program “ “ Programmable One-Touch Keys Program “ “ 1 2 3 Enter Enter Enter Enter a programmable key Erase a programmable key Print a list of programmable keys D “ “ 1 2 3 Enter Ent
Welcome …
This manual and any updates to it can be found online at www.muratec.com Go to the “Products” section of this site, then click on “F-98” As an ENERGY STAR® partner, Muratec America, Inc., has determined that this product meets the ENERGY STAR guidelines for energy efficiency. Copyright © 1998 by Muratec America, Inc.; all rights reserved. Muratec, the Muratec logo and all Muratec fax product names contained herein are trademarks of Muratec America, Inc.
Welcome to your Muratec fax machine! We know you want to use your machine now, without first having to climb over a mountain of jargon. So we’ve divided these instructions into three sections. • “Getting started” (see page 1.1) covers only what you absolutely have to know to use your machine immediately. • “Beyond the basics” (see page 2.1) provides more details. When you have time, look through it to learn more about your machine’s many features, as well as fax in general.
What’s in these operating instructions Note: Each section also contains its own (more abbreviated) table of contents, as well. Getting started What’s inside this section . . . . . . . . . . . . . . . . . . . . . . . . . . . . . . . . . . . . . . . . 1.1 A quick introduction to fax in general . . . . . . . . . . . . . . . . . . . . . . . . . . . 1.1 Make sure it’s all out of the packaging . . . . . . . . . . . . . . . . . . . . . . . . . . . . . 1.2 What are all the parts? . . . . . . . . . . . . . . . . . .
Special features . . . . . . . . . . . . . . . . . . . . . . . . . . . . . . . . . . . . . . . . . . . . . . . Cover page . . . . . . . . . . . . . . . . . . . . . . . . . . . . . . . . . . . . . . . . . . . . . . . . Managing your fax with its journal and reports . . . . . . . . . . . . . . . . . . Polling . . . . . . . . . . . . . . . . . . . . . . . . . . . . . . . . . . . . . . . . . . . . . . . . . . . . OneLine + distinctive ring detection . . . . . . . . . . . . . . . . . . . . . . . . . . . .
Getting started A quick and friendly trip through the basics of your Muratec fax machine
Getting started What’s inside this section A quick introduction to fax in general . . . . . . . . . . . . . . . . . . . . . . . . . . . . . . . . . . . 1.1 Make sure it’s all out of the packaging . . . . . . . . . . . . . . . . . . . . . . . . . . . . . . . . . . . 1.2 What are all the parts? . . . . . . . . . . . . . . . . . . . . . . . . . . . . . . . . . . . . . . . . . . . . . . . 1.2 A quick introduction to fax in general What’s a fax document? What do the keys do? . . . . . . . . . . . . . . . . .
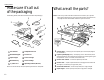
Getting started Make sure it’s all out of the packaging What are all the parts? The drawing, below, shows what should be included in the packaging: Note: Don’t worry if some of the terms used here are unclear to you right now. We’ll explain everything fully. Once you’re more familiar with these terms, this page will be an even handier reference to your fax machine.
Getting started 7 8 Scanner cover release — Pull up on this to open the scanner cover. Scanner cover — Open this (by using the scanner cover release) to provide access to the original document (what you put into the machine for faxing or copying) during occasional jams. 9 10 11 12 13 14 Document feeder — The slot into which you place your original document for faxing or copying. It holds up to 30 sheets.
Getting started What do the keys do? 5 6 4 3 2 1 ALARM 8 7 AUTO ANSWER 9 SPEED DIAL /TEL INDEX PC-CONNECT COMMUNICATION MEMORY RECEIVE MEMORY TRANSMIT REDIAL /PAUSE HOLD /DIALING OPTIONS REVIEW COMMANDS HALFTONE S-FINE qz abc 1 2 3 ghi jkl mno 4 5 6 prs tuv wxy 7 8 9 0 DARK NORM NORM LIGHT RESOLUTION CONTRAST 28 27 PROGRAM BROADCAST COM-OPTIONS MONITOR/CALL ENTER REPORT CANCEL STAMP STOP 26 25 24 23 22 21 20 19 18 17 16 15 COPY 14 Here’s a brief descripti
Getting started 13 14 15 16 17 18 19 20 21 22 START COPY — Begins a manual fax transmission or reception. — Press this key to make one copy, or multiple copies of a document. — An all-purpose “Whoa!” key. Stops the current operation, ejects a document from the document feeder and cancels alarms. STOP — Lets you quickly disconnect a call and go right to the next one without having to hang up the handset.
Getting started Setting up Pick an installation spot before going ahead Install the printing supplies Where should you install your fax machine? The location should be: • Clean — Dust buildup can damage your machine. (Still, do not use a cover! See next item.) • In the open — Allow at least 12″ of clearance around your machine. Be sure that you never cover the machine. Its vents must be able to “breathe.” • Away from direct sunlight — This helps avoid overheating.
Getting started Loading paper 4 Unpack the toner cartridge from its carton. Then, holding the toner cartridge with both hands, shake it well as shown (note the arrows). Your fax machine can hold up to 150 sheets of plain paper in the multipurpose tray, and your machine will use it to print received faxes and make copies. You can also attach an optional paper cassette, which holds up to 500 additional sheets of plain paper.
Getting started Attach the paper-handling parts 1 Attach the document tray by inserting it into the appropriate holes, as shown. 2 Attach the paper hopper into the appropriate hole, as shown. Press gently until the hopper won’t go in any farther. 3 Paper hopper 4 Document hopper Attach the document hopper by inserting its two pegs at a slightly upward angle into the appropriate holes, as shown.
Getting started 2 3 4 If the volume you hear is satisfactory, skip to step 4. Otherwise, go on to step 3. Adjust the volume as you like: To turn the volume up, press . To turn the volume down, press . The display, or LCD, indicates the volume. Here are the possible settings: ** Tel Mode ** Volume:■ ■ ■ ■ ■ ■ = Loudest setting. ** Tel Mode Volume:■ ■ ■ ■ ** = Medium setting. ** Tel Mode Volume:■ ■ ** = Low setting. Press MONITOR/CALL again to hang up.
Getting started EasyStart Your Muratec fax machine comes with EasyStart. It guides you in entering the bare-bones settings required for normal operation — so it’s easy for you to start using your machine quickly. (You can enter other settings later or change settings. We’ll explain in “Beyond the basics,” beginning on page 2.1.) 2 Important: At the end of EasyStart, your machine will print a list of its settings.
Getting started 4 In “Beyond the Basics,” we’ll show you how to use the CODE function to enter a wide variety of characters (see page 2.3). For now, however, become familiar with the ABC, abc and SYMBOL keys. Note: If you make a mistake, press CANCEL to erase leftward. Or, if you want to change just one character in the name, press to move the cursor leftward, or , to move it rightward, to that character and press CANCEL to erase it. Then re-enter until the name is just as you want it.
Getting started Sending faxes Some guidelines How big — and small — your pages can be While you’ll probably be sending normal-sized documents most of the time, you can fax a piece of paper as small as a notepad sheet or one nearly 3 feet long! To be precise, the acceptable dimensions (width × length) are: SINGLE-SHEET TRANSMISSION MULTIPLE-SHEET TRANSMISSION Maximum: 11.0″ × 35.4″ Maximum: 10.1″ × 14.4″ Minimum: 5.8″ × 4.1″ Minimum: 5.8″ × 4.
Getting started Changing the pause length The pause is set by the factory to last five seconds, but you can set it to last as long as ten seconds if necessary. If you find the five-second pause is satisfactory when you use it with your phone system, do not make this change. But, if you must: 1 How to insert a document 1 Adjust the document guides — by sliding either of them to the left or right — to fit the page (s) you’ll be faxing.
Getting started Note: Whether you decide to send your documents from memory or through the document feeder, you can override that choice one transmission at a time by pressing MEMORY TRANSMIT before you send your document. After completing the communication, your fax will return to the default setting. Note: Although it’s probably best to transmit from memory, please note there are some documents that use up memory more quickly than others.
Getting started Sending a fax with on-hook dialing or a handset If the call doesn’t go through — redialing You also can fax a document by dialing using either the monitor speaker (called “onhook” dialing) or the optional handset. If your call fails, and you dialed without using either the monitor speaker or an optional handset, your machine will automatically redial the fax call you just tried. While in this Auto Redial mode, the machine can receive faxes and make as many as 50 fax transmissions.
Getting started Making redial settings An introduction to Review Commands It’s up to you how many times the fax redials a number and how long it waits between redials (that length of time between calls is the redial interval). Here’s how to program the redial settings: To cancel either a transmission in progress, an automatic redial or a delayed command, you’ll use the Review Commands function. First, a short explanation . . .
Getting started Receiving faxes Different ways to get the job done Tel Ready mode — when Auto Answer is off Reception modes Use it if: Your fax machine has two different reception modes — Tel Ready and Fax Ready — each of which we’ll explain in a moment. We’ll also give you an idea of which one you should use, depending upon your setup. Answering calls manually — for both reception modes In either reception mode, you can always answer calls manually if you have an optional handset installed.
Getting started Fax Ready mode Use it if: When the paper runs out You have your fax machine installed on a “dedicated” line (one it doesn’t share with a second phone). In this mode: Your fax machine answers each incoming call after a certain number of rings (see page 2.5) and attempts fax reception. To select Fax Ready: 1 2 If there isn’t a document in the feeder, skip to step 2. If there’s a document in the feeder, press STOP so it will feed out.
Getting started Making copies One of the best things about your fax machine is that it doubles as a copier. This makes it easy for you to keep copies of your important documents, such as insurance forms, receipts and letters. To make a copy with your fax machine: 1 Prepare the document just as you would for a fax transmission. Remember: • There are certain types of documents you never should insert into your fax machine. (You might wish to review “Things not to put in your fax,” page 1.12.
Beyond the basics We’ve covered the “musts.” Now, let’s explore the goodies.
Beyond the basics What’s inside this section Getting everything just the way you want it . . . . . . . . . . . . . . . . . . . . . . . . . . . . . . 2.2 Autodialer . . . . . . . . . . . . . . . . . . . . . . . . . . . . . . . . . . . . . . . . . . . . . . . . . . . . . . . . . 2.8 It’s a great phone, too . . . . . . . . . . . . . . . . . . . . . . . . . . . . . . . . . . . . . . . . . . . . . . . 2.15 Broadcasting . . . . . . . . . . . . . . . . . . . . . . . . . . . . . . . . . . . . . . . . . . . . . . .
Beyond the basics Getting everything just the way you want it The EasyStart feature guided you through the “just-gotta” settings on your machine. In the next few pages, we’ll cover other settings.
Beyond the basics Using CODE to enter characters Making settings for printing faxes Certain settings give you a chance to enter some kind of identifying name. As explained earlier (page 1.11), you can do this with the one-touch keys. But you may also use the CODE key in combination with other keys to produce a wide variety of characters, as well as regular letters and numbers.
Beyond the basics Reduction margin Making settings for copying Your fax machine’s reduction margin is measured in millimeters (mm). We’ll define it by explaining how it’s used: When a fax message enters your machine’s electronic brain, the machine measures the message’s length and compares it to (a) the length of your selected paper plus (b) the reduction margin you set.
Beyond the basics Copy Reduc Rate: 75% Program/Enter 5 Press ENTER to save the setting. The LCD shows the current setting for the reduction margin: Copy Reduc Rate: 75% Margin(0-85mm): 24 If the setting you see is acceptable, skip to step 7. Otherwise, proceed to step 6. 6 To change the setting, use the numeric keypad to enter the reduction margin you want. If necessary, press or to move the cursor if you need. In this example, we’ve chosen 00mm.
Beyond the basics Setting silent mode If you and your fax machine share a quiet place, you’ll really appreciate being able to put the machine into silent mode. This setting mutes the ringer, the alarm and the key-touch tone. • Ringer — This mutes the ringer and a special ring alerts you if you receive a voice call and a call request call.
Beyond the basics Setting the transmission confirmation stamp Printing your settings You can set your fax machine so that it will automatically place a small stamp mark on the front of each original document that it successfully scans. After you have your machine set as you want, have it print a settings list. We recommend this particularly if you’ll be sharing the machine with other users, who might change the settings for one reason or another.
Beyond the basics Autodialer Your fax machine’s autodialer is one of its most versatile features. It stores your most frequently called phone and fax numbers for instant recall so you don’t have to remember them. Now, it’s easy to dial even the most complicated international calls! Autodialer basics How do you autodial? There are two kinds of autodialer numbers.
Beyond the basics Using One-touch numbers As indicated previously, your fax machine will store up to 30 one-touch numbers by using the keys marked A–Z and U1–U4 (fliptab a). 6 7 Important: To erase a number, see “Erasing a one-touch number” (page 2.11). 2 :Upper If you do not wish to enter or change this number’s Location ID, skip to step 9. If you do wish to enter or change this number’s Location ID, proceed to step 8. 8 If A is the key you want to set, skip to step 3.
Beyond the basics 9 Press ENTER. The LCD will display the next one-touch number. If you do not want to enter any more one-touch numbers, press STOP to finish. If you do not want to enter the currently displayed one-touch number but do want to enter another one-touch number, go back to step 2. If you do want to enter this one-touch number, go back to step 4. One-touch fax dialing Now that you’ve stored a one-touch number or two, let’s discuss the ease of using one-touch keys to make calls.
Beyond the basics Erasing a one-touch number 1 Using speed-dial numbers Press PROGRAM, A, 2, ENTER. The LCD shows: Select One-Touch A :No Number Stored Select One-Touch or A :9-1-555-345-6789 If A is the key you want to erase, skip to step 3. (However, our examples from here will say “B” rather than “A.”) 2 Press the key for the one-touch number you want to erase.
Beyond the basics Note: If you make a mistake or want to erase characters entered in a previous setting, press CANCEL to erase leftward. Or, if you want to change just one character in the number, press to move the cursor leftward, or to move it rightward, to that character and press CANCEL to erase it. Then re-enter until the number is just as you want it. 6 7 9 When the number is as you want it, press ENTER to store it.
Beyond the basics If you specified transmission from memory: • Your fax scans your document into memory first, then dials the other machine. • The LCD shows the Location ID and the document’s width and resolution settings: Shipping & Receiving A4 Normal Note: If the speed-dial number doesn’t have a Location ID, the number appears. • When the other machine answers, your fax will transmit the document directly from memory. (To review memory transmission, see pages 1.13–1.14.
Beyond the basics EasyDial directory dialing The EasyDial directory dialing feature makes your autodialer even more like an electronic phone book. EasyDial sorts and displays numbers alphabetically according to their Location IDs, so you can easily find them and dial them. When the name you want appears, you just press START to begin a call (either phone or fax). Your machine’s EasyDial directory alphabetizes in the following order: alphabet, numbers and, finally, symbols.
Beyond the basics It’s a great phone, too As you’ve probably guessed by now, your fax machine is a great phone, too! Let’s see just how good it is by looking briefly at the machine’s telephone features. Important: All of the instructions on this page assume you have attached an optional handset to your fax machine. On-hook dialing Because your machine has a monitor speaker, you can dial without picking up the handset. For hands-free dialing: 1 Redial Press MONITOR/CALL.
Beyond the basics Broadcasting The basics of broadcasting The fastest way to fax one document to many recipients is by broadcasting — and your fax machine has very powerful broadcasting capabilities. You can use broadcasting from any function requiring the entry of a fax number! That means you can perform delayed broadcasting (see pages 2.19–2.20), polling broadcasting (see pages 2.23–2.24) and even broadcasting to “hub” units for relay broadcast initiation (see pages 2.17–2.18).
Beyond the basics Relay broadcasting and relay broadcast initiation Setting up a relay broadcast initiation Relay broadcasting is a powerful function that takes advantage of a remote Muratec “hub” fax machine’s memory to reduce your total communication costs. A “hub” fax machine is one to which you send a document, so the “hub” can relay it to other machines which you don’t actually call.
Beyond the basics 7 Use the numeric keypad to enter the day of the month and time when you want to begin initiating the relay broadcast. Delayed Enter Time: 14/14:00 When the entry is complete, press ENTER. 8 Press START. If, in step 6, you chose an immediate relay broadcast initiation, your fax machine will begin dialing the remote “hub” machine. However, if you requested a delayed command, the machine will display “Reserved” on the LCD’s top line. This means the command is in memory. 2.
Beyond the basics Delayed transmission Take advantage of lower evening and weekend long-distance rates with delayed transmission. Your fax machine can store up to 50 delayed commands, each of which you can program up to 31 days in advance. Important: If you program a full 50 delayed transmission commands, no further memory transmission is possible until the machine performs at least one of the delayed commands. (To review memory transmission, see pages 1.13–1.14.
Beyond the basics Reviewing or cancelling delayed commands Printing a delayed command list If you’ve stored a delayed command in your fax machine, it will hold it in memory until it either completes the command successfully or reaches its maximum number of redial attempts (see pages 1.15–1.16). Your machine can store up to 50 delayed commands. It identifies each by a two-digit command number ranging from 01 to 50.
Beyond the basics Special features Your fax machine has a number of special features to make your communications easier. We’ll cover them here. Toggling the cover page 1 Press PROGRAM, H, 1, ENTER. The LCD shows: Cover Page: Off Program/Enter Cover page For your convenience, your fax machine can store a cover page to send at the beginning of each outgoing fax.
Beyond the basics Entering the cover page message 1 2 Press PROGRAM, H, 2, ENTER. Now, use the one-touch keypad to enter a message for the cover page. The message can be up to 40 characters in length. You enter the message the same way you entered your fax name during EasyStart. We’ll review the process here. (If you’re changing a previously entered message, see the note at the end of this step.) Important: As in EasyStart, you enter letters and other non-numeric characters through the one-touch keys.
Beyond the basics Setting the reports: TCRs You can set your fax machine to print a transmit confirmation report (TCR). You can receive a TCR after sending a fax to any Group 3 fax machine.
Beyond the basics 4 5 To perform the regular polling now, skip to step 8. To perform delayed regular polling, proceed to step 5. Press COM-OPTIONS, ENTER. The LCD will show: Delayed Enter Time: 15/17:05 6 7 8 Use the numeric keypad to enter the date and time when your machine should perform the delayed regular polling. Press ENTER. Press START.
Beyond the basics Some telephone companies provide only a very general description — for example, “short-short-long” — of their DRD ring patterns. Fortunately, though, your fax has eight possible distinctive ring patterns for use with OneLine + DRD. One of them should work with your phone company’s DRD service. This chart lists the patterns: Pattern One complete ring pattern (seconds) A B C D E F G H I 0.4 on, 0.2 off, 0.4 on, 0.2 off, 0.8 on, 4.0 off 0.3 on, 0.2 off, 1.0 on, 0.2 off, 0.3 on, 4.0 off 1.
Beyond the basics 3 If someone answers at the remote fax machine, your fax machine will ring several times. If so, pick up the optional handset. In a few seconds, the line will open and you can begin your conversation. Talking first, then sending a fax To talk first and then send a fax: 1 2 3 4 5 When your phone conversation is finished, don’t hang up. Insert the document you want to fax. Adjust the resolution and contrast if necessary.
Beyond the basics 4 Press SPEED DIAL/TEL INDEX twice. The LCD shows the latest caller-IDs. Note: If your machine is currently holding no caller-IDs, it will show the EasyDial directory (see page 2.14) on the LCD. 5 Scroll through the listings to find the one you want. You do this by pressing SPEED DIAL/TEL INDEX. Note: Do not press 2, 4, 6 or 8 on the numeric keypad. If you press 2, 4, 6 or 8, the fax machine will change to the EasyDial directory.
Beyond the basics F-Code communication F-Code: an introduction The ITU-T, part of the United Nations agency that maintains international telecommunications standards (see the Glossary that begins on page 3.17), has now created a fax industry standard for using sub-addressing and password-based communications with not only other Muratec fax machines but also other manufacturers’ machines.
Beyond the basics 7 The machine now is prompting you for a name for this F-Code box. The LCD shows: 03:Box Name:Upper _ 9 03:Sub-Address No. _ 03:Box Name:Upper or Muratec America_ An F-Code box’s name may be up to 16 characters in length. You enter the name the same way you entered your fax name during EasyStart. We’ll review the process here. (If you’re changing a previously entered name, see the note at the end of this step.) If you do not wish to change an existing sub-address, skip to step 11.
Beyond the basics If you do not want to enter or change this box’s password, skip to step 14. If you do want to enter or change this box’s password, proceed to step 13. 13 Use the numeric keypad to enter this box’s ITU-T-compatible password. This password can be up to 20 characters in length and include any combination of numbers and the * and # characters (but no other non-numerical characters). Here, we’ve entered 135*7#9.
Beyond the basics 4 Press ENTER. If the F-Code box is empty, the LCD shows: 03:Erase F-Code Box Enter I.D. Code:**** Important: If you select an F-Code box which is not empty, the machine beeps and, before returning to step 3, briefly displays: Select F-Code Box Box In Use Print any documents received in the F-Code box, then repeat this procedure from the beginning to erase the box. Otherwise, select another F-Code box. 5 Use the numeric keypad to enter the proper four-digit I.D. code.
Beyond the basics 4 Use the numeric keypad to enter your F-Code box’s four-digit I.D. code. Here we’ve entered 2345: 4 Enter Sub-Address _ 03:Print F-Code Doc. Enter I.D. Code:2345 5 Press ENTER. • If you’ve entered the correct I.D. code, your fax machine will print all documents in — and then erase them from — the F-Code box. • If you’ve entered an incorrect I.D. code, your fax machine will refuse to print the document.
Beyond the basics 12 13 Use the numeric keypad to enter the day and time when the transmission should begin, then press ENTER. F-Code polling Press COM-OPTIONS five times and then press ENTER. Enter Sub-Address _ 2 What you do now depends upon when you want the polling to begin. • To have it begin now, skip to step 10. • To delay it, proceed to step 8. 8 Press COM-OPTIONS, ENTER. The LCD will show: Press START. If in step 10 you chose an immediate transmission, your fax machine will begin dialing.
Beyond the basics Programmable one-touch keys Using the power of programmable one-touch keys The programmable one-touch keys P1–P6 (fliptab b) simplify complex fax operations, letting you really tap into your machine’s power. You can “teach” these keys the following multi-step operations for one-keypress convenience (the pages shown contain instructions for the specific operations): • Delayed transmission (pages 2.19–2.20) • Broadcasting (page 2.16) • Relay broadcast initiation (pages 2.17–2.
Beyond the basics 7 There’s a choice to make. Instruct your fax to carry out this delayed command in one of the following ways: Option 1: Perform the command once at a certain time on a certain day of the month. (For example, “Do this at 5:05 PM on the 30th.”) To select this option, use the numeric keypad to enter the date and time when the fax should perform the command: Delayed Enter Time: 30/17:05 Option 2: Perform the command at a certain time each day you press the key.
Beyond the basics 7 There’s a choice to make. Instruct your fax to carry out this delayed command in one of the following ways: Option 1: 8 9 … or indicates a command already is programmed into this key. If P1 is the key you want to program, skip to step 3. (However, our examples from here will say “P5” rather than “P1.”) 2 Perform the command at a certain time each day you press the key. (For example, “Do this at 5:05 PM today.”) To select this option, use the numeric keypad to enter 0, 0 (i. e.
Beyond the basics 7 Use the numeric keypad to enter the two-digit identifier (01–32) for the first call group. You can specify up to 10 separate groups for each relay broadcast initiation. Between the entry of each new group, press COM-OPTIONS to insert a comma but do not insert a comma after the last group number. For example, here, we’ve entered 0, 4, COM-OPTIONS, 1, 1, GROUP DIAL, 2, 4: Relay Tx Group No. Programming regular polling Note: To erase a programmable one-touch key, refer to page 2.41.
Beyond the basics 6 Now, while you can still see the fax number on the LCD, press COM-OPTIONS three times and then press ENTER. 7 If you want the polling to begin immediately every time you press the key, press ENTER and skip to step 10. If you want to delay the polling (perhaps to take advantage of lower phone rates), press COM-OPTIONS, ENTER. 8 1 Perform the command once at a certain time on a certain day of the month. (For example, “Do this at 5:05 PM on the 30th.
Beyond the basics 7 Use the numeric keypad to enter the ITU-T sub-address for the box to which you want to send the document. Here, we’ve entered 123456: 13 Enter Sub-Address 123456_ 8 Press ENTER. The LCD shows: Enter Password _ Note: If the password for the box is not entered, press ENTER and then skip to step 10. 9 Use the numeric keypad to enter the appropriate ITU-T password for the box. Here, we’ve entered 654321: Enter Password 654321_ When finished, press ENTER.
Beyond the basics 5 Use the numeric keypad to enter the number exactly as your machine should dial it, including whatever codes your phone system may require. The number can be up to 40 characters in length: P4:Fax Number 9-5558422_ 10 If you want the transmission to begin immediately every time you press the key, press ENTER and skip to step 13. If you want to delay the transmission (perhaps to take advantage of lower phone rates), press COM-OPTIONS, ENTER. 11 There’s a choice to make.
Beyond the basics Programmable one-touch fax dialing To dial a fax call using a programmable one-touch number: 1 2 3 4 4 Erase P One-Touch Check Program/Enter Insert the document. Important: If you want to quit without erasing the programmable onetouch key you’ve selected, press PROGRAM. The fax will return to step 2. Adjust the resolution and contrast if necessary. Toggle between transmission from the feeder or from memory if necessary, by pressing MEMORY TRANSMIT.
Beyond the basics PC-FAX connectivity Thanks to its built-in PC-FAX feature, your fax machine isn’t only a fax machine — it also can be an image scanner and printer for your computer. Note: If there is no fax software (see “Requirements for your computer”, below) installed on your computer, this interface serves no function. So, you must have installed such software on your computer before you connect the RS232C interface cable between your computer and your fax machine.
Beyond the basics Connecting the RS-232C interface cable 1 Make sure to turn off your fax machine and your computer before proceeding. 2 Attach the ferrite core to your RS232C interface cable. 3 Connect one end of the RS-232C interface cable to the RS-232C interface port on your fax machine. 4 Connect the other end of the RS232C interface cable to your computer’s RS-232C port. Note: If you don’t know where your computer’s RS-232C port is, check your computer’s operating instructions.
Beyond the basics Printing from your computer to your fax “AT” commands With the RS-232C interface installed, you can now use your fax machine to print letters, reports, graphics and other business correspondence directly from your computer. Note: This is a list of standard “AT” commands, which control your modem. For more information, please consult the instructions for your fax software.
Beyond the basics Keeping things secure Your machine has a number of features to enhance the security of your fax communications. These security features can help you keep your private fax documents private, avoid unwanted outside communication and even protect against unauthorized use of your machine. The key to it all — the passcode Your machine has a protection passcode system which is central to the machine’s security capabilities. Normally, this four-digit passcode is set to 0000 (four zeroes).
Beyond the basics Using your fax machine during operation protection 1 When you press any key on your machine, the LCD will show: Operation Protected Enter Passcode :**** 2 Use the numeric keypad to enter the four-digit passcode (here, we’ve entered the passcode we set previously; see page 2.45). Operation Protected Enter Passcode :6296 When you enter correct passcode, the machine will let you go on to the next step in the fax operation.
Beyond the basics 1 Press PROGRAM, K, 2, ENTER. The LCD shows: Print Mem Rx Doc. Enter Passcode :**** 2 Use the numeric keypad to enter the passcode. Here, we’ve entered 6296: Activating the PIN mask Important: For this feature to work, you must have preset the passcode to something besides 0000. If necessary, review “The key to it all — the passcode,” page 2.45. 1 Print Mem Rx Doc. Enter Passcode :6296 3 Press ENTER.
Beyond the basics 1 Make a normal autodialer entry through the entry of the name. The LCD will show: 2 Enter PIN Number 1057_ Set PIN Number Enter Passcode :**** 2 Use the numeric keypad to enter the four-digit passcode. Here, we’ll use our sample passcode again. Set PIN Number Enter Passcode :6296 3 Press ENTER. In our example, we’re setting speed-dial number 001: 001:PIN Number _ 4 3 5 Press ENTER to save the PIN.
Beyond the basics Settings for use with a closed network Setting Block Junk Fax For maximum communications security, use a closed network. This limits your machine to only communicating with other Muratec fax machines which can “present” the proper passcode. Your fax machine’s Block Junk Fax feature lets you bar the gates against unauthorized incoming faxes (“junk fax”) … But before you block junk fax, first please understand how this feature works, to determine whether it’s right for you.
Beyond the basics 4 The LCD now asks whether you want to enter a number: 10 Set BlockJunk Dial Program/Enter If you want to enter or modify a number, press ENTER and proceed to step 5. Otherwise, press PROGRAM and skip to step 10.
Just in case … Now, here’s how to care for your machine. Also, we’ll suggest procedures to try in case of trouble. Finally, the Glossary will explain fax terms you may encounter.
Just in case … What’s inside this section Clearing paper jams . . . . . . . . . . . . . . . . . . . . . . . . . . . . . . . . . . . . . . . . . . . . . . . . . 3.2 Print quality problems . . . . . . . . . . . . . . . . . . . . . . . . . . . . . . . . . . . . . . . . . . . . . . . . 3.4 Figuring out communications problems . . . . . . . . . . . . . . . . . . . . . . . . . . . . . . . . . 3.6 Caring for your fax machine . . . . . . . . . . . . . . . . . . . . . . . . . . . . . . . . . . . . . . . . . . 3.
Just in case … Clearing paper jams We designed your fax machine to work reliably for years. However, you may occasionally experience one type of paper jam or another. Here’s what to do. If a printout jams To clear a printout (either a received fax or a copy) jammed inside your fax machine: If an original document jams 1 Open the scanner cover by holding the scanner cover release. 1 Open your fax machine’s printer cover by pressing the printer cover release button.
Just in case … To clear a printout jammed at the multipurpose tray: 1 Remove the paper stack from the tray. 2 Carefully remove the jammed paper from the machine, as shown. 3 Reload the paper stack into the tray. Note: Be sure not to reload any sheets which may have become crinkled or torn during either the jam itself or your removal of the jammed paper. 4 Open your fax machine’s printer cover by pressing the printer cover release button.
Just in case … Print quality problems If your machine’s printouts (received faxes or copies) develop quality problems, check the following descriptions. When you find one which is like yours, try the suggested solutions. If they don’t work, please contact your authorized Muratec dealer. Printouts are too dark Pages are blank • The drum cartridge or toner cartridge may not be installed correctly. Install each cartridge correctly. • The toner cartridge may be out of toner, or the toner may be very low.
Just in case … Printouts have irregularities ABCDE ABCDE ABCDE ABCDE ABCDE • The paper you’re using may have absorbed moisture, perhaps due either to high humidity or water having been spilled on the paper supply at some point. Toner will not adhere well to paper at the locations where the paper has been wet. Replace the paper with dry paper and try printing again.
Just in case … Figuring out communications problems Occasionally during transmissions, your fax machine will detect a problem with the phone line or will encounter some other trouble in transmission or reception. When it does, it will alert you with an alarm. You can further identify the problem with LCD messages, printed check messages and error reports. In the next few pages, we’ll tell you more about these troubleshooting methods.
Just in case … What you see on the LCD What it means/What to do What you see on the LCD What it means/What to do Hang Up Phone The optional handset is off the hook. Hang it up, making sure the upper part of the handset presses down on the “hook” button. No Passcode Insert Document There was no document in the document feeder when you tried to send a fax or make a copy. Place a document in the feeder and try again.
Just in case … 3.8 What you see on the LCD What it means/What to do Errors Reset Document Your document wasn’t inserted correctly, or the fax to which you’re sending can’t handle the document’s page length. Reset the page and try again. Scanner In Use The command you’re trying to enter requires the use of the scanner, which is already in use. Wait for the fax to complete the scan, then try again.
Just in case … Specific errors Transmission errors Let’s quickly summarize the error codes you may see on an error report: T.1.1 Dialing errors D.0.3, D.0.8 The remote unit didn’t respond, the call couldn’t be completed or STOP was pressed during dialing. Re-try the call. If your machine repeats the message, call the remote fax unit’s operator and verify that unit is operating properly. D.0.2 The remote unit is busy. Try the call again. D.0.
Just in case … “Check Message” printouts When there’s a problem with a fax call and your machine detects an error, it produces an error printout headed by the words “Check Message.” This printout lists the following information about the transmission: • The resulting error code • A communications error message (see “What error messages can mean,” below) • The phone number (or TTI, if programmed) of the fax machine with which your machine had attempted to communicate.
Just in case … Caring for your fax machine With proper installation and a little maintenance, your fax machine should give you dependable service for years to come. Although it requires little day-to-day care, you can take these simple precautions to keep it in top form: • Always make sure your fax machine is installed according to our specifications, including using an electrical surge suppressor. (If necessary, review “Pick an installation spot before going ahead,” page 1.6.
Just in case … Corrective cleaning If you have unsatisfactory printout quality Here are some simple cleaning procedures for keeping your fax machine operating smoothly. Use each as the need arises. Your machine automatically cleans its charger and transport roller, two items which are very important to printout quality. So, if you notice poor printout quality (whether on received faxes or on copies), it may mean that your machine requires service. Review “Print quality problems” (pages 3.4–3.
Just in case … Common questions We’re on-line to help you! Before you try calling for help, please give the Muratec Information System a try first. The Muratec Information System is available to you 24 hours a day, 7 days a week. You can use your fax machine to call this “fax-on-demand” system and receive printouts of information, such as the most common questions asked about your machine. Often, this is the fastest way to find out the answer to any question you may have.
Just in case … Q: How do I send a fax to an overseas telephone number? A: Dialing requirements for international calls may vary depending on your local telephone company’s requirements. For most international calls, call 011, then dial the appropriate country code, city code and phone number. (You may find country and city codes in the front section of your telephone directory.) Q: Can I transmit if my fax machine runs out of paper? A: Yes, but confirmation reports (see page 2.
Just in case … Receiving faxes Working with your answering machine Q: My fax never answers. What’s wrong? A: Check to make sure your fax machine is properly connected to a working AC power outlet and phone jack (see pages 1.6–1.8). If you’re using a second phone with your machine, make sure it’s connected properly (page 1.9). Q: People have complained that they call my fax machine and hear my answering machine’s message, but are cut off before they can send a fax.
Just in case … • The remote fax machine prints the representation. Now, the recipient can use the document. … and that’s how fax works! The only difference between a regular telephone call and a fax call is the content of the transmission: • On a regular call, your telephone sends your voice. • On a fax call, your fax machine sends a coded image. If your fax machine is in Tel/Fax Ready mode and you have other telephone extensions on the same line, all the other phones will ring.
Just in case … Glossary This glossary contains terms and words you may encounter when discussing or reading about fax machines and fax communications. Please use these definitions for reference only. A4, B4, A3 — Standard stationery sizes defined by the International Standards Organization, an agency of the United Nations. See also Paper sizes. Answering machine — See TAD. Autodialing — Enables user to store preprogrammed telephone numbers in the unit’s memory. Storage capability varies from unit to unit.
Just in case … Digital fax — Unlike analog systems that scan every portion of a document, digital fax machines survey a document’s overall picture content. Digital fax machines scan a line and convert the information into a binary code of zeros and ones. The fax machine takes this information and compresses it, providing high transmission speeds. Many Muratec units offer proprietary methods for faster transmissions between Muratec-manufactured units (see also MSE, SMSE).
Just in case … Monitor — A speaker in most Muratec fax machines which allows the user to hear the dialing process. This is not a speakerphone, because it has no microphone for speaking to the person being called. For regular two-way voice communication, users must use the optional handset. See also On-hook dialing. MSE, SMSE — Muratec’s proprietary data compression methods, allowing a Muratecmanufactured fax machine to transmit more quickly when communicating with another Muratec-manufactured unit.
Just in case … Station ID — (Also called Location ID or Receiver ID.) An autodialer feature which lets the fax user enter a descriptive name to correspond with the number in an autodialer entry. For example, rather than entering only 1-972-555-3465, the user can enter that number and a name, such as Dallas Branch Office. (Many Muratec models with this feature allow entry of both upper-case and lower-case letters, for greater ease of reading.
Just in case … (This page intentionally blank.) 3.
Appendix and index
Appendix and index Specifications Type: High-speed facsimile transmitter and receiver for home and office use. Phone line: Normal Public Switched Telephone Line (PSTN) or equivalent. Modem: 14,400 bps with fallback to 12,000, 9,600, 7,200, 4,800 and 2,400 bps per ITU-T, V.17, V.29 and V.27 ter. Compatibility: ITU-T Group 3. Data compression method: ITU-T-standard MH, MR, MMR; Murata-proprietary MSE. Transmission speed: 6 seconds per page.* Document feeder capacity: 30 pages (20-pound bond paper).
Appendix and index Regulatory information United States of America Federal Communications Commission (FCC) information Ringer Equivalence Number (RENs): AC REN, 3.2B; DC REN, 0.3. This facsimile machine has been tested and found to comply with the limits for a Class A digital device, pursuant to Part 15 of the FCC rules. These limits are designed to provide reasonable protection against such interference in a residential installation.
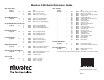
Appendix and index Index A D Activity journal . . . . . . . . . . . . . . . . . . . . . . . . . . . . . . . . . . . . . . . . . . . . . . . . . . . . . . . . . . . . . 2.22 Alphanumeric directory . . . . . . . . . . . . . . . . . . . . . . . . . . . . . . . . . . . . . . . . . . . . . . See EasyDial Ans/Fax Ready mode . . . . . . . . . . . . . . . . . . . . . . . . . . . . . . . . . . . . . . . . . . . . . . . . . . . . . . . . .1.19 Answering machine (not included with fax machine), attaching . . . . .
Appendix and index I P Inserting pages (for faxing or copying) . . . . . . . . . . . . . . . . . . . . . . . . . . . . . . . . . . . . . . 1.13, 1.21 Installation AC power line connection . . . . . . . . . . . . . . . . . . . . . . . . . . . . . . . . . . . . . . . . . . . . . . . . 1.8 Answering machine . . . . . . . . . . . . . . . . . . . . . . . . . . . . . . . . . . . . . . . . . . . . . . . . . . . . .1.9 Drum cartridge . . . . . . . . . . . . . . . . . . . . . . . . . . . . . . . . . . . . . . . .
Appendix and index S Security reception . . . . . . . . . . . . . . . . . . . . . . . . . . . . . . . . . . . . . . . . . . . . . . . . . . . . . . 2.46–2.47 Sending faxes (basic instructions) . . . . . . . . . . . . . . . . . . . . . . . . . . . . . . . . . . . . . . . . . 1.12–1.16 Settings list, printing . . . . . . . . . . . . . . . . . . . . . . . . . . . . . . . . . . . . . . . . . . . . . . . . . . . . . . . . 2.7 “Silent” fax machine, detection of . . . . . . . . . . . . . . . . . . . . . . . . . .
Appendix and index Limited warranty This warranty is made by Muratec America, Inc. (hereafter referred to as “Muratec”). This warranty is valid only on Muratec products purchased and used in the United States of America. This warranty applies to the product only while owned and used by the original purchaser (“Customer”). If ownership of the product is transferred, this warranty terminates. This warranty does not apply to any product in use for rental purposes.
Appendix and index Safety information Laser safety Warning labels This fax machine contains a page printer which operates by means of a laser. There is no possibility of danger from the laser, provided the fax machine is operated according to the instructions provided in this manual. Since radiation emitted by the laser is completely confined with a protective housing, the laser beam cannot escape from the machine during any phase of user operation.
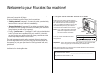
Installing the optional cassette The optional cassette holds an additional 500 sheets. When properly installed, the fax machine will automatically detect the presence of the cassette. To install the optional cassette: 1 2 Make sure your fax machine is turned off. Unpack the optional cassette and place it on a flat, level surface. Note: Installation should be performed at the fax machine’s permanent location to avoid moving it once installation is complete.