
User manual


1.6
Getting started
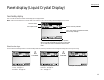
Resolution, grayscale and contrast
Reviewing resolution and grayscale:
• Normal resolution is suitable for most typed documents and simple drawings.
• Fine resolution is ideal for maps,moderately complicated drawings, floorplans or
handwritten documents.
• Superfine resolution (“
S
-
FINE
” on the control panel) reproduces the detail of
extremely complicated drawings or line art.
• Grayscale mode (“
HALFTONE
” on the control panel;“Gray” on the
LCD
) captures
shades in photos and drawings.
Note: If you send a fax in superfine, certain fax models (especially older, non-
Muratec models) receive it only in fine mode. However, you can send a fax in
grayscale mode to virtually any fax machine currently in use.
To change the resolution setting, press
RESOLUTION
repeatedly.
A glowing
LED
indicates the machine is using the setting named by
that
LED
.
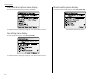
Reviewing contrast:
Setting the contrast allows you to compensate for any excessive lightness or dark-
ness,as the case may be, of document pages you are sending or copying.
Pressing
CONTRAST
to select the contrast mode:
DARK
– Darkens weak,“washed-out” images.
= – Provides some darkening of documents.
NORMAL
– Suited to most documents.
= – Provides some lightening of documents.
LIGHT
– Lightens up overly dark documents.
AUTO
– This mode automatically set the suitable setting
according to the document density.
Note: You can set the primary mode of the resolution and contrast.
⇒ See Page 3.1.
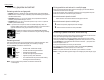
Mixing resolution and contrast in a multiple page
When you send the document with more than one page, you can select different
resolutions and contrasts for each page.
Place your document, select resolution and contrast for first page, dial and press
START
.Then follow one of the following two procedures.
When the document is placed in the ADF
Select resolution and contrast before the next page is scanned.
When the document is placed on the FBS glass
1
Remove the previous page and place the next page.
2
Select resolution and contrast.Then press
START
.
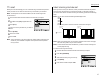
Entering a pause character when dialling
Some long-distance systems require dialling pauses, and pauses can also be useful
when you’re dialling through special telephone exchanges.
When you are dialling or storing the autodialer, and you want to insert a pause
character, press
NEXT
until the [Pause] is appeared on lower part of the
LCD
, then
press [Pause] after you’ve dialled at least one other character.
-/
(the pause char-
acter) will appear on the
LCD
.
Each pause entered lasts for a factory-set two seconds.
For example, if the pause is at the factory setting, pressing 9,
NEXT
, [Pause],
19725552009 dials 9 [2-second pause] 1 9 7 2 5 5 5 2 0 0 9.
Note: Each pause uses two of the characters you’re allowed in a number.
Note: To change the dialling pause length, see “Changing the pause length,” page
3.6).