
User manual


Beyond the Basics
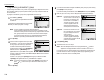
If you chose Relay:
28
The bulletin box has the following settings:
• Box Name – Same as in step 7.
•
ITU
-
T
sub-adrress – Same as in step 7.
•
ITU
-
T
password – Same as in step 7.
• Location – You must enter the fax num-
ber of the remote unit.When your machine
received document into the relay box, it
dials to this number to relay the received
document.
• TTI Type – You can select the type of
TTI
you want to appear on the faxes that are
relayed to other callers.
• Auto Print – You can set your machine to
print the received document received into
the relay box.
•
I
.
D
. code for this F-Code box – This is the four-digit
I
.
D
. code for the
box’s security, which you use to enter before you can make any changes to
this F-Code box. (See step 35.)
29
To enter the Box name:
This is same procedure in step 8. Please refer to step 8.
30
To enter the
ITU
-
T
sub-address:
This is same procedure in step 9. Please refer to step 9.
31
To enter the
ITU
-
T
password:
This is same procedure in step 10. Please refer to step 10.
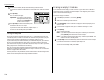
32
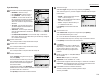
To enter the Location:
Select “Location” using the cursor key, and
then press [Enter].
Then, enter the fax number using a one-touch
key, a speed-dial number or a call group num-
ber.You cannot use the numeric keypad to
enter these numbers.
To add each fax number, press [Broadcas]
between each one to insert a comma, then enter the number.You can specify
up to 300 numbers for a remote unit.
Press [Enter] to save the box’s name and continue.
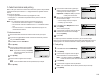
33
To set the TTI Type:
Select “TTI Type” using the cursor key, and then press [Enter].
Then, select the type of
TTI
you want to appear on the faxes that are relayed
to other callers.
• Sender — Relay the document with hub
unit’s
TTI
(don’t send your
TTI
).
• Both — Relay the document with both the
hub unit’s
TTI
and your
TTI
.
• Yours — Relay the document with your
TTI
instead of the hub unit’s.
Press [Enter] to save the box’s name and
continue.
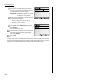
34
To set the Auto Print:
Select “Auto Print” using the cursor key, and then press [Enter].
Then, select desired setting “On” or “Off”.
On: Print the document automatically when it’s received.
Off: The machine does not print it, but only relays it to the other machine.
Press [Enter] to save the box’s name and continue.
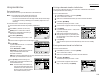
35
Press [Exit].
The machine asks for your F-Code box’s four-
digit security
I
.
D
. code.This is the
I
.
D
. code for
the box’s security, which you use to enter
before you can make any changes to this F-
Code box.
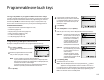
36
Decide on a four-digit
I
.
D
. code (0001-9999) for
this F-Code box.
Write it down, and put it in a safe place.
Important: Do not use 0000 as an
I
.
D
. code.
37
Use the numeric keypad to enter the four-digit
I
.
D
. code for this F-Code box.
Important: After completing this step, you must know this code to access
this F-Code box. Be sure to write it down.
38
Press
ENTER
to save the F-Code box information.
To create or modify another F-Code box, go back to step 3.
To finish, press
RESET
.
2.31