Installation Manual For Service Engineer Pick an installation spot . . . . . . . . . . . . . . . . . . . . . . . . . . . . . . . . . . . . . . . . . . . . . . . . 1 Unpacking . . . . . . . . . . . . . . . . . . . . . . . . . . . . . . . . . . . . . . . . . . . . . . . . . . . . . . . . . . . 1 Attaching the 2nd paper cassette . . . . . . . . . . . . . . . . . . . . . . . . . . . . . . . . . . . . . . . . . 2 Joining Scanner unit and Printer unit . . . . . . . . . . . . . . . . . . . . . . . . . . . . . . .
Installation Setting up Pick an installation spot Where should you install your fax machine? The location should be: • Clean — Dust buildup can damage your machine. (However, do not use a cover!) • In the open — Allow at least 12 inches (30 cm) of clearance around your machine. Be sure that you never cover the machine. Its vents must be able to “breathe.” • Away from direct sunlight — This helps avoid overheating.
Installation Attaching the 2nd paper cassette Peel off the all tapes and cushions from the machine. Multi purpose cassette Unpacking Cushion 1 Tapes Protective sheet Tape Remove the paper cassette from the box and check that the following accessories are contained in the box. (1) Fixing plate . . . . . . . . . . . . . . . . . . . . . . . . . . . . . . . . . . . . . . . . . . . . . . . . . .4 (2) Flat-head screw . . . . . . . . . . . . . . . . . . . . . . . . . . . . . . . . . . . . . . . . . . . . . .
Installation Installing 2nd paper cassette 1 Grasp the front and rear handles of the machine and set it on the paper cassette. 2 Pull out the multipurpose cassette and paper cassette on your unit. Using the four enclosed fixing plates and flat-head screws furnished with the paper cassette, secure the paper cassette to the machine. 3 Remove the connector cover from the back side of the machine. 4 Remove the rear cover from the paper cassette.
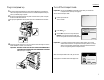
Installation Joining Scanner unit and Printer unit Important: Be sure that you do not turn the power on until after you have removed the transport screws (in step 5). Otherwise, damage could result. 1 2 4 Fix the scanner unit and the printer unit with two fixing screws. 5 Remove two transport screws by turning them 90º. Attach protection sponges on each transport screw hole. Remove one screw, then remove the connect cover. Put the scanner unit on the printer unit.
Installation Installing the printing supplies This machine prints incoming faxes and copies with a laser print engine. The engine requires two types of printing supplies (sometimes also called consumables): • The drum cartridge — It yields 74,000 normal letter- or A4-sized printouts. By “normal,” we’re referring to the amount of text and/or graphics on each page. This is based on an industry-standard test document. • The toner bottle — It yields 11,000 “normal” letter- or A4-sized printouts.
Installation 6 Grasp the handles and push the drum cartridge into the machine until it clicks. 2 Sharply tap the new toner bottle against a desk or other hard surface four or five times. Then turn the toner bottle upside down and tap it the same way again. 7 Close the printer cover. 3 Shake the new toner bottle well and turn it over lengthwise five times.
Installation Plug in and power up 1 Plug one end of the telephone line cord into the LINE jack on the machine’s rear side. Plug the other end of the cord into a standard telephone wall jack, just as you would plug in a phone. 2 Plug the non-pronged end of the AC power cord into the AC power cord jack on the rear side of the machine. 3 Plug the pronged end of the AC power cord into a standard electrical outlet.
Installation Loading paper 1 2 Pull the cassette toward you. Push down the bottom plate inside the cassette so it clicks and the plate and the bottom of the cassette are even. Paper size and type input After you attach a new paper cassette or change the paper size, you must tell the machine the new setting. Paper size and type input for 1st cassette 1 2 3 Paper Size Select Select paper cassette. Paper:Plain Press COPY to change to the copy mode. Press NEXT, then press [Chg.Ppr.].
Installation When using special sized paper: (1) Press [Other]. (2) Select “Custom” using the cursor key. Note: You can register three types of special size as you want. Paper Size Select Move cursor and enter value. 2 Paper range H.( 5.5-17.0) V.( 3.6-11.7) (1) Select the paper size using the cursor key or pressing [Paper]. 11.0" Paper Size Select Set paper size. Letter Letter Legal 11x17 Enter (4) Enter the horizontal and vertical size of the paper using the numeric keypad.
Installation Initial setting 4 Clearing stored settings Before initial setting, clear your machine’s built-in user data memory. This ensures the memory will hold only your settings. Important: After you done the initial setting, do not clear the memory again unless an authorized technician asks you to do so. To clear the machine’s memory: 1 2 Press MENU, *, 2. The LCD now asks if you want to clear the memory. Note: If you don’t want to clear the memory, just press [Cancel].
Installation 14 The LCD now asks you to enter the name you want to appear at the top of faxes you send. The name may be up to 22 characters in length. Select TTI 1, 2 or 3 using the cursor key. Then press [Enter]. I.User Install TTI 1 Upper case _ TTI 1 : TTI 2 : TTI 3 : Chara. Clear Enter 15 Use the one-touch keys to enter letters and other non-numeric characters. To enter characters, see page 1.15 in the operating instructions. Note: If you make a mistake, press [Clear] to erase to the left.
Installation Changing paper size of the 2nd paper cassette Note: There are two springs under the paper lifting plate. Note: The replacement springs are stored in the bottom of the front side of the paper cassette. Note: Always set the springs so the upper end of the spring fits into the metal clips of the paper lifting plate and the lower end fits into the cutout in the bottom of the paper cassette. The initial setting is as follows.
D84-90510-60
Getting started EasyStart (Initial setting) Clearing stored settings Before using EasyStart, clear your machine’s built-in user data memory. This ensures the memory will hold only your settings. Getting started Determine the following before you go any further: 1 2 Important: After you use EasyStart, do not clear the memory again unless an authorized technician asks you to do so. To clear the machine’s memory: 1 Press MENU, *, 2. The LCD now asks if you want to clear the memory.
Getting started 4 5 Press [Enter] to save the clock setting and continue EasyStart. The LCD now asks if you want to set the calendar/clock to automatically recognize daylight saving time (DST). I.User Install Set Daylight saving ON or OFF. ON OFF When the setting is On, your machine automatically recognizes DST at 2 AM on the appropriate ▲ switchover Sundays each year. When the setting is Off, no automatic change will occur.
Getting started How to set the document The acceptable dimensions as follows: • In the Automatic Document Feeder(ADF) How to set the document • On the Flatbed Scanner(FBS) glass Setting the documents in the Automatic Document Feeder 1 Feed direction Automatic document feeder (ADF) (width × length) Maximum: 11.0″ × 17.0″ Minimum: 5.8″ × 5.0″ Flatbed scanner (FBS) glass (width × length) Maximum: 11.0″ × 17.0″ Set your document face up into the document feeder.
Basic copy features Some guidelines . . . . . . . . . . . . . . . . . . . . . . . . . . . . . . . . . . . . . . . . . . . . . . . . . . . . . 2.1 Basic procedure . . . . . . . . . . . . . . . . . . . . . . . . . . . . . . . . . . . . . . . . . . . . . . . . . . . . . . 2.4 Reduce / Enlarge . . . . . . . . . . . . . . . . . . . . . . . . . . . . . . . . . . . . . . . . . . . . . . . . . . . . . 2.5 Sorting . . . . . . . . . . . . . . . . . . . . . . . . . . . . . . . . . . . . . . . . . . . . . . . . . . . .
Basic copy Select document type Automatic document size detection You can select the two document types by pressing DOCUMENT. Your machine can automatically detect the following size of your document and select a suitable sized paper to copy your document. • Letter (8.5″ × 11″) • Legal (8.5″ × 14″) • Ledger (11″ × 17″) • Half-letter (5.5″ × 8.5″) PHOTO PHOTO/TEXT AUTO – Select this mode when copying documents containing photographs or drawings with letters.
Basic copy Scanning the document When scanning the document using the FBS (Flatbed scanner) When scanning the document(s) using the ADF Note: The machine gives priority to the document on the ADF to make a copy or send a fax, when the documents are set both on the ADF and FBS glass. 1 Set your document in the ADF (automatic document feeder). (See “How to set the document,” page 1.19.) 2 3 Set any setting you want. Set Press START.
Basic copy Select paper Reset the settings Auto paper select Auto reset Note: Make sure that the “Auto” is selected. If not, select “Auto” by pressing [Paper] or using cursor key. Copy Ready Ppr. Auto Set 100% 1 During your operation, if any keys are not pressed within three minutes, the machine reset the display to the initial screen and after more three minutes the machine reset any key settings automatically. Note: As default setting, the auto reset time is set three minutes.
Basic copy Basic procedure 1 2 3 Make sure the machine is in the Copy mode. To change to the Copy mode, press COPY. Press RESET to clear the previous setting, if necessary. Set your document on ADF or FBS glass. Note: See “How to set the document” on page 1.19 for details. 4 5 6 Set any settings you want. 7 Press START to begin the copying process. If you want to make only one copy of each page of the document, skip to step 7. Otherwise, proceed to step 6.
Basic copy Reduce / Enlarge Auto Reduce/Enlarge Your machine can select an appropriate reduction/enlargement ratio based on the paper and document sizes you select. 4 5 Enter the number of copies using the numeric keypad. Press START. Zoom Copy You can enter the reduction/enlargement ratio from 25% through 400% in 1% steps. Copy Features Note: Enlargement is available only with FBS glass. Note: Be sure to set the document in the same direction as the selected paper.
Basic copy Sorting 4 Set your documents, and then press START. When setting your document on the FBS glass: 1. Place the first page of your documents and then press START. The machine scans the first page. Note: When making 1-sided copies, the first set will print. Your fax machine can sort copies in sequential order. Non-Sort 1 2 3 Sort 1 1 2 2 1 2 3 3 3 1 2 3 1 2 1 2 3 3 1 2 3 2. Set the next page and then press START. Note: Set the document in the same direction as step 1. 3.
Basic copy 7 Select the paper size. When using the standard paper size: If you want to copy onto the transparency film, thick paper, envelopes or post cards, use the bypass tray. Note: Also, your machine’s multi-purpose cassette (1st cassette) can hold these papers. Note: You can set the paper in the bypass tray with a length of 3.6″ to 11.7″ (91 to 297 mm) and width of 5.5″ to 17″ (140 to 432 mm).
Advanced copy features Quick index for major functions (Copy mode) . . . . . . . . . . . . . . . . . . . . . . . . . . . . . 2.9 Combine . . . . . . . . . . . . . . . . . . . . . . . . . . . . . . . . . . . . . . . . . . . . . . . . . . . . . . . . . . 2.10 Image Repeat . . . . . . . . . . . . . . . . . . . . . . . . . . . . . . . . . . . . . . . . . . . . . . . . . . . . . . 2.11 Series Copies . . . . . . . . . . . . . . . . . . . . . . . . . . . . . . . . . . . . . . . . . . . . . . . . . . . . . . . 2.
Advanced copy Quick index for major functions (Copy mode) Reduce / Enlarge Erase Center ⇒ Page 2.5 ⇒ Page 2.13 ⇒ Page 2.16 Sorting Copy Erase Border Last copy job ⇒ Page 2.14 ⇒ Page 2.17 TopUp copy Mix length copy 1 2 3 Combine ⇒ Page 2.10 Image Repeat 1 2 3 1 2 3 1 2 3 ⇒ Page 2.14 ⇒ Page 2.18 ⇒ Page 2.11 Binding Margin Duplex Copies ⇒ Page 2.15 ⇒ Page 2.19 Series Copies Directional Magnification Booklet Copies ⇒ Page 2.13 Copy Features ⇒ Page 2.
Advanced Copy Combine To copy with combining: You can copy 2, 4 or 8 pages of your documents into one sheet. 2 pages --> 1 sheet 1 2 Select “Combine” using the cursor key, and then press [Enter]. Note: The Auto Reduce/Enlarge is selected automatically. 4 pages --> 1 sheet 3 4 2 4 2 1 1 6 6 3 3 8 8 5 5 7 Select the desired combination modes using the cursor key. Note: The number of documents combined can be 2, 4 or 8.
Advanced copy 13 14 15 16 If you want to change the layout, proceed to next step. Otherwise, skip to step 16. Note: Use this function when you set the reduction/enlargement ratio by yourself. Press [Layout], the LCD will show: Note: If [Layout] is not appeared on the LCD, press NEXT until it appears. Combine Use cursor to select layout. You can copy one document repeatedly 2, 4 or 8 times in one sheet. 2 repeats 4 repeats Layout Mode Mod1 Mod2 Select the layout using the cursor key.
Advanced Copy To make copy with repeat: 1 2 3 4 5 6 7 Select “Repeat” using the cursor key, and then press [Enter]. Note: The Auto Reduce/Enlarge is selected automatically. # of Rep. 2 4 8 Paper Letter Paper Cancel Enter Select the desired repeat modes using the cursor key. Note: The number of documents repeated can be 2, 4 or 8. If you want to change the recording paper size for combining, proceed to next step. Otherwise, skip to step 6. Press [Paper] to select the paper size, and then press [Enter].
Series Copies Erase center You can make one-sided copies from two facing pages of book documents. Your machine can make copies with erasing the shadow at the center of the recording paper. Note: In this mode, the reduce/enlarge ratio will be set to “Auto” (automatically). If you want to set the reduction/enlargement ratio manually, set the ratio after setting the series copies function. Note: According to the size of document and recording paper you selected, a part of the image might be lacked.
Advanced Copy Erase border TopUp Copy Your machine can make copies with erasing the shadow at all four sides of the recording paper. Your machine can make copies with erasing the shadow of the outside of the document. This feature is convenient when you make a copy keeping the top cover opened and the document is smaller than the paper you want to copy, for example, when you want to make a copy of half-letter sized document on letter-sized paper.
Advanced copy Binding Margin Directional magnification You can make a binding margin on the copy by shifting the image to left, right, upper or lower. Directional ratio(%) magnification You can copy with different magnification ratios horizontally and vertically. Note: You can set the desired margin between 0.1 and 1.0 inch, however, if you set the margin too large, a part of the image might be lacked. Note: The default setting of binding margin is 0.0 inch. You can change this default setting.
Advanced Copy Directional size (inch) magnification The suitable magnification ratios will be automatically selected according to the horizontal and vertical length of your document and copy image you entered. Positive / Negative When this feature is turned on, black and white areas of your document will be reversed. Horizontal original size Note: You cannot use this function with the Erase border function.
Advanced copy Last copy job Erase the document for Last Job Important: You must set the Last Job hold time in advance. (See page 2.28.) If you want to set this feature Off, set 0 minute in the Last Job hold time setting. Note: The machine holds only the last copy job in the memory. Note: This feature will be not available in the following cases: • When the power was turned off after making a copy • When the Last Job hold time you set has passed (see page 2.28.
Advanced Copy Mixed length copy When you want to make a copy of the various sized documents, turn this feature on. 3 1 2 3 4 Set your documents face up into the ADF. Adjust the document guide to fit the documents. Press MENU. Select “Mix Length” using the cursor key and then press [Enter]. 2 2 3 Making copies on the same sized paper as each documents: To make a mixed length copy: 1 1 Mix Length 5 Press [Enter] to turn this feature On. Note: If you want to turn this feature Off, press [Cancel].
Advanced copy Duplexed copies 4 Your machine can scan 2-sided documents and make 1-sided copies. When your machine has the optional duplex unit, you can also make 2-sided copies from 1-sided documents, 2-sided documents or facing pages of book documents. Select the bind position using the cursor key. Select [R&L] when the document direction is as illustrated below: Front side Back side DuplexCopy Use cursor to select item. 2->1-sided Bind R&L Top Doc.
Advanced Copy Making duplex copies from two 1-sided documents If you select [Top], the copy result will be as illustrated below: Note: The optional duplex unit is required to use this feature. Front side Back side Front side 1 2 3 Back side Press MENU. Select “DuplexCopy” using the cursor key and then press [Enter]. →2-sided” using the cursor key and Select “1→ then press [Enter]. DuplexCopy Use cursor to select doc.type.
Advanced copy Making duplex copies from 2-sided documents Making duplex copies from facing pages of the book Note: The optional duplex unit is required to use this feature. When you want to make duplex copies from facing pages of the book, you can choose the document type from the following two types. Note: The optional duplex unit is required to use this feature. Two facing pages --> One 2-sided sheet Press MENU. 3 4 →2-sided” using the cursor key and Select “2→ then press [Enter].
Advanced Copy Making two facing pages into one 2-sided sheet 1 2 Press MENU. 3 Select “Book (Face)” using the cursor key and then press [Enter]. Making duplex copies the same as the original book Select “DuplexCopy” using the cursor key and then press [Enter]. DuplexCopy Use cursor to select doc.type. 1 2-sided 2 2-sided 2 1-sided Book(Face) Book(F&B) 1 2 Press MENU. 3 Select “Book (F&B)” using the cursor key and then press [Enter].
Advanced copy Booklet copies Copy Ready 4 Press [Enter] to save the setting. The Booklet icon with Duplex and Sort icon will be displayed on the LCD. Set Auto 1 Booklet Setting complete Note: The optional duplex unit is required to use this feature. Note: This feature is available only with the ADF. Paper Zoom Sort Making a booklet copy from eight 1-sided documents 1 2 3 Set your documents in the ADF, then press START. Copy Features 5 Press MENU.
Changing the default copy settings Erase border setting . . . . . . . . . . . . . . . . . . . . . . . . . . . . . . . . . . . . . . . . . . . . . . . . . 2.25 Erasing center setting . . . . . . . . . . . . . . . . . . . . . . . . . . . . . . . . . . . . . . . . . . . . . . . 2.26 Binding margin setting . . . . . . . . . . . . . . . . . . . . . . . . . . . . . . . . . . . . . . . . . . . . . . 2.26 Sorting copy setting . . . . . . . . . . . . . . . . . . . . . . . . . . . . . . . . . . . . . . . . . . . . .
Copy settings Accessing the default copy setting mode A. Erase border setting You can change or set the machine’s default copy settings. Default setting: OFF, Erased margin: Left and Right 0.2″, Top and Bottom 0.2″ Note: Regarding the changing of the fax settings, see pages 3.69–3.76. Note: Regarding the changing of the machine settings, see pages 4.6–4.16. The default setting of the erased margins in the erase border function can be changed within 0.2 – 2.0 inches in 0.1 inch steps.
Copy settings B. Erasing center setting C. Binding margin setting Default setting: OFF, Erased margin: 0.1 inch Default setting: OFF, Binding margins: 0 inch The default setting of the erased margins in the erase center function can be changed within 0.1 – 2.0 inches in 0.1 inch steps. The default setting of the binding space in the image shift copy function can be changed within 0.1 – 1.0 inch in 0.1 inch steps. 1 2 Press MENU, [Copy Set]. Select “B.Erase Center setting” and then press [Enter].
Copy settings D. Sorting copy setting 01. Copy scan setting Default setting: Non-Sort Default setting: Document type: Auto, Image density: Auto You can select sort function. You can change the priority mode of Document type and Image density. Press MENU, [Copy Set]. Select “D.Sort Setting” and then press [Enter]. Select desired function for default sort setting. Press [Enter] to save the default setting. Sort Setting Use cursor to select item. Non sort Sort Note: Press RESET to return to standby.
Copy settings 02. Width of the separator line Default setting: 0.01 inch 6 Select “Reset after scan” and then press [Enter]. You can change the width of the separator line in the Combine and Repeat function. The default setting is 0.01 inch, but you can change it to within 0.01 – 0.05 inch in 0.01 inch steps. 7 Select “ON” or “OFF” then press [Enter] to save the setting. 8 Press [Exit] to finish. 1 2 3 4 5 6 Press MENU, [Copy Set]. Select “E. User Settings” and then press [Enter].
Copy settings 05. Image Compression Mode 06. Cassette for copying Default setting: NORM Default setting: 1st cassette: ON, 2nd cassette: ON You can compress the scanned image and store it in memory. When you select HIGH in this setting, you can store more documents in the memory. If you do not want to use certain cassette for copying, set it to OFF. 1 2 3 Press MENU, [Copy Set]. 1 2 Press MENU, [Copy Set]. Select “E. User Settings” and then press [Enter]. Select “E.
Copy settings F. Print the copy settings You can print the list of copy settings. In the list, the current setting is shaded. To print the copy setting list: 1 2 3 2.30 Press MENU, [Copy Set]. Select “F. Print Copy Settings” using the cursor key. Press [Enter].
Copy Features Copy settings This page intentionally blank. 2.
Basic fax features Some guidelines . . . . . . . . . . . . . . . . . . . . . . . . . . . . . . . . . . . . . . . . . . . . . . . . . . . . . 3.1 Sending a fax . . . . . . . . . . . . . . . . . . . . . . . . . . . . . . . . . . . . . . . . . . . . . . . . . . . . . . . 3.3 Receiving faxes . . . . . . . . . . . . . . . . . . . . . . . . . . . . . . . . . . . . . . . . . . . . . . . . . . . . . . 3.8 Using as a Phone . . . . . . . . . . . . . . . . . . . . . . . . . . . . . . . . . . . . . . . . . . . . . . .
Basic fax Some guidelines Resolution, grayscale and contrast Mixing resolution and contrast in a multiple page Reviewing resolution and grayscale: When you send the document with more than one page, you can select different resolutions and contrasts for each page. Place your document, select resolution and contrast for first page, dial and press START. Then follow one of the following two procedures.
Basic fax TTI select Select scanning size to be sent When you send a fax message, your TTI is automatically printed at the top of documents you send. You can select one of three TTI you’ve stored in your machine. When you send or store your document, usually the machine automatically detects the size of your document when it is placed on the ADF or FBS glass. However, if you wish to override this and select scanning size manually, proceed to the following steps. Note: See “EasyStart” on pages 1.17–1.
Basic fax Sending a fax Your fax machine has a great memory! Take advantage of it, and you could: Save Time. By using your fax machine’s memory, you won’t have to wait for your machine while it completes the transmission. Simply scan your document into your fax machine’s memory, and you can walk away with your original in hand. Save Money. If you’re transmitting to another memory-equipped fax machine, your machine will send the document directly into the other machine’s memory and hang up.
Basic fax 7 Now, everything is up to the machines — yours and the one you’re dialing. • If the fax has been set for Quick Memory transmit, your machine scans the first page of your document into memory, then dials the other fax. When it makes contact, your machine transmits the stored document from memory while at the same time scanning the remaining pages of your document into memory. (To set Quick Memory transmission, see page 3.70.
Basic fax 9 10 If you want to send more pages, proceed to step 8. Otherwise, press START to start the transmission, and skip to step 9. Place the next page, then press [Start] to start scanning. Sending a fax using monitor/call or a handset You may also fax a document using either the monitor speaker or the optional handset to dial. To send any more pages, repeat this step. Otherwise, press [Exit] to start the transmission, and skip to step 9. 1 Place the document in the ADF.
Basic fax Redialing To redial a fax call manually with the monitor speaker or an optional handset: If your fax call fails, your machine automatically redials it. In the Auto Redial mode, your fax automatically redials the number every minute until one of the following happens: • It reaches the remote fax machine. • It has attempted the two redials and has still not connected. While in the Auto Redial mode, the machine can continue to receive faxes and can make as many as 100 fax transmissions.
Basic fax Receiving faxes Answering calls manually Reception modes In any reception mode, you can always answer calls manually if you have an optional handset installed. Just pick it up, as you would if using a normal phone. Your fax machine has five different reception modes — Tel Ready, Fax Ready, Fax/Tel Ready, Tel/Fax Ready and Ans/Fax Ready. (See below for details.) Fax Features Getting Started If you hear someone speaking to you, use your optional handset to speak back.
Basic fax Fax/Tel Ready mode Using an answering machine with your fax machine The Fax/Tel Ready mode is a combination of the Fax Ready and Tel Ready modes. To connect your answering machine to your fax machine: Use it if: An optional handset is installed on your fax machine and You’re using the machine as both a fax machine and a telephone In this mode: Your fax machine answers each call without ringing. If you receive a voice call, it alerts you with a special ring.
Basic fax Your machine can also be used as a phone, if you have an optional handset installed. The following is a brief look at the machine’s telephone features. Hold Redial You can put a call on hold during a conversation by pressing [Hold]. At this point, you can either hang up the handset or leave it off the hook. To return to your conversation: • If you hung up the handset, pick it up. • If you did not hang up the handset, press [Hold] again.
Advanced fax features Autodialer . . . . . . . . . . . . . . . . . . . . . . . . . . . . . . . . . . . . . . . . . . . . . . . . . . . . . . . . . 3.11 Broadcasting . . . . . . . . . . . . . . . . . . . . . . . . . . . . . . . . . . . . . . . . . . . . . . . . . . . . . . . 3.24 Delayed transmission . . . . . . . . . . . . . . . . . . . . . . . . . . . . . . . . . . . . . . . . . . . . . . . . 3.25 Batch transmission . . . . . . . . . . . . . . . . . . . . . . . . . . . . . . . . . . . . . . . . . . . . . .
Advanced fax Autodialer Autodialer basics Special Dialing Characters Your fax machine allows you to enter special dialing characters when programming the autodialer. These characters include hyphens and dashes, which make phone numbers easier to read, and special characters needed for international calls. The chart below briefly describes each of these characters.
Advanced fax Using one-touch numbers Your fax machine stores up to 78 one-touch numbers using the keys marked 01–78. You can not only enter, change and erase one-touch numbers but also insert and delete (delete and shift) them. Refer to the followings about the select function keys you should use. A.One-Touch Dial Select one-touch. Erase 01:New York Office 02:Los Angeles Office 03:Chicago Office 04:London Office 05:Paris Office 3.12 Delete Press MENU, A, [Enter].
Advanced fax • Group number — If you enter the group number, you can use the group dial transmission function. (See “Using call group,” in page 3.21.) Note: If you wish to omit these settings, skip to step 16. 9 Enter the Location ID. (Regarding how to enter the character, see “Entering character” on page 1.15.) A number’s Location ID may be up to 24 characters in length. Chara. Clear Enter 10 11 12 Press [Enter] to save the setting. Enter the alternative number using the numeric keypad.
Advanced fax Changing a one-touch number 1 2 3 4 Press MENU, A, [Enter]. The LCD shows the one-touch number list. A.One-Touch Dial Select one-touch. 01:New York Office 02:Los Angeles Office 03:Chicago Office 04:London Office 05:Paris Office Select the one-touch key you want to change a previously stored number. Note: You can select the one-touch key by Detail Erase Enter pressing that key on the control panel.
Advanced fax Inserting and deleting a one-touch number You can insert a one-touch number without erasing any one-touch number already stored. If you insert a one-touch number, other numbers will be shifted downward automatically. Also, you can delete a one-touch number and shift other numbers upward automatically. To insert a one-touch number: Select the one-touch key in which you want to enter new number. Note: You can select the one-touch key by pressing that key on the control panel.
Advanced fax Printing a list of one-touch numbers Using speed-dial numbers Forgot which number is stored in which one-touch key? Just print a list of your onetouch numbers. The list includes each key’s number, the Location ID (if any), fax/telephone number and group number(s) you’ve stored in the key. To print a list of one-touch numbers, press MENU, A, [List]. Your fax machine can store up to 222 speed-dial numbers, designated by three-digit identifier codes from 001 through 222.
Advanced fax Entering a speed-dial number 001:123-4567 1 Press MENU, B, [Enter]. The LCD shows the speed-dial number list. Note: Pressing the SPEED DIAL/TEL INDEX for a few seconds from the standby mode, you can also enter a speed-dial number. 2 Detail Erase Enter Select the speed-dial number in which you want to store a number. Note: You can select the speed-dial number by directly entering that threedigit identifier code.
Advanced fax 13 14 To enter the Group number: Select the “Group No.” and press [Enter]. Use the numeric keypad to enter the call groups for this number. There are 32 possible call groups, numbered 1–32. 001:123-4567 Enter group number. (0-32) _ Location: Alt.No. : GroupNo.: Add Clear Changing a speed-dial number 1 2 Press MENU, B, [Enter]. The LCD shows the speed-dial number list. 3 4 Press [Enter].
Advanced fax 1 2 3 4 Inserting and deleting a speed-dial number Press MENU, B, [Enter]. The LCD shows the speed-dial number list. Select the speed-dial number you want to erase. Note: You can select the speed-dial number by directly entering that threedigit identifier code. When entering the identifier code for speed-dial numbers less than 100, you must enter leading zeroes to make three digits. For example, 001-099.
Advanced fax 8 Enter the fax number as described in step 4 on page 3.17. 9 When the number is as you want it, press [Enter] to store it. 10 11 001: Enter fax number. _ Location: Alt.No. : GroupNo.: Enter Location I.D., Alternative number or Group number as described in steps 7–15 on pages 3.17–3.18. Note: If you want to omit these settings, go to step 11. Clear 2 Select the speed-dial number you want to delete.
Advanced fax Phoning via speed-dial Using call group To make a phone call using a speed-dial number, you must have an optional handset attached to your machine. To make the call: If you frequently send the same fax message to more than one location, store the group number into your autodialer. (If necessary, see “Using a one-touch dial” and “Using speed-dialing”, in previous pages.) After you store the group number, you can send the same fax to many different locations.
Advanced fax Printing a group directory EasyDial directory dialing Your machine can also print a call group directory. This lists all your stored autodialer numbers by Location ID and lists the groups to which these numbers belong. The directory divides the call groups into four banks, 01–09 (the list shows 00), 10–19 (the list shows 10), 20–29 (the list shows 20) and 30–32 (the list shows 30).
Advanced fax If an EasyDial call fails If an EasyDial call fails, what happens next depends upon the kind of call it was. If it was a fax call … … Your fax machine automatically redials the number according to the redial interval you’ve set (see page 3.75). It keeps trying until either of the following occurs: • It successfully reaches the other number • It has attempted the number of redials programmed and has still not connected (see “Changing redial settings,” page 3.75).
Advanced fax Broadcasting Broadcasting basics Delayed broadcasting The fastest way to fax one document to many recipients is to broadcast it. In an ordinary broadcast, you send the fax as you normally would, except you add more fax numbers. You can enter up to 330 numbers: • 30 manually-dialed numbers AND • 300 autodialer numbers OR 1 call group with all 300 autodialer numbers You can broadcast using any function that requires a fax number to be entered.
Advanced fax Delayed transmission Important: If you program all 100 delayed transmission commands, no memory transmission is possible until one or more of the commands is completed. (To review memory transmission, see pages 3.3 and 3.70.) However, if all 100 delayed commands are programmed, you can always transmit manually using monitor/speaker dialing or an optional handset (see page 3.5). 5 When the date and time are entered, press [Enter] to save the delayed transmission.
Advanced fax Batch transmission Batch transmission allows you to store multiple documents in an electronic “basket” throughout the day and then fax that entire basket to one location. To do this, just tell the machine when and where the transmission should go. When that date and time arrives, your machine will transmit each document in the batch box to the remote fax machine. You can store up to 40 documents (each document can include one page or many pages) into your machine’s five electronic batch boxes.
Advanced fax Printing a list of batch boxes Storing a document for batch transmission You can easily print a list of your batch boxes. The list includes each box’s identifier number, the Location ID, fax number and date/time the transmission should start. To print the list, press MENU, L, [Box List]. Your fax machine can store up to 40 documents (each document can include one page or many pages) in each batch box until the date and time you designate the batch transmission to take place.
Advanced fax Printing a list of documents stored in batch boxes You can print a list of the documents stored in your machine’s batch boxes. This list provides you with the documents’ file numbers so you can erase or print them as needed. To print the list, press MENU, L, [Doc.List]. Printing a document stored in a batch box To print a document stored in a batch box: 1 2 3 4 5 Press MENU, L, [Enter]. Select the batch box storing the document you want to print. Press [Document].
Advanced fax Job Review 4 If the command is to send a batch transmission, the LCD shows its batch box number (such as “B001”) rather than the command number. (For more information of “Batch transmission,” see pages 3.26–3.28.) If the command is for a Call group dialing, the group number (such as “G01”) appears instead of the phone number. (For more information of “Call group dialing,” see page 3.21.
Advanced fax Reserved Transmission 4 Use cursor to select Select the command you want to review or cancommand. cel using the cursor key. Then press [Location] C001 15/21:30 L.A.Office to see individual numbers within the broadC002 15/21:40 Broadcast B001 15/22:00 Batch Tx cast. C003 17/08:00 987-6543 C004 17/08:10 N.Y.Office PrintDoc Location Erase Reserved Transmission 5 Use cursor to select The LCD shows: command. Note: Press [Location] again to return to the 001:N.Y.Office 002:L.A.
Advanced fax Printing a communication result Out-of-paper Rx 1 2 Press JOB REVIEW & COMM CANCEL. 3 Select the command you want to print and press [Detail]. The LCD will show: Note: Press [Detail] again to return to the previous display. 4 2 Receiving Select “Out-of-paper Rx” and then press 002 21:10 L.A.Office [Enter]. The list of Out-of-paper Rx will 003 21:22 N.Y.Office appear. 004 21:35 234-5678 It will be indicated by assigned numbers, time 005 21:46 N.Y.
Advanced fax Special features Your fax machine has numerous special features to make your communication easier. We’ll cover them here. Duplexed transmission 4 5 The LCD will show: 6 7 Adjust resolution, contrast and memory transmission, if necessary. 8 Press START. You can send 2-sided documents from the ADF. How to set the document Set the documents as shown below: 1 1 3 Adjust the document guides to fit the page(s) you’ll be faxing.
Advanced fax Mixed length transmission Enlarge transmission When you want to send the various sized documents with the ADF, turn this feature on. You can transmit your document with enlarging. Note: When you use the FBS glass, you do not need to turn this on. Acceptable document size Acceptable document size for the mixed length transmission is as follows: Half-letter , Letter , Legal or Letter , Ledger Set your documents face up into the ADF. Adjust the document guide to fit the documents.
Advanced fax Fax & Copy Polling With the Fax & Copy feature turned on, your machine asks if you want to make a copy of a document each time it transmits that document from memory. Polling allows someone to fax a document to you without having to make the call or pay for it. There are several kinds of polling: • Regular polling — Your fax retrieves a document from a remote fax machine. • F-Code polling — Your fax retrieves a document stored as a file in the remote fax machine.
Advanced fax When your machine polls for documents, it dials the number and, upon making contact with the other machine, begins receiving the document as if the other machine had placed the call. Continuous polling 4 5 6 Note: When you want to end a continuous polling operation, you must delete it using the Job Review feature (see page 3.29). Being polled Enter Cont Polling Enter end time. 18:30 Not only can you poll, but you can also be polled.
Advanced fax Printing a stored polling document Transferring documents (Fax forwarding) To print a document you’ve stored for regular polling without erasing it, press MENU, D, [Enter], [PrintDoc]. This feature tells your fax machine to receive documents and then transfer them automatically to another fax machine. You can set the time period for which the fax machine will continue this process.
Advanced fax 7 8 9 10 11 To add more fax numbers, press [Broadcas] between each one to insert a comma, then enter the number as described in step 3. If [Broadcas] is not appeared on the LCD, press NEXT until it appears. You can specify up to 301 numbers for transferring. Note: You can enter only 1 location by using numeric keypad. Note: If you enter characters by mistake, press [Clear] to clear them.
Advanced fax Cover page Entering the cover page message Your fax machine can store a cover page to send at the beginning of each outgoing fax. This page includes the current date and time, your Location ID and your fax number (as stored in the TTI) and a message of up to 40 characters in length. The information appears in a box similar to this: 1 2 Press MENU, K, [Enter]. 3 When the message appears as you want it, press [Enter] to save it. Fax Message From: Nov 26 2001 14:00 Name: AABBCC Co.
Advanced fax Separate each received document (Separator Page) Your machine has a simple sorting feature. It can separate each received document by inserting the separator page on the top of the received document. For example, if you use the colored paper for the separator page, it is easy to see the individual received document. 6 Select “Prt on Sep Page” then press [Enter]. Note: You can assign the turning this feature on/off to a Soft Key. (See page 4.1.
Advanced fax Setting the activity journal Setting the reports: TCRs and RCRs Just as a checkbook records your daily financial transactions, your fax machine keeps an activity journal which records its 125 most recent fax transactions.
Advanced fax 1 2 Press MENU, G, [Enter]. Select “ReportType” then press [Enter]. G.Journal & Reports Use cursor to select item. Journal :OFF Report :OFF ReportType:TCR Line up :OFF Enter 3 4 Select confirmation report type “TCR” or “RCR” by using the cursor key. Press [Enter] to save the setting. Report Type Use cursor to select TCR or RCR. TCR RCR Enter 5 To print the selected report automatically after every fax you send, select “Report”, and then press [Enter]. G.
Advanced fax OneLine + distinctive ring detection Many phone companies now offer their customers a special service which makes it possible for one phone line to do the work of two. With this service, you physically still have one phone line, but, electronically, you have two phone numbers. Your phone recognizes these different numbers and rings differently for each one.
Advanced fax You can send or receive a fax message and have a regular phone conversation on the same call (although, not at the same time). This is called a call request. It doesn’t matter whether you’re sending the fax or receiving it. You may fax first and then talk, or talk first and then fax. Important: For this feature to work, the remote fax machine must have a similar call-request capability. Your machine must also have an optional handset attached. Note: Communicating this way disables “V.
Advanced fax F-Code communication F-Code: an introduction The ITU-T, the United Nations agency that standardizes international telecommunications, has created a fax industry standard for using sub-addressing and password-based communication. One name for this standard is F-Code, and that’s what we’ll call it in these instructions and on your machine’s display. How sub-addressing works To help understand sub-addressing, think about how someone in a large company receives mail.
Advanced fax To create or modify an F-Code box: If you chose Security: Keep pen and paper with you as you follow these steps. As you decide on a sub-address and enter it into your machine, write it down. Remember to: (1) write down which box goes with which sub-address, (2) write down any passwords or I.D. codes you enter, (3) keep these printed records in a safe place. 2 3 Press MENU, N, [Enter]. The LCD shows the F-Code box list. 4 Press [BoxSet].
Advanced fax 10 Note: To erase characters, press [Clear] to erase to the left. To change just one character in the name, move the cursor to that character and then press [Clear] to erase it. Then re-enter the name correctly. 13 Press [Enter] to save the ITU-T sub-address and continue. 14 Important: Do not use 0000 as an I.D. code. To enter the ITU-T password: Select “Password” using the cursor key, and then press [Enter]. Then, use the numeric keypad to enter this box’s ITU-T-compatible password.
Advanced fax To enter the ITU-T sub-address: This is same procedure in step 9. Please refer to step 9. 19 To enter the ITU-T password: 20 To set the Rx Protect: 23 Select “Rx Protect” using the cursor key, and then press [Enter]. 24 Press [Enter] to save the box’s name and continue. 21 To set the Auto Print: Note: This setting is available only when the reception protection (Rx protect) setting is set to off (see step 20). Select “Auto Print” using the cursor key, and then press [Enter].
Advanced fax If you chose Relay: 28 01:Relay Box SetBox Use cursor to select item. Box Name : Sub-Address : Password : Location : TTI Type :Sender The bulletin box has the following settings: • Box Name – Same as in step 7. • ITU-T sub-address – Same as in step 7. • ITU-T password – Same as in step 7. • Location – You must enter the fax number Exit Enter of the remote unit.
Advanced fax The list of F-Code boxes includes: (1) Each box’s identifier number (2) Box name (if any) (3) Sub-address (4) Password (5) Box type (6) Each box’s settings To print a list of your F-Code boxes, press MENU, N, [BoxList].
Advanced fax Using a bulletin box Printing a document stored in a bulletin box Storing a document You can print a document stored in your machine’s F-Code bulletin boxes without erasing the document from memory. Your fax machine can store up to 30 documents in each bulletin box. To print a stored document: Note: For this operation to work, two things must be true: • The bulletin box must exist on your fax machine. • You must know the bulletin box’s two-digit number (01-50) and four-digit I.D. code.
Advanced fax Select the file number (01-30) of the document you want to erase. If you want to erase the all documents in this bulletin box, select file number “00”. 6 Press [Enter]. The LCD shows (see right): Important: If you want to quit without erasing the document you’ve selected, press [Cancel]. The fax will return to step 2. 7 02:Bulletin Box OK to erase? EraseDoc 00:All stored documents. 01:Already stored. 02:Already stored. 03:Not stored. 04:Not stored.
Advanced fax F-Code transmission and polling With F-Code, your machine can send secure transmissions, perform relay broadcast initiations and even poll from other ITU-T-equipped machines, regardless of manufacturer. You can do this two ways: • Using the programmable one-touch key (see pages 3.54–3.60). • Entering the ITU-T sub-address and password directly, which is what we’ll describe here.
Advanced fax 7 Enter the fax number either by pressing a onetouch key, entering a speed-dial number or dialing from the numeric keypad. FCodePolling Enter fax number. _ Important: Do not press START, if you want to delay this transmission. What you do now depends on when you want the transmission to begin. • To have it begin now, skip to step 11. • To delay it, go on to step 9. 9 Press MENU, select “Delayed Tx” and then press [Enter].
Advanced fax Programmable one-touch keys Using the power of programmable one-touch keys In order to complete some operations on your machine, you may have to follow several steps and press several different buttons. But programming your machine’s one-touch keys (79–84) can reduce those many steps to a simple press of a key. You can “teach” the one-touch keys to carry out any of the following operations: Communications functions: • Delayed transmission (explained on page 3.25) • Broadcasting (page 3.
Advanced fax Programming a broadcast is very similar to programming a delayed transmission. But instead of sending to just one phone number, you set up multiple numbers for the transmission. To program a broadcast / group into a programmable one-touch key: 1 Press MENU, C, [Enter]. The LCD shows the programmable one-touch number list. 2 Select the programmable one-touch number that you want to program or change. 6 If you want to delay the broadcast, select “Delayed Tx” and press [Enter]. 7 C.Prog.
Advanced fax Programming regular polling 8 Note: You cannot program continuous polling into a programmable one-touch key. For more information on continuous polling, see page 3.35. Next, tell your fax to carry out this delayed command one of these ways: Option 1: Perform the command once at a certain time on a certain day of the month. (For example, “Do this at 5:05 PM on the 30th.
Advanced fax Programming a batch transmission Programming an F-Code transmission For this operation to work, two things must be true: • The batch box you’re using must exist on your fax machine. To program a batch transmission into a programmable one-touch key: For this operation to work, two things must be true: • You must know how the remote fax is using each F-Code box to which you’re transmitting — for example, as a security box or a relay box.
Advanced fax 9 10 11 Use the numeric keypad to enter the appropriate ITU-T password for the box. Note: If there isn’t a ITU-T password for this box, skip to step 10. F-Code Tx Enter password. _ SubAddress :12345678 Password : Press [Enter]. Clear Enter If you want the F-Code transmission to begin immediately every time you press the key, press [Exit] and skip to step 14. If you want to delay the F-Code transmission, select “Delayed Tx” and press [Enter].
Advanced fax 10 11 F-Code Polling Enter password. _ SubAddress :123-4567 Password : Press MENU, C, [Enter]. The LCD shows the programmable one-touch number list. Clear 3 Press [Erase]. The LCD shows: Enter If you want the F-Code polling to begin immediately every time you press the key, press [Exit] and skip to step 14.
Advanced fax Fax dialing with programmable one-touch To dial a fax call using a programmable one-touch number: 1 2 Set the document and select resolution and contrast you require. Press the programmable one-touch key in which you’ve stored the fax communication command. Your fax will perform the operation now, or at whatever time you programmed. Note: To review the details of each operation, review the instructions for that operation. See page 3.59 for a list of each operation and where to find it. 3.
Advanced fax Security features The passcode Your machine has a passcode protection system which must be turned on in order to use the security features listed above. To set your machine’s passcode: 1 Decide on the four-digit passcode (0001–9999) you want to use. Write it down, and put it in a safe place. Important: Do not use 0000. This turns off passcode protection. 2 3 4 5 6 7 Press MENU, [Mach Set]. B.Protect Passcode Enter old passcode. **** Select “B. Protect Passcode” and then press [Enter].
Advanced fax Printing from security reception / Turning off security reception Masking the PIN When security reception is on, an incoming fax goes directly into your machine’s memory and the MEMORY RECEIVE light comes on. But the fax has not been printed.
Advanced fax Autodialing while using the PIN mask If you chose “Mode 2” — as you autodial, load the code Note: The following instructions presume you understand how to set and use your machine’s autodialer. If you need to review, see pages 3.11–3.23. In this mode, you don’t have to add the PIN to the autodialer setting.
Advanced fax Performing batch transmission while using the PIN mask Setting security transmission Note: The following instructions presume you are familiar with how to set and use both your machine’s autodialer and its batch transmission feature. If you need to review, see pages 3.11–3.23 for more on the autodialer and/or pages 3.26–3.28 for more on batch transmission. Your fax’s security transmission feature provides extra assurance that your documents go where you’re sending them.
Setting for use with a closed network Setting Block Junk Fax For maximum communications security, use a closed network. This limits your machine to only communicating with other Muratec fax machines which can “present” the proper passcode. Your fax machine’s Block Junk Fax feature lets you bar the gates against unauthorized incoming faxes (“junk fax”). But before you block junk fax, first understand how this feature works, to determine if it’s right for you.
Advanced fax 11.Block Junk Fax Enter fax number. _ 4 The LCD now shows blocked numbers list. 5 Use the numeric keypad to enter the last eight Clear Enter characters of a fax number you want to block. For example, if you want to block a fax from someone with a Subscriber ID of 972-555-3038, you should enter 5, 5, 5, [–], 3, 0, 3, 8. If you want to enter or erase a number, go on to step 5. Otherwise, press [Enter] and skip to step 7.
Fax Features Getting Started Advanced fax This page intentionally blank. 3.
Changing the default fax settings Settings for transmission . . . . . . . . . . . . . . . . . . . . . . . . . . . . . . . . . . . . . . . . . . . . . 3.69 Settings for reception . . . . . . . . . . . . . . . . . . . . . . . . . . . . . . . . . . . . . . . . . . . . . . . . 3.72 Settings for dialing . . . . . . . . . . . . . . . . . . . . . . . . . . . . . . . . . . . . . . . . . . . . . . . . . . 3.75 Settings for operation . . . . . . . . . . . . . . . . . . . . . . . . . . . . . . . . . . . . . . . . . .
Fax settings Scan settings Setting ECM Default setting: Primary resolution: Normal, Primary contrast: Normal Default setting: ON. Four different settings tell your machine how to scan documents. The initial factory settings are probably right for most applications, so try using them before changing any of these settings: • Primary resolution mode — Sets the resolution for your documents. Choose either normal, fine, superfine (“S-Fine” on the LCD) or grayscale mode (“Gray”).
Fax settings Memory transmission Quick Memory transmission Default setting: ON. Default setting: ON. Your fax machine has a great memory! Take advantage of it, and you could: Save Time. By using your fax machine’s memory, you won’t have to wait for your machine while it completes the transmission. Simply scan your document into your fax machine’s memory, and you can walk away with your original in hand. Save Money.
Fax settings Image rotate transmission Default setting: ON. When this feature is activated, if you set letter-sized document in the sideways direction( ), the image will be sent rotated by 90°. Choose desired setting you want using the cursor key. Then press [Enter]. 03.Image Rotate Tx Use cursor to select ON or OFF. ON OFF Press RESET to return to the standby mode. Enter Fax Features Getting Started 1 2 3 Press MENU, J, 0, 3, [Enter]. Setting the confirmation stamp Default setting: OFF.
Fax settings Settings for reception Print settings Reduction margin You can set three parameters for printing received fax messages: • Print reduction rate • Reduction margin • Paper save function You set all three in the same procedure, discussed on next page. Following is a explanation for each: Your fax machine’s reduction margin is measured in millimeters (mm).
Fax settings Adjusting the print settings Setting ECM Default setting: Rx reduction rate: Normal, Reduction margin: 40 mm, Paper saving:OFF. Default setting: ON. 3 4 5 6 Select desired item and then press [Enter]. Select item you want to set using the cursor key. Then press [Enter]. 02.Print Settings Use cursor to select item. Rx Reduc.Rate:Normal Reduc. Margin:40 mm Paper Saving :OFF Exit Enter If you want to change other items, repeat step 2-3. When you finish, press [Exit].
Fax settings Cassette for fax reception Default setting: 1st cassette: ON, 2nd cassette: ON If you do not want to use certain cassette for fax reception, set it to OFF. 1 2 Press MENU, J, 2, 3, [Enter]. Select the cassette you want to set using the cursor key and then press [Enter]. 23.Cassette for Rx Use cursor to select cassette. 1st Cassette :ON 2nd Cassette :ON Exit 3 4 5 Select “ON” or “OFF” using the cursor key. Press [Enter] to save the setting.
Fax settings Settings for dialing Changing the dialing pause length Changing redial settings Default setting: 2 sec. Default setting: Number of redial: 2 times, Redial interval: 1 minute. The pause is set by the factory to last two seconds, but you can set it to last as long as ten seconds if necessary. To change the pause length: It’s up to you how many times the fax redials a number and how long it waits between redials (that length of time between calls is the redial interval).
Fax settings Settings for operation Adjust the monitor speaker’s volume Printing your fax settings Default setting: Medium. After you’ve programmed settings into your machine, print a fax settings list. We recommend this, particularly if you’re sharing the machine with other users, who might change the settings. With this list, you can quickly confirm that all of your settings are correct, without having to go back and check them on the machine.
Fax Features Getting Started Fax settings This page intentionally blank. 3.
Common settings Soft Keys . . . . . . . . . . . . . . . . . . . . . . . . . . . . . . . . . . . . . . . . . . . . . . . . . . . . . . . . . . . 4.1 Macros . . . . . . . . . . . . . . . . . . . . . . . . . . . . . . . . . . . . . . . . . . . . . . . . . . . . . . . . . . . . . 4.3 Machine settings . . . . . . . . . . . . . . . . . . . . . . . . . . . . . . . . . . . . . . . . . . . . . . . . . . . . . 4.
Common settings Soft Keys * When you change the setting by using the Soft Key, it will be available only for the next transmission. Once that transmission is complete, your machine returns to its default setting. Getting Started But instead of using the Soft Keys to control the functions above, you can program them to turn other functions on or off. These functions are: • TTI Tx*— Normally, when you send the fax message, your TTI will be printed at the top of document you send.
Common settings 4 Select the function you want to assign to the Soft Key using the cursor key. Press [CopyFunc] or [FaxFunc.] to see other functions, If you need. Note: “Booklet” will appears only when the optional duplex unit is attached. 5 6 Press [Enter]. If you want to set another Soft Key, go back to step 3. If you do not want to set any more Soft Keys, press [Exit] or RESET to finish.
Common settings In order to complete some operations on your machine, you may have to follow several steps and press several different buttons. But programming your machine’s Macro keys (M1 – M6) can reduce those many steps to a simple press of a key. You can “teach” the Macro keys to carry out any of the following jobs: Document storage: • Regular polling documents (see page 3.35) • F-Code Box (bulletin box) documents (see page 3.50) Note: One Macro key can hold only one job.
Common settings 4 The LCD shows: If you want to overwrite the operation already programmed, press [Yes]. If you do not want to overwrite the key you have chosen, press [No] and go back to step 2. 9 Macros Over Write? M1:AABBCC M2:BBCCDD M3:EEFFGG M4:Not Stored M5:Not Stored Yes Copy Ready 5 6 The LCD of copy standby mode appears, which means the machine is ready to register the steps into the Macro key.
Common settings Setting the speed for Macros You can adjust the speed of one step in the Macro key. 1 2 3 Press MACRO PROGRAM, NEXT, [Setting]. Select desired speed for Macros using the cursor key. Press [Enter] to save the setting. Macros Use cursor to select Macro speed. Very Fast Fast Normal Slow Enter Getting Started Copying or fax dialing with the Macro key To copy or dial a fax call using a Macro key: 1 2 3 Insert the document.
Common settings Machine settings Accessing the machine setting mode A. Confirm the Counter for total printed pages You can change or set the default of your machine settings. You can confirm the total number of pages you have printed. Note: Regarding the changing of the copy settings, see pages 2.25–2.30. Note: Regarding the changing of the fax settings, see pages 3.69–3.76. Note: It can be different from the number on the optional page counter. 1 2 To access the machine settings: 1 2 Press MENU.
Common settings C. Copy protect E. Sleep mode You can set your machine to not use the copy functions. When you set the copy protect to ON, the machine will not change to the copy mode even if you press COPY. Your machine is initially set to be in the Sleep mode automatically when 15 minutes has passed after you pressed a key. If you want to change the time or to set the Sleep mode to OFF, you can set it here. 1 2 Press MENU, [Mach Set]. Select “C. Copy Protect” using the cursor key.
Common settings F. Auto power off mode G. Adjust the sound settings Your machine is initially set to be in the Auto power off mode automatically when the machine keeps to be in the Sleep mode for 60 minutes. If you want to change the time or to set the Auto power off mode to OFF, you can set it here. You can adjust or change the following sounds: • Fax Ringer — If you set this to “ON”, the ringer that alerts you when you receive a fax will be active even if you do not have the optional handset.
Common settings To set the “Fax Ringer”: If you want the machine’s ringer to alert you when you receive a fax though you do not have the optional handset, select “ON”. Then press [Enter] to save the setting. 01.Fax Ringer Use cursor to select ON or OFF. ON OFF ▲ 5 To set the “Volume”: Select the desired volume for fax ringer, alarm, key touch tone and complete beep using the cursor key. Then press [Enter] to save the setting. ▼ 9 If you want to set the type of beep for other item, repeat steps 8–9.
Common settings H. Paper for list printing I. 2-Bin tray (Option) When you print a list, your machine selects a paper automatically. However, you can set the paper size or cassette for list printing, if you want. When you have the optional 2-Bin tray, you can set where to exit a copied paper, a received fax message and a list, on the upper tray or the lower tray. Note: If the list can not be printed on one sheet with 100% ratio, it may be reduced or rotated.
Common settings L. Print the list of documents stored in memory M. Energy saving release time Your machine will print the list of the documents stored in the memory. It will tell you how much memory each document is using. The list includes: • Type — The type of the document, such as “Batch box”, will appear. • Data(KB) — How much memory is used for the document will appear. • Page — The number of pages will appear. • Note — Other information, such as the box number, will appear.
Common settings N. Department codes Entering a department name When the department code setting is activated, the machine reminds each user to enter the department code before sending a document or making copies. With this feature, the fax transaction time and the copy charge can be managed by department. After you turn on this setting, assign specific code to your office’s machine users and tell them to enter these department codes before sending faxes or making copies.
Common settings Turning the department code setting on and off Press [Setting]. Note: If department code operation is protected (see below), the fax beeps briefly Enter and then returns to standby mode. You will have to turn off the protection first, then repeat this step. Press MENU, [Mach Set], N, NEXT, NEXT. Press [Mode]. Press [Enter]. Press MENU, [Mach Set], N, NEXT. Machine Settings Use cursor to select item. M.EnergySave ReleaseTime N.
Common settings Sending a fax using a department code Making a copy using a department code For this operation to work, two things must be true: • The four-digit department code must exist on your fax machine. • You must know the department code or department ID. For this operation to work, two things must be true: • The four-digit department code must exist on your fax machine. • You must know the department code or department ID.
Common settings Printing the department code list for fax Copy charge setting The department code list for fax transmissions includes the following information for each department code: • Time period covered by the department code list • Each department code • Each department ID • Total communication time (in hours, minutes and seconds; HH:MM:SS) — Counts the communication time up to 999:59:59 (999 hours:59 minutes:59 seconds). If the fax exceeds the maximum time, it does not count further.
Common settings To print the list: 1 2 Press MENU, [Mach Set], N, [List]. Select “Copy Dept. List” and press [Enter]. The department code list for copy charge will be printed. N.Department Codes Use cursor to select item. Copy Dept. List Fax Dept. List ▲ ▼ Enter Note: If department code operation is protected (see page 4.13), the machine beeps briefly and then returns to standby mode. You will have to turn off the protection first, then repeat the above.
Getting Started Common settings Common Settings This page intentionally blank. 4.
Just in case ... Clearing paper jams . . . . . . . . . . . . . . . . . . . . . . . . . . . . . . . . . . . . . . . . . . . . . . . . . . 5.1 Print quality problems . . . . . . . . . . . . . . . . . . . . . . . . . . . . . . . . . . . . . . . . . . . . . . . . 5.6 Caring for your machine . . . . . . . . . . . . . . . . . . . . . . . . . . . . . . . . . . . . . . . . . . . . . . 5.8 In the event of a power failure . . . . . . . . . . . . . . . . . . . . . . . . . . . . . . . . . . . . . . . . . 5.
Just in case If an original document jam occurred during scanning, an alarm sounds and the part the paper jammed will blink on the LCD. Please remove the jammed paper carefully as below. Important: If you wait more than 60 seconds without pressing any key, the machine will delete from memory all pages stored during this operation and the machine will return to the standby mode.
Just in case If the platen cover is blinking on the LCD: If a printout jams Document jam Open & Check the blinking cover. If a printout jam occurred during printing, an alarm sounds and the part the paper jammed will blink on the LCD. Please remove the jammed paper carefully as below. CAUTION: The fuser unit becomes very hot. Do not touch the fuser unit when you are removing a paper jam. Electrical Contacts 1 Open the platen cover.
Just in case 3 4 Remove the jammed paper. 5 6 Remove the jammed paper. Turn the green dial as the arrow indicates and remove the jammed paper. Cassette Optional Large capacity cassette Close the printer cover. 9 10 Remove the jammed paper. 11 12 Pull the cassette toward you and remove the papers in the cassette. Getting Started Close the fuser cover. Close the side cover. Open the side cover. Reset the papers into the cassette and close the cassette. Just in Case 7 8 5.
Just in case The Bypass tray 1 The optional duplex unit Open the printer cover by holding the printer cover release (R1). Important: Never touch the electrical contacts inside the printer cover or under the drum cartridge, as an electrostatic discharge may damage the machine. Electrical Contacts 2 3 5.4 1 Open the duplex unit cover. 2 Remove the jammed paper. 3 Open the printer cover by holding the printer cover release (R1).
Just in case 1 Open the printer cover by holding the printer cover release (R1). Important: Never touch the electrical contacts inside the printer cover or under the drum cartridge, as an electrostatic discharge may damage the machine. 3 Open the 2-Bin tray cover or the shift tray cover. 4 Remove the jammed paper. 5 6 Close the 2-Bin tray or the shift tray.
Just in case Print quality problems If your machine’s printouts develop quality problems, try to find the example below that matches your printout problem. When you find one which is like yours, try the suggested solutions. If they don’t work, contact your authorized Muratec dealer. Pages are blank • The drum cartridge or toner cartridge may not be installed correctly. Install each cartridge correctly. • The toner cartridge may be out of toner, or the toner may be very low.
Just in case • The paper you’re using may have absorbed moisture, perhaps due either to high humidity or water having been spilled on the paper supply. Toner will not adhere well to wet paper. Replace the paper with dry paper and try printing again. ABCDE ABCDE ABCDE ABCDE ABCDE Printouts have white and/or black lines ABCDE ABCDE ABCDE ABCDE ABCDE • The toner cartridge or drum cartridge may be defective. Remove the cartridges and check them for damage.
Just in case Caring for your machine With proper installation and a little maintenance, your machine should give you dependable service for years to come. Although it requires little day-to-day care, you can take these simple precautions to keep it in top form: • Always make sure your machine is installed according to our specifications, including using an electrical surge suppressor. • Always use good, copier-quality paper. • Always clean your machine as needed (see “Cleaning tips,” below).
Just in case 5 Open the inner cover. 6 Use the cloth with the rollers cleaner to clean the face of the rollers. Rotate the rollers by hand to allow cleaning of the entire roller surface. 1 2 Open the platen cover. 3 Using the cloth, gently clean the glass surface of the FBS and the white background area on the underside of the platen cover. Get a soft, lint-free cloth and moisten it with water. Important: Make sure the cloth doesn’t have any rough areas.
Just in case In the event of a power failure Power failure during the machine is working Memory back up During telephone call: The image data stored in memory will be kept for the following time, even when the power failure occurs or your machine is turned off. You can continue to speak with the handset. During fax transmission: The transmission will be cut off. When the power comes back, your machine starts to transmit again automatically if it was the memory transmission.
Just in case Alarm Your fax machine sounds an alarm tone — a series of short beeps — if either of these two problems occur: • Trouble transmitting or receiving • The machine is out of paper LCD error messages If a message not listed here is displayed, take corrective action by following the instructions in the message. < Copy > What you see on the LCD What it means/What to do ADF is not available. Set document on FBS glass When use the series copy function, the document is set in the ADF.
Just in case < Fax > What you see on the LCD What it means/What to do 1 location or less You tried to enter too many forwarding numbers for fax forwarding through the numeric keypad. You can enter up to 201 forwarding numbers by using one-touch key, speed dial number, group number and numeric keypad, but you can enter only 1 location by using numeric keypad (see pages 3.36–3.37). 30 locations or less You tried to enter too many numbers for broadcast through the numeric keypad.
Invalid protect passcode The protection passcode you entered isn’t valid. Repeat the operation, entering the correct protection passcode. No command stored You pressed REVIEW COMMANDS to review upcoming commands, but your fax machine had none stored. No document stored You tried to print a document from memory, but your fax machine had none stored. No protect passcode You tried to protect an operation or department code but there’s no protection passcode stored in your fax machine.
Just in case Scanner in use < Common > What you see on the LCD What it means/What to do Call for service The scanner lamp is dim or inoperable. Make repeated copies to help evaporate any internal moisture. If that doesn’t resolve the problem, call your authorized Muratec dealer or Muratec Customer Support. Cannot register Macro key. Please use Soft key. You cannot register "Last Job" feature to the Macro key. Assign it to a Soft key.
Just in case Symptom Symptom Check for/What to do . . . or . . . In Combine mode, parts of the image are not copied or parts of the copy paper are blank. Your set originals are not identical in size and direction. It is impossible to combine originals as they are not identical in size and direction. Copy these originals with the same size paper, set copies which are identical in size and direction, and then select Combine. The power switch is turned OFF. Turn the power switch ON. . . . or . . .
Just in case If you cannot make clear copies Symptom Possible cause/What to do The image is too light. The image contrast is too light. Adjust the image contrast by pressing CONTRAST key. The edge of the copy is dirty. The FBS pad is dirty. Wipe the FBS pad clean with a soft cloth dampened with alcohol. . . . or . . . The toner is low. Replace the toner bottle. You have selected a paper size larger than your original document.
Just in case Errors Reception errors When sending faxes, your machine occasionally runs into communication errors. These can be caused by anything from lightning to telephone line interference. (These same factors cause static, or line noise, you sometimes hear on phone calls.) They also can be caused by problems with the fax machine at the other end of the line. Often, simply trying your call again is all that’s necessary.
Just in case T.2.3 T.3.1 T.3.2 T.4.1 T.4.2 T.4.4 T.5.1, T.5.2, T.5.3 T.8.1 Bad phone line conditions made fax communication impossible. Conditions can change rapidly, so try the call again later. The page counter in your fax machine detected a document feeder error during transmission. Carefully re-insert the document into the feeder and re-try the call. The fax machine didn’t detect the silence indicating the call had ended.
Just in case Common questions 1 2 3 On your fax machine, press MONITOR/CALL to get a dial tone, or lift your optional handset. Call 1-800-215-1698. Follow the voice instructions you’ll receive from the system. General questions Q: Where do I add ink or toner to make my fax machine’s printouts darker? A: You can’t adjust the darkness of an incoming fax printout, but you can adjust the darkness of a copy or of a transmission. Insert a document and press CONTRAST to adjust the contrast setting.
Just in case Q: Can I transmit a document that’s extra long? A: Yes, if the receiving fax machine is equipped to handle long documents. Many machines have a special setting which allows them to receive documents that exceed the normal length. Q: Can I transmit a page from a newspaper? A: No. A newspaper page can jam in your document feeder. First, use a copy machine to make an appropriately sized copy of the newspaper page, then transmit the copy.
Just in case Receiving faxes Polling Q: My fax never answers. What’s wrong? A: Check to make sure your fax machine is properly connected to a working AC power outlet and phone jack. If you’re using a second phone with your machine, make sure it’s connected properly. Q: What’s the purpose of polling? A: Polling lets you automatically “pull” a document which is set in another fax machine. You can poll whenever you need to retrieve information and don’t want the source to pay for the phone call.
Appendix and index Specifications . . . . . . . . . . . . . . . . . . . . . . . . . . . . . . . . . . . . . . . . . . . . . . . . . . . . . . . AI.1 Combination chart for copy functions . . . . . . . . . . . . . . . . . . . . . . . . . . . . . . . . . . . AI.4 Glossary . . . . . . . . . . . . . . . . . . . . . . . . . . . . . . . . . . . . . . . . . . . . . . . . . . . . . . . . . . . AI.6 Index . . . . . . . . . . . . . . . . . . . . . . . . . . . . . . . . . . . . . . . . . . . . . . . . . . . . . . . .
Appendix and index Specifications Type: Photo conductor: Copying system: Developing system: Fusing system: Scanning system: Document size : capacity: Document thickness: ADF Printing paper size: Console OPC Electrostatic Dry Powdered Image Transfer to Plain Paper Micro-Toning High-Grade System Lamp-Heated Roller CCD (width × length) ADF: Maximum 11.0 inches × 17.0 inches, Minimum 5.8 inches × 5.0 inches FBS: Maximum 11.0 inches × 17.
Appendix & index Dual access: Document set: Multitasking ADF: Face Up FBS: Face down Original reference position: Center Paper exit system: Face down exit system Printing margin: Upper: 4 mm, Lower: 4 mm, Right: 4 mm, Left: 4 mm Smoothing print: Yes Receiving paper tray capacity: 250 sheets Fax communication Compatibility: Modem speed: Transmission speed: Phone system: Coding method: Scanning resolution: One-touch dial: Speed Dial: Error Correction Mode: Polling/Broadcasting: Scanning width: Scanning sp
Appendix and index Option Shift Tray Paper Feed Unit (3rd, 4th, 5th paper cassette) Shift home position: Shift position: Paper capacity: Paper capacity: Power source: Power consumption: Weight: Dimensions : Transmission: Letter , Legal , Ledger Copy: Letter , Legal , Ledger A3 , B4 , A4 , F4 Plain Paper(16-24 lb) : 550 sheets Supplied from Main unit 10W or less 15.25 pounds Width 21 × Depth 21.
Appendix & index AI.4 Special sized paper select Manual paper select (other paper) Manual paper select (standard paper) D. Size Magnification(inch) Selecting recording paper Auto paper select × D.
Selecting output tray Soft Key Paper tray Enhanced copy (DocEnhance) Getting Started 2-Bin tray Selecting paper type Others Large capacity cassette Paper cassette *3 *3 *3 Multipurpose cassette Zoom *3 *3 *3 *3 *3 *3 Slecting paper cassette Bypass tray Preset Reduce/Enlarge *1 × × × × × × *2 *2 Blank : means that these functions can be used together. : means that these functions cannot be used together. : means that the function you select last will be available.
Appendix & index Glossary This glossary contains terms you may encounter when discussing or reading about fax machines. Please use these definitions for reference only. A list of definitions can also be found on the Muratec website at www.muratec.com. 24-hour format — Also called military format. A format for keeping time that does not use a.m. or p.m. to distinguish between morning and afternoon. In the 24-hour format, one o’clock in the morning marks 1:00, noon marks 12:00 and midnight marks 24:00.
Appendix and index Default — The setting your machine will always refer to if no other action has been programmed. For example, you can set the default for this machine to send a fax by using its memory. If you set this action as the default, that’s how your machine will always send a fax, until you tell it differently. Grayscale — Not a level of resolution, but a method of scanning and transmitting halftone images.
Appendix & index Memory — Internal document storage. In Muratec fax machines, random access memory in the form of computer chips is used to store and hold documents for transmission and to hold some documents that have been received. Memory overflow — A message that appears on the machine’s LCD when the current operation requires more of the machine’s electronic memory than what is available. MH — Modified Huffman, the standard ITU-T Group 3 data compression method.
Appendix and index Redialing — The dialing again, either manually or automatically controlled, of the most recently dialed fax or phone number. Automatic redialing follows an unsuccessful dialing attempt. Super Group 3 — An extension of Group 3 fax technology standards, allowing the use of high-speed v.34 bis modems for 33.6 Kbps transmission and high-speed protocols for rapid handshaking.
Appendix & index Limited warranty This warranty is made by Muratec America, Inc. (hereafter referred to as “Muratec”). This warranty is valid only on Muratec products purchased and used in the United States of America. This warranty applies to the product only while owned and used by the original purchaser (“Customer”). If ownership of the product is transferred, this warranty terminates. This warranty does not apply to any product in use for rental purposes.
Appendix and index Index B Basic copying procedure . . . . . . . . . . . . . . . . . . . . . . . . . . . . . . . . . . . . . . . . . . . . . . . . . . . . . . . 2.4 Batch transmission . . . . . . . . . . . . . . . . . . . . . . . . . . . . . . . . . . . . . . . . . . . . . . . . . . . . . . . . . . 3.26 Binding margin . . . . . . . . . . . . . . . . . . . . . . . . . . . . . . . . . . . . . . . . . . . . . . . . . . . . . . . . . . . . . 2.15 Block Junk Fax . . . . . . . . . . . . . . . . . . . . . . . .
Appendix & index J P Job Review . . . . . . . . . . . . . . . . . . . . . . . . . . . . . . . . . . . . . . . . . . . . . . . . . . . . . . . . . . . . . 3.6, 3.29 Reviewing or canceling a command for faxing . . . . . . . . . . . . . . . . . . . . . . . . . . . . . . . . 3.29 View the reserved copy jobs . . . . . . . . . . . . . . . . . . . . . . . . . . . . . . . . . . . . . . . . . . . . . . . 3.31 View the reserved printing jobs for out-of-paper reception . . . . . . . . . . . . . . . . . . . . . . 3.
Appendix and index Getting Started Scan settings . . . . . . . . . . . . . . . . . . . . . . . . . . . . . . . . . . . . . . . . . . . . . . . . . . . . . . . . . . . . . . . 3.69 Primary contrast . . . . . . . . . . . . . . . . . . . . . . . . . . . . . . . . . . . . . . . . . . . . . . . . . . . . . . . . 3.69 Primary resolution . . . . . . . . . . . . . . . . . . . . . . . . . . . . . . . . . . . . . . . . . . . . . . . . . . . . . . . 3.69 Scanning size . . . . . . . . . . . . . . . . . . . . . . . .
Appendix & index This page intentionally blank. AI.
Getting Started Appendix and index Appendix & Index This page intentionally blank. AI.
Appendix & index This page intentionally blank. AI.
MML item number: D84-90560-60 MAI order number: OMMFX2530 Muratec America, Inc. 6400 International Parkway Suite 1500 Plano, Texas 75093 http://www.muratec.com © Muratec America, Inc. 2001 Printed in Japan.