
All in One Printer User Manual

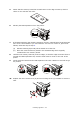
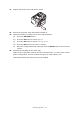


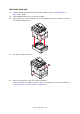
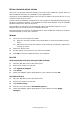

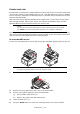
Table Of Contents
- Preface
- Emergency first aid
- Manufacturer
- Contents
- Notes, cautions and warnings
- About this guide
- Introduction
- Getting started
- Paper recommendations
- Loading paper
- User authentication and access control
- Operation
- Copying
- Scanning
- Scan to e-mail
- Scan to network PC
- Scan to USB memory
- Scan to local PC
- Scan to remote PC
- Managing profiles
- Managing the address book
- Setting sender and reply to e-mail addresses (from/reply to)
- Creating e-mail templates
- Adding an e-mail address entry to the address book
- Deleting an e-mail address entry from the address book
- Modifying an e-mail address entry from the address book
- Adding a group entry to the address book
- Deleting a group address entry from the address book
- Modifying a group address entry from the address book
- Printing
- Faxing
- Functions common to copy, fax and scan operations
- Maintenance
- Installing upgrades
- Troubleshooting
- Specifications
- Appendix A - menu system
- Index
- Muratec contact details

Installing upgrades > 113
11. Replace the access cover and latch it closed.
12. Reconnect the power cable and switch the MFP on.
13. When the machine is ready, print a menu map as follows:
(a) Press the SETTING button.
(b) Press the OK button to select Reports.
(c) Press the OK button to select Configuration.
(d) Press the OK button once more to execute.
(e) When the Configuration map is printed, press the Back button to exit the menu
system.
14. Examine the first page of the menu map.
Near the top of the page, between the two horizontal lines, you will see the current
printer configuration. This list contains the figure for total memory size.
This should indicate the total memory now installed.