
All in One Printer User Manual

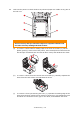


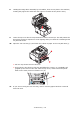


Table Of Contents
- Preface
- Emergency first aid
- Manufacturer
- Contents
- Notes, cautions and warnings
- About this guide
- Introduction
- Getting started
- Paper recommendations
- Loading paper
- User authentication and access control
- Operation
- Copying
- Scanning
- Scan to e-mail
- Scan to network PC
- Scan to USB memory
- Scan to local PC
- Scan to remote PC
- Managing profiles
- Managing the address book
- Setting sender and reply to e-mail addresses (from/reply to)
- Creating e-mail templates
- Adding an e-mail address entry to the address book
- Deleting an e-mail address entry from the address book
- Modifying an e-mail address entry from the address book
- Adding a group entry to the address book
- Deleting a group address entry from the address book
- Modifying a group address entry from the address book
- Printing
- Faxing
- Functions common to copy, fax and scan operations
- Maintenance
- Installing upgrades
- Troubleshooting
- Specifications
- Appendix A - menu system
- Index
- Muratec contact details

Troubleshooting > 126
8. Holding the image drum assembly by its handles, lower it into place in the machine,
locating the pegs at the sides into their slots in the sides of the printer cavity.
9. Lower the top cover but do not press down to latch it closed yet. This will protect the
drum from excessive exposure to room lighting while you check the remaining areas
for jammed sheets.
10. Open the rear exit tray (h) and check for a sheet of paper in the rear path area (i).
> Pull out any sheets found in this area.
> If the sheet is low down in this area and difficult to remove, it is probably still
gripped by the fuser. In this case raise the top cover, reach around and press
down on the fuser pressure release lever (d).
11. If you are not using the rear exit tray, close it once any paper has been removed
from this area.
h
i
d