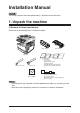
Installation Manual WICHTIG The set-up procedure should be performed by a qualified service technician. 1. Unpack the machine q Remove all items from the box. Check that all the following items have been included.
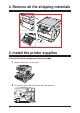
. Remove all the shipping materials 打开纸盒并取出隔片。 3. Install the printer supplies q Install the Drum cartridge and toner cartridge 1 Open the front cover and side cover. 2 Turn the lever (B3) to the left. Slide the lever (B4) rightward.
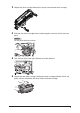
4 Unpack the drum cartridge. Remove the spacer from the new drum cartridge. Slide the new drum cartridge into the machine gently and firmly until it locks into place. Hinweis DO not touch the drum surface. 5 6 Turn the lever (B3) to the right. Slide the lever (B4) leftward. Unpack the new toner cartridge. Holding the toner cartridge with both hands and gently shake it to distribute the toner evenly inside the cartridge.
7 8 Slide the new toner cartridge into the machine gently and firmly until it locks into place. Close the front and side covers. Hinweis The following message will appear when a new drum cartridge is installed.
4. Load paper q Acceptable paper sizes for the cassette: Paper type Paper size Quantity Plain paper A3, A4, A4 , A5, A5 , B4, B5, B5 , (Weight: 60–90 g/m2) F4 (210 x 330 mm), 8K (270 x 390 mm), Approx. 500 sheets 16K (195 x 270 mm), 16K (270 x 195 (Weight: 70 g/m2) mm), Letter, Letter , Legal, 11 x 17, H.Ltr, H.Ltr , Executive, Executive 1 2 3 Pull the handle toward you to open the paper cassette. Adjust the paper guide to the desired paper size. Load the paper into the cassette.
4 Pinch the paper guide and adjust it to the width of the paper. 5 Adjust the paper size dial according to the paper size you loaded. WICHTIG When you loaded 8K (270 x 390 mm), 16K (195 x 270 mm), 16K (270 x 195 mm), Letter, Letter , Legal, 11 x 17, Half-Letter, Half-Letter , Executive or Executive , set the dial to “Others”. When the paper size dial is set to "Others", you need to set the loaded paper size.
6. Connect the cables q Connect the telephone line cable 1 2 Connect the telephone line cable to the machine. Connect the other end of the telephone line cable to the telephone wall jack. Telefonanschlussbuchse q Connect an external phone When using an external phone, connect the external phone’s line cable as shown.
q Connect the power cord 1 2 Plug the non-pronged end of the supplied power cord into the power socket on the machine. Plug the pronged end into a properly grounded electrical outlet.
7. Unlock the scanner WICHTIG In order to avoid damage, the scanner unit is locked prior to shipping. Before using the machine, you must unlock the scanner locking. If you need to relocate the machine, lock the scanner prior to moving it. To lock the scanner, please use the reverse process of the instructions below. Use a flat-blade screwdriver, turn the inside pins down from the left side of the machine 90 degrees counterclockwise. Verriegelt Entriegelt 8.
9. Turn off the transport mode WICHTIG Before turn off the transport mode, unlock the scanner locking (see “Unlock the scanner” on page 9). 1 When the machine is turned on, the display shows the following message: Spiegel verriegelung 2 3 Press , < >, <1>, <4>. Select “OFF” and press [Enter]. Spiegel verriegelung Off On Abbruch Eingabe 4 The following message will appear when a new drum cartridge is installed.
10. Initial setup q Memory initialize 1 2 Press , <7>, <2>, <5>, [Enter] to initialize the memory. When the confirmation message appears, press [Yes]. q Set the basic settings 1 2 Press , <9>, [Enter]. Ben.-Inst. 1/3 Sprache:Deutsch Akt. Zeit:2007 04/02 13:30 Sommerzeit:Off Schl. Eingabe Use the cursor key to select the item and press [Enter]. After adjusting the setting press [Enter] to save it. You can set the following items. Items 3 Descriptions Sprache Select the language.
11. Install drivers Install drivers to use your machine as a local printer and scanner. A USB cable is required to connect your machine to your computer. WICHTIG Do NOT connect a USB cable before installing the driver. Install the drivers first. Hinweis • The following procedure uses Microsoft Windows XP. For Windows 98SE/ Me/2000/Server 2003, please refer to the “Printer and scanner driver manual" located on the supplied CD.
4 After reading and accepting the License Agreement, click [Ja]. 5 Select your machine, and then click [Weiter]. 6 Select the “Örtlich”, and then click [Weiter]. 7 Select where to install the driver, and click [Weiter].
8 Confirm the displayed contents and click [Weiter]. 9 Click [Fertig stellen] to close the screen appears. 10 After installing the driver, you can connect the USB cable. Go to the “Connecting a USB cable,” below. q Connecting a USB cable WICHTIG Make sure that you followed installation steps 1 to 10 described on “Install the driver” on pages 12 to 14. 1 Plug the USB cable to your machine and then connect it to your computer. Connect Hinweis Be sure to use a shielded USB cable.
3 The “Assistent für das Suchen neuer Hardware” for Muratec MFX-2200/2700 Scanner will appear. Hinweis When the following message appears, select “Nein, diesmal nicht” and click [Weiter]. 4 5 Select “Software von einer Liste oder bestimmten Quelle installieren (für fortgeschrittene Benutzer)” and click [Weiter]. Select “Folgende Quelle ebenfalls durchsuchen:” and clear any other choices. Click [Durchsuchen] to navigate your hard disk: C:\*****\GDI (***** means device name). Then click [OK].
6 7 8 Click [Weiter]. If the following dialog box appears, click [Installation fortsetzen] to install the driver. Click [Fertig stellen]. The “Assistent für das Suchen neuer Hardware” appears again for Muratec MFX2200/2700 GDI printer. Repeat the same procedures from steps 3 to 7. This will complete the installation. q Activating an optional device If an optional device has been installed on your machine, you must open the driver and activate it.