MOWER Model INSTRUCTION BOOK20646x9A This Instruction Book contains information for several models. Read and keep this book for future reference. This book contains important informationon SAFETY,ASSEMBLY, OPERATION,AND MAINTENANCE. PRODUCTINFORMATION The owner must be certain that all the product Information Is Included with the unit. This Information Includes the INSTRUCTION BOOKS, the REPLACEMENT PARTS and the WARRANTIES.
MURRAY, INC. Two Year Limited Warranty Murray, Inc.
OWNER'S INFORMATION This instruction book is written for • person with some mechanical ability. Like most service books, not all the steps are described. Steps on how to loosen or tighten fasteners are steps anyone can follow wi_ some mechanical ability. Read and follow these instructions before you use the unit. Know your product: If you understand the unit and how the unit operates, you will get the best performance. As you read this manual, compare the illustrations to the unit.
IMPORTANT Safe Operation Practices for Walk- Behind Mowers. This cutting machine is capable of ampotalt ng hands and feet and throwing objects. Failure to observe the following safety insfruotlons could result in serious injury or death. I. General Operation tJonwhich can cause drowsiness or affect your ability to operate this machine safely. 1. Read, understand, and follow all inslruc5ons on the machine and in the manual(s).
IMPORTANT DO NO_ Do not mow near drop- offs, ditches, bankments. or balance. The operator nect the spark plug wire, and keep the wire away from the plug to prevent accidental starting. Always wear eye protec_on when you make adjustments or repairs. or em- could lose footing Do not mow excessively steep slopes. 4. Keep all nuts and bolts, especially btede attachment bolts, 5ght and keep equipment in good condition. 5, Never tamper wi_ safety devices. Check their proper operation regularly. 6.
SAFE MOWING Every person who uses power equipment must learn the difference between proper and improper use, safe and unsafe mowing prac* fices. Read the next few pages carefully. They can help you learn. Too often the mower user is inexperienced, not Ixopedy instructed, or has not read the Instruction Book and ins_-uc_ons on the unit before using it for the first time. This can result in unsafe use endangering the operotor, bystanders, and the equipment.
SAFE MOWING GUIDE bruises, or even put out an eye. Often the person hurt by a thrown object isa bystander such as a child, another family member or a neighbor. Keep people and _ completely away from the mowing area. Direct the mower s discharge away from areas whore people can be. planning your mowing pattern has a double benefit, it can reduce chances of an injury and make the clean up after mowing easier.
SAFE MOWING GUIDE Use only original equipment or approved substitutions as service parts. If you need professional service, select a shop that is an Au_orized Service Center for your brand of mower. If you plan to service the unit yourself, follow directions in the Instruction Book. in the rain is no fun and it is dangerous.
SAFE MOWING While mowing, if you hit a foreign object stop the engine. Remove the spark plug wire. Care. fully and thoroughly inspect the mower for damage. Make necessary repairs before re. starting. If the unit starts to vibrate abnormally, stop the engine immediately and check for the cause. Vibration is generally a warning of trouble. Keep all nuts, bolts, and screws fight. The blade is the most dangerous part of the mower and also the most important part in ohmining a nice lawn appearance.
STEPS TO FOLLOW BEFORE MOWING • • Be sure to dress correctly. Wear hard shoes, not sandals or tennis shoes. Examine the blade. A blade that is bent, cracked, or damaged must be replaced with a factory replacement blade. Fill the fuel tank outside. Clean off spilled fuel. Read and follow the Owner's Manual, the instructions with the engine, and the ins_Jc_ons wi_ any attachments. Owner's Manual instructions are for your safety and the safety of others. Exhaust fumes are dangerous. Start the engine outside.
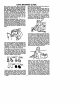
PREPARATION UNPACKING INSTRUCTIONS Jpper Handle The mower was fully assembled at the factory. When the mower was put in the carton, the handle was put in the storage position. To put the handle in the operating posilion, follow the stops below. Offset Hole Lower 1, Remove the mower frem the carton. 2. Putthe lower handle inthe oper_ng pesition(Figure1). Upper Pin 3. Remove the hair pins from the lower pin. Attach the hair pins to the upper pins. 4. Put the upper handle in the operating pesition.
PREPARATION CAUTION: Do not bend the control cables. A cable that Is bent or dan]aged must be replaced. 4. Remove the hair pin from the right and left handle bracket. (Figure 1) 5. Remove the lower handle from the handie brackets (Figure 1), 6. Rotate the lower handle around 7, InstaJlthe hair pin on the rlght and left handle bracket (Figure 1). 8. Fasten the upper handle to the lower handle with the bolts and wlngnuts (Figure 4). 9. Secure the control cables to the lower handle wi_ the cable ties.
PREPARATION HOW TO ASSEMBLETHE GRASSBAG 1. To attach the support tube, pull the rear of the bag through the front opening (Figure 5). Front Figure 5 2. Look for a small opening in the grass bag next to the tag START LOOP HERE (Figure 6). Slide the small opening in the grass bag onto the support tube. T, START L_I_P HERE 3.
PREPARATION 4. Continue to slide the grass bag onto the support tube until the grass beg material is gathered onto the top of the support tube (Figure 8). Support Tube Grass Bag Frame Assembly Figure 9 Figure 8 Frame Assembly / 5, Push the support tube and bag through the front opening until only the two ends of the support tube are visible (Figure 9), Clips 6. Slide the frm assembly into the ends of the support tube (Figure g). Figure lC Top Cover 7.
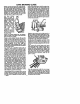
PREPARATION HOW TO MOUNT THE GRASS BAG 1. To mount the grass bag on the mower, raise the rear door. Hold the handle of the grass bag. Put the grass bag in the operaling posi_on (Figure 12). Lower the rear door. IMPORTANT: Make sure the hooks, on each side of the frame assembly, are mounted on the pivot rod. A WARNING: Do not use the grass bag unless the cover is In the op erating postlon.
PREPARATION HOWTO DISCHARGEOUTTHE SIDE W'bngnut 1. Stop the engine. 2. Loo6en the wlngnut (Figure 14). 3. Move the chute deflector to the open SIDE DISCHARGE position. 4. Tighten the wfognut. 5. If equipped, remove the grass bag. Make sure the rear door is completely closed. Chute Deflector HOW TO MULCH 1. Stop the engine. 2. Loosen the wlngnut ....iii' Figure 14 Wingnut (Figure 15). 3. Move the chute deflector to the clo6ed MULCH position. 4. Tighten the wlngnut. 5.
PREPARATION HOW TO PREPARE THE ENGINE ENGINE DOES NOT CONTAIN OIL OR GASOLINE See the engine manufacturer's instructions for the type of gasoline and oil to use. Before you use the unit, read the information on safety, operation, maintenance, and storage. WARNING: Follow the engine manufacturer's Instructions for the type of gseollne and oll to use. Always use a safety gasowhen adding gasoline to the enline contelner. Do not smoke gine. When Inside an enclosurs, do not fill with gseollne.
OPERATION ENGINE STOP LEVER Retease the engine stop lever end the engine and the blade will automatically stop. To run the engine, hold the engine stop lever in the Operating position (Figure 17). Before you start the engine, operate the engine stop lever several times, Make sure the cable moves easily, _R_ WARNING: For safe operation, the drive system must immediately disengage when the drive lever is released.
OPERATION HOW TO START WARNING: ENGINE A WARNING: The blade when the engine runs. will rotate IMPORTANT: Before you start the engine, operate the engine stop lever several times. Make sure the engine stop cable moves freely. 6. NOTE: A two speed throttle control is Iorated on the engine. Set the throttle control In the FAST position for cuffing grass, bagglng grass, and for extended engine life. 1. Check the oil. 2. Fill the fuel tank with regular unleaded gasoline. Make sure the gasoline is clean.
MAINTENANCE ENGINE MAINTENANCE 7. Check the front Use the following maintenence seclfon to keep your unit in good operating condition. All the maintenance informalJon for the engine is in the =Engine Insfruc_on Book'. Before you start the engine, read this book. WARNING: _IL wheels. Make sure the front wheels turn freely. If the drive system does not disengage correctly, do not oporate the mower until the drive system is edjusted or repaired by an authorized service center.
MAINTENANCE HOW TO REMOVETHE DRIVE BELT S. Removethe belt fromthe Idlerbracket (Figure 24). NOTE: Make sure you replace the drive belt only with a replacement belt from the factory. the belt, disconnect wire WARNING: Before youthe remove from the spark plug. 4_ 1. Remove the belt cover (Figure 22), 2. Remove the front wheels. 9. To assemble the drive belt, reverse the above stops. Idler Bracket \ Belt Figure 24 PinionGear Front Wheel Washer Figure 22 3.
MAINTENANCE BLADE SERVICE WARNING: Before you Inspect the blade or the blade adapter, plug. If the the blade hitsto an dtsconnect wire the object, spark stop the engine. Disconnect the wire to the spark plug. Check the unit for damage. _lb Blade _ade :_ '?_'_::i:'_'_ Frequently check the blade for wear or darnage such as cracks. Frequently check the holt that holds the blade. Keep the holt tig_. If the blade hits an object, stop the engine. Disconnect the wire to the spark plug.
MAINTENANCE 3. die. Move the ends of the lower handle past the locking pins or locking tabs. Rotate the handle forward over the engine as shown. Make sure the cables are not damaged. Folding Handle Screwdr__ e t whenparallelto / . _ _ I theground. I I Ground CHECK THE I LEVEL Figure 27 OF CUT Test the unit in a small area.
TROUBLE SHOOTING CHART The Engine will not start. 1. Move the throttle control lever to the FAST or START poaition. 2. Make sure the fuel tank is filled with clean gasoline. Do not use old gasoline. 3. On a cold engine, push the primer button (optionol on some modals) five timas. 4. Make sure the wire for the spark plug is connected to the spark plug. 5. Adjustthe Carburetor. See the "Engine tnstruc_on Book'. 6. There is too much gasoline in the engine cylinder. Remove and dry the spark plug.
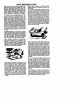
MODEL 20646x9A 8 \ 9 \ 5 11 / 12 / 16 11 13 11 11 KEY NO. DESCRIPTION 1 Handle,Upper(Black) 672665E701 8 Lever,Stop 672580E701 2 Handle,Lower(Black} 671917E701 9 Bracket,StopLever 43628BC 3 Bolt 26x256 11 Fastener,Cable 71372 4 Control,Drive 672580 12 Bolt 2x77 5 Locknut 15x116 13 Knob 71294 6 Cable,Stop 672551 16 Guide,Rope 71530 F- 98534 KEY NO. PART NO. 25 DESCRIPTION PART NO.
MODEL 20646x9A 61 62 2 3 7 6 54 38 37 / \ 26 29 70 71 41 46 32 F- 98534 48 42 26
MODEL 20646x9A KEY NO_ DESCRIPTION KEY NO. PARTNO, DESCRIPTION PARTNO.
MODEL 20646x9A KEY NO. F- 98534 DESCRIPTION PART NO.
NOTES F- 98534 29
NOTES F-9B534 30
SLOPE GUIDE SIGHT AND HOLD THIS GUIDE LEVEL WITH A VERTICAL TREE, A CORNER OF A STRUCTURE, A POWER LINE POLE, OR A FENCE. Operate a walk-beilind mower across the face of slopes, never up or down slopes. up or down Mopes, never across the face of slopes. On a riding mower to determine if a slope is safe to mow: (1) disengage the blade(e), (2) put the unit in reverse, and (3) try to hack straight up the elope, ff you can back up the slope it Is generally safe to mow.
HOW TO ORDER REPAIR PARTS Onlyusen factoryrel_r pert.I_epalrpads,exceptfortheengineorthetransmission, areavalleblefromthestorewhere theunitwas psmhased,.aserviceshoprecommended bythestore,oran w,'tho_ed serviceshopfoundin thepallow pagesd.thetelephoned=rectory. If youcannotgeta repmrpenorservzceandascnbed above,callor writeto theContrst PartsDistributor shownbelow.