music hall ikura INSTRUCTION MANUAL music hall http://www.musichallaudio.
CONGRATULATIONS ON YOUR PURCHASE You have selected an exceptional turntable. Each component used in the construction of the music hall ikura was selected to provide you with superior performance and the highest level of sound reproduction available today. We know of no turntable that costs as much to produce yet sells for so little. The precise and elegant design of this turntable makes it easy to install and operate.
6. Racks and Stands Place the turntable on a fixed, level surface strong enough to support its weight. Do not place it on a moveable cart that could tip over. We recommend only using stands approved for use with audio equipment. See the SITING section for further suggestions. 7. Cleaning Please refer to the MAINTENANCE section for detailed cleaning instructions. 8.
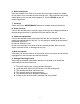
Parts Inventory and Operation Control Diagram 1. 2. 3. 4. 5. 6. 2 x removable transport screws 1 x stepped motor pulley 1 x drive belt (packaged in parts bag) 1 x sub-platter 1 x platter with felt mat (packaged in bottom of box) 1 x tonearm counterweight (packaged in carton foam) with attached tracking force scale (6a) 7. 1 x tonearm lift lever/cueing lever 8. 1 x tonearm rest 9. 1 x tonearm 10. 1 x removable dustcover 11. 2 x dustcover alignment knubs 12.
Parts bag includes: 1 x 45 rpm adapter 1 x drive belt (3) 1 x anti-skate weight (15) (tiny weight attached to small piece of fishing line) 1 x belt changing tool (17) 1 x Allen Key to adjust tonearm VTA 1 x audio cable (13) 1 x cartridge alignment guide 1 x instruction manual 1pr. x white gloves 1 x tonearm bearing adjustment tool (no photo – small black plastic tool packaged in parts bag) GETTING STARTED Thank you for purchasing the music hall ikura turntable.
FOR YOUR INFORMATION This manual provides valuable information that will help you get optimum performance from your system. Please contact your authorized music hall dealer for any additional clarifications you may require. Save the music hall ikura shipping carton and all enclosed packing material for future use. Shipping or moving the ikura in anything other than the original packing material may result in severe damage that is not covered by the warranty.
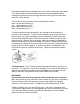
9. Make sure the tonearm (9) is in the tonearm rest (8). Carefully, remove the stylus guard if fitted (the piece of clear plastic on the bottom of the cartridge). It slips off of the cartridge by pulling it towards you in a slight downward motion. Save it for future use. 10. You will now set the cartridge tracking force. The ikura comes complete with a factory-installed cartridge. We recommend a tracking force of 1.8g. Please note; the tracking force scale (6a) on the counterweight (6) has no decimal point.
IMPORTANT Do not touch the tracking force scale again. Turn the counterweight counterclockwise with your right hand. You will notice that the tracking force scale will also turn. Turn it through numbers 5, 10, 15 to the position centered at 18 (1.8g) on the scale). The correct tracking force has now been set. Every arm and cartridge combination has an optimum tracking force. This can easily be set by ear. Increments of 0.1g can produce significant differences.
All cartridges with half inch mounting holes can be fitted. Leaving the stylus guard on, fit the cartridge to the head shell (19) using the screws supplied with the cartridge by passing one screw through each slot in the finger lift and the head shell (19). Snug the nuts. Connect the tonearm (9) wires to the cartridge pins as follows: white left channel positive (L+) red right channel pos.
Azimuth Adjustment: Azimuth is the angle of the stylus to the record groove. Viewed from head-on. You want the stylus to be perpendicular to the record groove so as to not favor one channel over the other. Keep in mind that azimuth is properly set at the factory and rarely needs to be adjusted. You can check the azimuth by performing a visual inspection. Place the tonearm (9) in the middle of a non-spinning record and look to see that the stylus is perpendicular to the record groove.
OPERATION Place a record on the platter (5) and push the mains switch (18) to the 'ON' position. Remove the stylus guard and lift up the tonearm (9) with the arm lift/cueing lever (7). Position the cartridge stylus tip above the initial groove of the record. Gently lower the cueing lever (7) to lower the tonearm (9) onto the record. Enjoy. To stop play, lift the cueing lever (7) to raise the tonearm (9) and then move the arm back to the tonearm rest (8). Push the mains switch (18) to 'OFF'.
OIL - The oil supplied for the main bearing provides life-long protection. If oil is lost from the bearing housing, replace it with a few drops of Mobil 1 (10w/40) or other synthetic oil containing Teflon. DUST COVER - This can be cleaned using any commercial acrylic or plastic cleaners. The simplest approach is to remove any dust with a damp, lint-free cloth without rubbing and then use a soft duster. Dust covers are more often damaged in cleaning than in use. STYLUS - Remove the stylus guard.
CARTRIDGE SPECIFICATIONS – ortofon 2m blue Output voltage at 1000 Hz, 5cm/sec: 5.5 mV Channel balance at 1 kHz: 1.5 dB Channel separation at 1 kHz: 25 dB Channel separation at 15 kHz: 15 dB Frequency range at - 3dB: 20-25.000 Hz Frequency response: 20-20.000 Hz + 2 / - 1 dB Tracking ability at 315Hz at recommended tracking force: 80 µm Compliance, dynamic, lateral: 20 µm/mN Stylus type: Nude Elliptical Stylus tip radius: r/R 8/18 µm Tracking force range: 1.6 - 2.0g (16-20 mN) Tracking force, recommended: 1.
LOUD HUM ON PHONO INPUT: • No earth connection from cartridge, tonearm, or audio cable to amplifier. • Ground loop. • Turntable too close to one or both speakers. DISTORTED SOUND FROM ONE OR BOTH CHANNELS: • Record player connected to wrong input of amplifier. • MM/MC switch on pre-amp incorrectly set. • Dust on the stylus. • Needle or cantilever damaged. • Wrong speed • Dirty or over-stretched belt. • Platter bearing dry, dirty, or damaged.
WARRANTY This entitles you to have the music hall ikura repaired free of charge, at our discretion, for one year after the date of purchase, at any authorized music hall service center, provided the unit was purchased from an authorized dealer. Your original sales receipt is proof of purchase date. Music hall takes no responsibility for defects arising from accident, misuse, abuse, wear and tear, neglect or unauthorized repair and/or adjustment.