
Instruction manual


11
You may need to go back and forth a couple of times to achieve the best setting.
Please note that small changes in azimuth make a big difference in the sound.
*Save all packing materials, parts, and screws for possible future transport*
SITING
FLOOR MOUNTING - Place the deck on a small, light, rigid table, e.g., coffee table.
Ensure that the table is level on the floor and not rocking.
WALL MOUNTING - Wall mounting may be preferable when the floor is springy or when
there is risk of damage by children or pets. The shelf should be light and rigid, and fully
supported by, but not firmly screwed or glued to its brackets.
To allow the lid to open fully, a clearance of 3 inches (7.5 cm.) is required behind the
plinth and at least 13 inches (33 cm.) above.
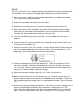
AUDIO CONNECTION
The Goldring cartridge supplied is a moving-magnet cartridge. Plug the interconnect
cable (14) (found in parts bag) into the turntable output connectors (27) matching black
to black and red to red. Attach the small ground wire to the thumbscrew connection.
Connect the other end of the interconnect cable to the MM (moving magnet) phono
input on your receiver or pre-amplifier in the same fashion.
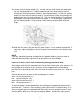
MAINS CONNECTION
Locate the wall transformer. It’s in a small white box set into the underside of the
packing foam. Plug the small male end of the wall transformer wire into the female
receptacle on the power socket for the motor. The power socket for the motor is located
on the underside of the turntable near the back. Plug the transformer into the wall.
Turn the motor ‘ON’ (20) and check that the platter (5) spins.
OPERATION
Place a record on the platter (5) and screw on the record clamp (found in parts bag).
Simply snug the clamp. Do not over tighten the clamp as damage to your record or
turntable may result. Push the mains switch (20) to the 'ON' position. Remove the
stylus guard and lift up the tonearm (9) with the cueing lever (7). Position the cartridge
stylus tip above the initial groove of the record. Gently lower the cueing lever (7) to
lower the tonearm (9) onto the record.
To stop play, lift the cueing lever (7) to raise the tonearm (9) and then move the arm
back to the tonearm rest (8). Push the mains switch (20) to 'OFF'.
To play 45 rpm records, first remove the felt mat and platter (5) then move the drive belt
(3) from the small diameter rim to the large diameter rim of the stepped motor pulley (2).
Do this using the belt-changing tool (19) to avoid touching the belt with your hands.
Replace the platter (5) and felt mat. Please note, for singles (7-inch records with a large
center hole), you will need to use the black 45rpm adaptor. Simply, center the adaptor