
Instruction manual


9
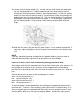
12. Locate the anti-skating weight (16). You will notice a small fishing line attached to
the anti-skating weight (16). Slip the looped end of the fishing line over the anti-
skating rod (15) and into notch number 2 (See diagram below). Lift the anti-skating
weight (16) over the anti-skating hanger (17) and feed the fishing string through the
looped end of the anti-skating hanger (17). The anti-skating weight (16) should now
be dangling in free space to the left of the hanger. If it is not dangling, simply bend
the anti-skating hanger (17) by pushing it away from the tonearm pillar with your
finger.
13. Slide the dust cover (10) onto the dust cover hinges (11) on the back of the plinth. If
necessary, adjust the tightness of the hinges by turning the dust cover hinge screws
(12).
NOTE
If you are substituting another cartridge for the supplied Goldring, you may need to
make the following further adjustments to the tonearm (9) and cartridge:
If you are a novice, music hall recommends getting professional help.
All cartridges with half inch mounting holes can be fitted. Leaving the stylus guard on, fit
the cartridge to the head shell (21) using the screws supplied with the cartridge by
passing one screw through each slot in the finger lift and the head shell (21). Snug the
nuts.
Connect the tonearm (9) wires to the cartridge pins as follows:
white left channel positive (L+)
red right channel pos. (R+)
green right channel return (R -)
blue left channel return (L -)
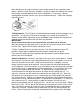
To achieve the best sound reproduction, the cartridge must be positioned precisely in
the head shell. To do this, fit the tangency guide (you'll find this in the parts bag. It's a
white rectangular piece of cardboard with black lines) over the spindle at point 'A’ and
onto the platter, black lines side up (See diagram below). Remove the stylus guard.