music hall mmf-7.1 INSTRUCTION MANUAL music hall http://www.musichallaudio.
CONGRATULATIONS ON YOUR PURCHASE You have selected an exceptional turntable. Each component used in the construction of the mmf-7.1 was selected to provide you with superior performance and the highest level of sound reproduction available today. We know of no turntable that costs as much to produce yet sells for so little. The precise and elegant design of this turntable makes it easy to install and operate.
7. Cleaning Please refer to the MAINTENANCE section for detailed cleaning instructions. 8. Power Sources Connect the turntable only to a power supply of the type and voltage described in the operating instructions or specified on the rear panel of the unit. 9. Power-cord protection Connect the turntable to the power outlet only with the cord supplied. Do not modify the supplied cable in any way. Do not attempt to defeat grounding and/or polarization provisions. Do not use extension cords.
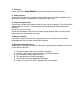
PARTS INVENTORY AND OPERATION CONTROL DIAGRAM 1. 3 x removable transport screws 2. 1 x stepped motor pulley 3. 1 x drive belt (packaged in parts bag) 4. 1 x sub-platter 5. 1 x platter with felt mat (packaged in bottom of box) 6. 1 x tonearm counterweight (located in packing material) 7. 1 x tonearm lift lever/cueing lever 8. 1 x tonearm rest 9. 1 x tonearm 10. 1 x dust cover 11. 2 x dust-cover hinges 12. 4 x dust-cover hinge screws 13. 1 x mains cable connected to wall transformer 14.
GETTING STARTED Thank you for purchasing the music hall mmf-7.1 turntable. The music hall mmf-7.1 turntable is 2-speed belt-driven, audiophile quality turntable with many unique features. It is constructed using a split-plinth design and features an external motor. The mmf-7.1 comes in a high gloss, black piano lacquer finish. THE SPLIT-PLINTH. The plinth has three adjustable spiked feet and comes with a set of small discs (cups). The discs prevent marking of the surface of the supporting shelf.
FOR YOUR INFORMATION This manual provides valuable information that will help you get optimum performance from your system. Please contact your authorized music hall dealer for any additional clarifications you may require. Save the music hall mmf-7.1 shipping carton and all enclosed packing material for future use. Shipping or moving the mmf-7.1 in anything other than the original packing material may result in severe damage that is not covered by the warranty.
SET-UP The music hall mmf-7.1 is supplied partially disassembled and carefully packaged for safe transport. To assemble the turntable, please follow the instructions carefully. 1. Clear a level (use a spirit level) and suitable workspace to assemble the turntable. This may be the final playing location. 2. Remove and put on white cotton gloves (in large plastic bag) 3. Remove the turntable and all parts from the carton.
13. Place the counterweight (6) onto the tonearm. To do this, position yourself in front of the turntable. Hold the counterweight so that the numbers are nearer you. Carefully, screw the counterweight counterclockwise onto the back of the tonearm. 14. Remove the tonearm-locking strap (18). Place it in a safe position for possible future transport. 15. Make sure the tonearm is in the tonearm rest (8). Carefully, remove the stylus guard (the piece of clear plastic on the bottom of the cartridge).
The tonearm is now zeroed. Check it, by once again floating the tonearm between the tonearm rest and the platter. If the tonearm doesn’t float parallel to the platter at zero, return to the previous steps and make the necessary adjustments. Return the tonearm to the tonearm rest. IMPORTANT Do not touch the tracking force scale again. Turn the counterweight counterclockwise with your right hand. You will notice that the tracking force scale will also turn.
NOTE If you are substituting another cartridge for the Goldring Eroica, you may need to make the following further adjustments to the tonearm (9) and cartridge: If you are a novice, music hall recommends getting professional help. All cartridges with half inch mounting holes can be fitted. Leaving the stylus guard on, fit the cartridge to the head shell (21) using the screws supplied with the cartridge by passing one screw through each slot in the finger lift and the head shell (21). Snug the nuts.
If you have any further questions regarding the adjustment of your turntable, please contact your music hall dealer. Azimuth Adjustment: Azimuth is the angle of the stylus to the record groove. Viewed from head-on, you want the stylus to be perpendicular to the record groove so as to not favor one channel over the other. Keep in mind that azimuth is properly set at the factory and rarely needs to be adjusted. You can check the azimuth by performing a visual inspection.
MAINS CONNECTION Locate the wall transformer. It’s in a small white box set into the underside of the packing foam. Plug the small male end of the wall transformer wire into the female receptacle on the power socket for the motor. The power socket for the motor is located on the underside of the turntable near the back. Plug the transformer into the wall. Turn the motor ‘ON’ (20) and check that the platter (5) spins. OPERATION Place a record on the platter and screw on the record clamp (found in parts bag).
BELT - The belt should last for many years. The belt can be cleaned at the same time as the pulley. The best way to clean the belt is to pull it gently through a damp cloth. If the turntable is not going to be used for a long period of time, it is advisable to remove the belt from the platter rim to prevent stretching. OIL - The oil supplied for the main bearing provides life-long protection.
TECHNICAL SPECIFICATIONS: Power Supply: 115V/60Hz or 230V/50Hz Power Absorption: 2VA Speeds: 33⅓ rpm (manual change to 45 rpm) Speed deviation: ± 0.9% Wow and flutter: ±0.15 % Rumble Max: > -70 db Tracking force: 10 - 30 mN Effective tonearm length: 9.5 in (24.13cm) Overhang: .71 inch (18mm) Platter diameter: 11.81 in (30cm) Platter weight: 6 lbs (2.7kg) Dimensions: (W x D x Hw/dust cover closed) 18.25 x 13.25 x 5.5 in (46.4 x 33.7 x 14 cm) Weight (including pkg.): 24lbs (10.
TROUBLESHOOTING music hall turntables are manufactured to the highest standards and undergo strict quality controls before leaving the factory. If, for some reason your turntable is not working properly, please take a few moments to review this list of potential causes. THE PLATTER DOESN'T TURN, ALTHOUGH THE DECK IS SWITCHED ON: The turntable is not connected to the mains power supply. No mains at the socket. The belt is not fitted or has slipped off.
Fit the stylus guard on the cartridge and attach the tonearm locking strap (18) to the tonearm (9). Insert and tighten the transport screws (1). Package the turntable carefully and correctly in its original box.
WARRANTY This entitles you to have the music hall mmf-7.1 repaired free of charge, at our discretion, for one year after the date of purchase, at any authorized music hall Service Center, provided the unit was purchased from an authorized dealer. Your original sales receipt is proof of purchase date. music hall takes no responsibility for defects arising from accident, misuse, abuse, wear and tear, neglect or unauthorized repair and/or adjustment.